How to Fill a Raised Garden Bed: Pro Gardener Tips for Success
Filling a raised garden bed correctly is one of the most important decisions you’ll make as a gardener. Whether you’re building your first vault garden or expanding an existing landscape, the soil composition and layering method you choose will directly impact plant health, drainage, nutrient availability, and long-term maintenance costs. Many beginner gardeners make costly mistakes by simply dumping topsoil into their beds without considering soil structure, compaction, or the benefits of composted materials.
This comprehensive guide walks you through professional techniques for filling raised beds, from calculating volume requirements to selecting the best soil amendments for your specific plants. You’ll learn why the lasagna gardening method works so well, how to avoid common pitfalls, and discover cost-effective strategies that experienced gardeners use to maximize growing potential while minimizing expenses.
Calculate Your Raised Bed Volume
Before purchasing a single bag of soil, you need to determine exactly how much material your raised bed requires. This prevents both wasteful overpurchasing and frustrating shortfalls mid-project. The calculation is straightforward: multiply length × width × depth, all measured in feet, then divide by 27 to convert cubic feet into cubic yards (the standard measurement for bulk soil ordering).
For example, a 4-foot by 8-foot bed that’s 12 inches deep requires 32 cubic feet of material, or approximately 1.2 cubic yards. Most gardeners prefer beds between 10-12 inches deep for vegetables, though herb garden planters can work with 8 inches. Deeper beds (18-24 inches) benefit root vegetables like carrots and potatoes, but require significantly more filling material.
Write down your exact dimensions and keep this information handy. You’ll reference it when ordering soil, calculating amendments, and planning future expansions. Many garden centers will help you calculate if you provide dimensions, and some delivery services include volume calculation in their estimates.
Choose Your Soil Foundation Strategy
Professional gardeners typically employ one of two foundational approaches: the budget-conscious method and the premium method. The budget approach uses cardboard or newspaper as a base layer to suppress weeds and eventually decompose, while the premium method relies on quality compost throughout.
The cardboard base method works exceptionally well for raised beds placed directly on grass or weedy ground. Lay down overlapping cardboard sheets (remove staples and tape), wet them thoroughly, then proceed with layering soil materials on top. This barrier prevents perennial weeds from creeping upward while the cardboard breaks down over 1-2 seasons, improving soil structure.
If your raised bed sits on hardscape, gravel, or previously prepared ground, you can skip the cardboard base entirely and move directly to soil layering. Some gardeners install landscape fabric for additional weed suppression, though this isn’t essential if you’re using quality topsoil and compost.
Consider the surrounding environment when choosing your strategy. Raised beds near established trees may benefit from extra weed barriers, while beds in sunny open areas can rely more heavily on soil quality alone.
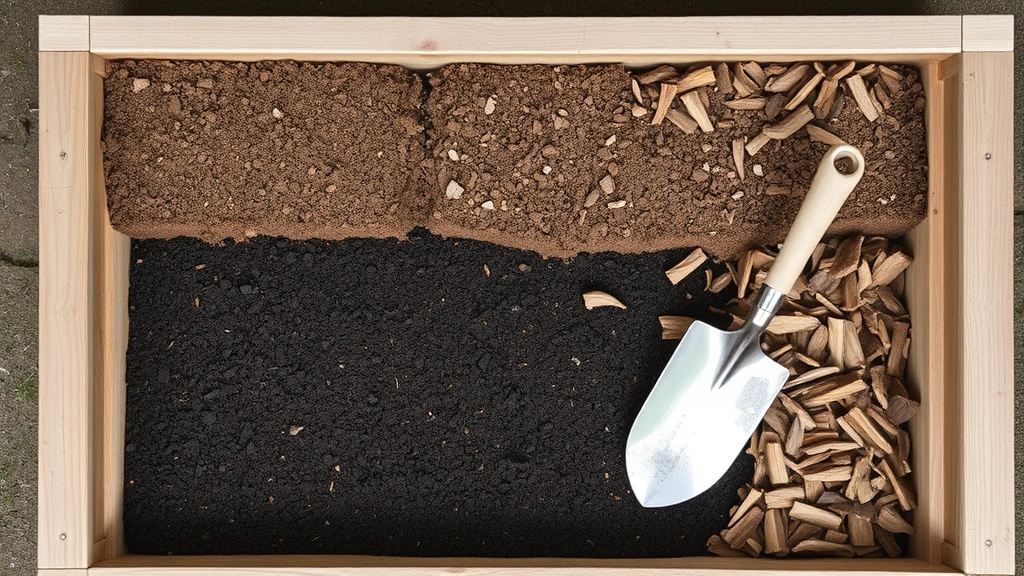
Layer Your Materials Properly
The lasagna gardening method—layering different materials in your raised bed—creates an ideal growing environment while improving soil quality over time. This approach, popularized by horticulturists and detailed extensively by Oregon State University Extension, mimics natural soil formation and provides balanced nutrition for plants.
Start with large woody material if available: branches, twigs, or wood chips create air pockets that improve drainage and prevent compaction. This layer shouldn’t exceed 2-3 inches and works best in deeper beds (16+ inches). If you’re filling a standard 12-inch bed, you can skip this layer entirely.
Next, add a 3-4 inch layer of compost or well-rotted manure. This material is rich in organic matter and nutrients, providing immediate food for plants while improving soil structure. Quality compost is worth the investment because it supports microbial life and water retention.
Follow with a 4-6 inch layer of topsoil. This is your primary growing medium and should be high-quality, weed-free, and ideally tested for pH and nutrient content. Avoid cheap “fill dirt” that contains clay, rocks, and minimal organic matter.
Top with another 2-3 inch layer of compost or finished compost-based planting mix. This final layer provides accessible nutrients for young plant roots and helps retain moisture during the critical establishment phase.
Water each layer as you build to settle materials and eliminate air pockets. The bed will settle slightly over weeks, but this is normal. You may need to add additional topsoil after the first season.
Select Quality Topsoil and Amendments
Not all topsoil is created equal. Professional-grade topsoil contains 5-10% organic matter, drains well, and tests free of contaminants and weed seeds. Garden center topsoil varies wildly in quality, so ask specific questions before purchasing.
Request information about the topsoil’s origin, organic matter percentage, and any testing completed. Quality suppliers can provide soil test results showing pH, nutrient levels, and heavy metal screening. The USDA recommends soil testing before filling new beds, especially if you’re growing vegetables.
Consider your specific growing goals when selecting amendments. If you’re filling multiple beds for herb garden planters, you might choose a lighter, sandier mix that drains quickly. For vegetable beds, incorporate more compost for water retention. Acid-loving plants like blueberries require sulfur amendments, while alkaline-loving plants benefit from lime.
Peat moss and coconut coir both improve water retention but differ in sustainability. Peat is harvested from ancient bogs and raises environmental concerns, while coconut coir is a renewable byproduct. Both work effectively in raised beds, though coconut coir requires more frequent watering initially.
Perlite and vermiculite improve drainage and aeration. Perlite is ideal for vegetables and herbs, while vermiculite helps moisture-loving plants. Most raised beds benefit from 10-15% perlite or similar aggregate by volume.
Budget-Friendly Filling Options
Filling large raised beds can cost $200-500 in soil and amendments, making budget strategies essential for gardeners with multiple beds. Creative sourcing and smart material choices can reduce costs by 40-50% without sacrificing growing results.
Source free or inexpensive materials from your community. Shredded leaves, grass clippings (from untreated lawns), and kitchen scraps layer beautifully in raised beds. Fall is ideal for collecting leaves; pile them in your bed and let them decompose over winter. By spring, you’ll have nutrient-rich material that costs nothing.
Contact local tree removal services, arborists, and landscaping companies about free wood chips and composted materials. Many businesses pay to dispose of these materials and happily deliver to gardeners. Let wood chips age 3-6 months before incorporating into beds, as fresh chips can tie up nitrogen during decomposition.
Bulk topsoil from landscape suppliers typically costs 30-50% less than bagged soil from garden centers, though you’ll need a truck or delivery service. For a 4x8x12″ bed requiring 1.2 cubic yards, bulk soil might cost $30-50 delivered, versus $150+ in bags.
Build your bed in fall and fill it with free materials—leaves, grass, kitchen waste—then cover with 2-3 inches of purchased topsoil. By spring, the lower layers have decomposed into rich growing medium. This method works exceptionally well for vault garden designs where layering is intentional.
Mix purchased topsoil with homemade compost at a 50-50 ratio. If you have an existing compost pile, this stretches purchased material while improving soil structure. You’ll need less total topsoil, reducing costs significantly.
Seasonal Considerations for Filling
The season when you fill your raised bed affects both your strategy and long-term results. Spring filling requires different approaches than fall filling, and understanding these differences helps you plan effectively.
Spring filling (March-May) works best with quality purchased materials because decomposition happens slowly in cool weather. Use a layered approach with finished compost and topsoil so plants have immediate nutrients. Avoid fresh manure in spring; it needs 3-4 months to decompose. Spring-filled beds are ready for planting within 2-3 weeks.
Fall filling (September-November) is ideal for the composting method. Layer leaves, grass clippings, kitchen scraps, and other organic materials, then top with 3-4 inches of topsoil. Over winter, microbial activity breaks down materials, creating rich, dark growing medium by spring. This method saves money and produces superior soil structure.
Summer filling requires immediate watering and potential shade cloth for young plants, as new beds heat up quickly. If you must fill in summer, use cooler compost-based mixes and water deeply for the first month.
Winter filling in cold climates is challenging because the ground may be frozen and decomposition halts. If you fill in winter, use purchased topsoil and compost that won’t decompose significantly before spring. Wait until soil thaws before planting.
Maintenance and Refreshing Over Time
Raised beds aren’t “fill once and forget” projects. Over seasons, organic matter breaks down, nutrients get depleted, and soil compacts. Professional gardeners refresh their beds annually to maintain productivity and structure.
Each fall, add 1-2 inches of compost to the top of your bed. This replenishes organic matter, provides nutrients for next season, and improves soil structure. This simple step doubles the lifespan of your original filling materials and keeps beds productive indefinitely.
Every 3-4 years, consider a complete refresh. Remove the top 4-6 inches of tired soil (which you can compost or donate), then layer fresh compost and topsoil on top of the remaining bed material. This approach is less expensive than complete refilling while revitalizing growing conditions.
Monitor drainage and compaction annually. If water pools on the surface or drains too quickly, your soil composition needs adjustment. Add perlite for drainage issues or compost for compaction problems.
Test soil every 2-3 years to track nutrient levels and pH. The American Horticultural Society recommends testing through your local cooperative extension service, which provides detailed recommendations for amendments specific to your region and plants.
If you’re creating a permanent landscape feature like a garden arbor or raised concrete block garden beds, plan for long-term maintenance when you initially fill. Deeper beds with excellent drainage require less frequent refreshing than shallow beds with poor structure.
FAQ
How deep should I fill my raised garden bed?
Most vegetables thrive in 10-12 inches of soil. Root vegetables like carrots and potatoes need 14-18 inches. Shallow-rooted plants like lettuce and herbs manage with 8 inches. Consider your specific plants when determining depth, and remember that soil settles over time, so fill slightly higher than your target depth.
Can I use garden soil instead of topsoil?
Garden soil contains clay and is intended for amending existing beds, not filling new ones. Topsoil is specifically formulated for new construction and contains higher organic matter. Using garden soil alone creates compaction problems and poor drainage. Mix it with compost if you must use it, but purchase quality topsoil for best results.
Should I add fertilizer when filling my raised bed?
If you’re using quality compost and topsoil, additional fertilizer isn’t necessary initially. Compost provides balanced nutrition for most vegetables. After 4-6 weeks, side-dress with compost or apply balanced fertilizer (10-10-10) based on your plants’ needs. Avoid synthetic fertilizers near root vegetables, which may develop forked roots.
How long does it take for a newly filled bed to settle?
Expect 30-50% settlement over the first month as materials compact and air pockets collapse. By the end of the season, beds typically settle another 10-15%. This is normal and actually beneficial—it removes air pockets that dry out soil. Top off with compost in fall to maintain depth.
Can I fill my raised bed with only compost?
Technically yes, but it’s expensive and unnecessary. Pure compost drains too quickly and compacts easily. Use compost as 30-40% of your fill, mixed with topsoil for structure and water retention. This balance gives you the benefits of both materials at reasonable cost.
What’s the best way to fill a raised bed on a budget?
Layer free materials in fall: leaves, grass clippings, kitchen scraps, and shredded paper. Top with 3-4 inches of purchased topsoil. By spring, lower layers have decomposed into rich growing medium. This method costs 50-70% less than filling entirely with purchased materials while producing superior soil.
Should I use a weed barrier under my raised bed?
Landscape fabric is optional if your bed sits on prepared ground, but essential over grass or weeds. Cardboard is free, biodegradable, and equally effective. If using landscape fabric, choose breathable types that allow water penetration. Avoid plastic, which traps moisture and prevents root penetration into native soil below.
Can I reuse old potting soil in raised beds?
Old potting soil is excellent for raised beds when mixed with topsoil. Use it at 25-50% of your total fill volume. This stretches new materials while recycling resources. Potting soil is lightweight and drains well, improving overall bed structure compared to topsoil alone.
How do I know if my topsoil is quality?
Quality topsoil is dark brown or black, crumbles easily in your hand, smells earthy, and contains visible organic matter. Request soil test results showing organic matter (5-10% is ideal), pH (6.0-7.0 for most vegetables), and nutrient levels. Avoid pale, compacted soil that smells musty or contains rocks and clay.
When should I add mulch to my newly filled bed?
Wait 2-3 weeks after filling and planting before adding mulch. This allows soil to settle and plants to establish roots. Then apply 2-3 inches of wood chips, straw, or compost to suppress weeds, retain moisture, and regulate soil temperature. Keep mulch 2 inches away from plant stems to prevent rot.


