
Garden Hose Adapter: DIY Expert Advice for Every Gardener
A garden hose adapter is one of the most underrated yet essential tools in any gardener’s arsenal. Whether you’re watering delicate seedlings, filling a birdbath, or connecting multiple hoses for a larger irrigation project, having the right adapter can transform how efficiently you maintain your outdoor space. These small connectors are the unsung heroes that bridge incompatible hose sizes, connect to various faucet types, and enable you to customize your watering system without expensive replacements.
Many gardeners struggle with mismatched hose connections, leaking joints, and frustrating compatibility issues that waste both water and time. The good news is that understanding garden hose adapters—and knowing how to select, install, and maintain them—is entirely within reach for DIY enthusiasts of all skill levels. This comprehensive guide will walk you through everything you need to know about these practical connectors, from basic types to advanced troubleshooting techniques.
Understanding Garden Hose Adapter Types
Garden hose adapters come in numerous configurations, each designed for specific applications and connection scenarios. The most common types include straight adapters, which simply connect two hoses or components in a linear fashion; elbow adapters, which redirect water flow at ninety-degree angles for navigating tight spaces or obstacles; and tee adapters, which split a single water source into two separate lines—incredibly useful when you’re watering multiple garden beds raised at different heights or locations simultaneously.
Reducing adapters are essential when you need to connect hoses of different diameters. For instance, if your main outdoor faucet has a three-quarter-inch connection but your soaker hose is only half-inch, a reducing adapter bridges that gap seamlessly. Barbed adapters feature small ridges that grip the hose material, creating secure connections without additional fasteners, while threaded adapters use screw connections for maximum durability and pressure tolerance.
Swivel adapters deserve special mention for their ingenious design. These adapters feature a rotating connection point that prevents hose tangling—a feature that becomes invaluable when you’re maneuvering around garden obstacles, navigating between garden stones stepping stones, or working in confined spaces where hose rotation is inevitable. They’re particularly popular among experienced gardeners who understand how much frustration a twisted hose can cause during a watering session.
Male and Female Connector Basics
Every gardener must grasp the fundamental concept of male and female connectors to successfully use garden hose adapters. A male connector is the fitting that protrudes outward—imagine it as having an external thread or ridge that inserts into something. A female connector is the receptacle designed to receive the male fitting, featuring an internal thread or opening. These complementary designs ensure that connections are secure and water-tight when properly matched.
The standard garden hose size in North America is five-eighths inches in diameter, which corresponds to three-quarter-inch National Pipe Thread (NPT) connections. However, many older homes and certain fixtures may have different sizes, which is why understanding this male-female relationship is crucial. When shopping for adapters, always verify whether you need a male-to-female configuration, male-to-male, female-to-female, or a combination that reduces or increases size.
Quick-connect adapters represent a modern innovation that eliminates the need for threading entirely. These push-to-connect systems feature a spring-loaded mechanism that locks onto a corresponding quick-connect fitting. They’re ideal for gardeners who frequently swap between different watering tools, change seasonal garden tool attachments, or want to simplify their setup process.
Measuring Your Hose Connections
Before purchasing any garden hose adapter, accurate measurement is non-negotiable. Start by examining your current hose and faucet connections. The easiest method involves measuring the diameter of the hose itself using a ruler or measuring tape. Standard garden hoses are typically five-eighths inches in diameter, but half-inch hoses exist for lighter-duty applications, while three-quarter-inch versions are designed for high-volume watering scenarios.
For faucet connections, you’ll want to determine the thread type and size. Most outdoor faucets in the United States use three-quarter-inch NPT threads, but some older fixtures or specialized equipment may differ. If you’re unsure, bring a photo of your faucet to a local garden center or hardware store—staff members can usually identify the correct size quickly. Alternatively, visit your local extension service office, where Master Gardener volunteers often provide free consultations on garden equipment compatibility.
When measuring threaded connections, count the number of threads per inch (TPI) if possible, though this is less critical than overall diameter for most home gardening applications. Document all measurements in a notebook or smartphone note—this reference becomes invaluable when you’re standing in the hardware store aisle trying to remember whether your back-garden spigot was half-inch or three-quarter-inch.
Installation and Maintenance Tips
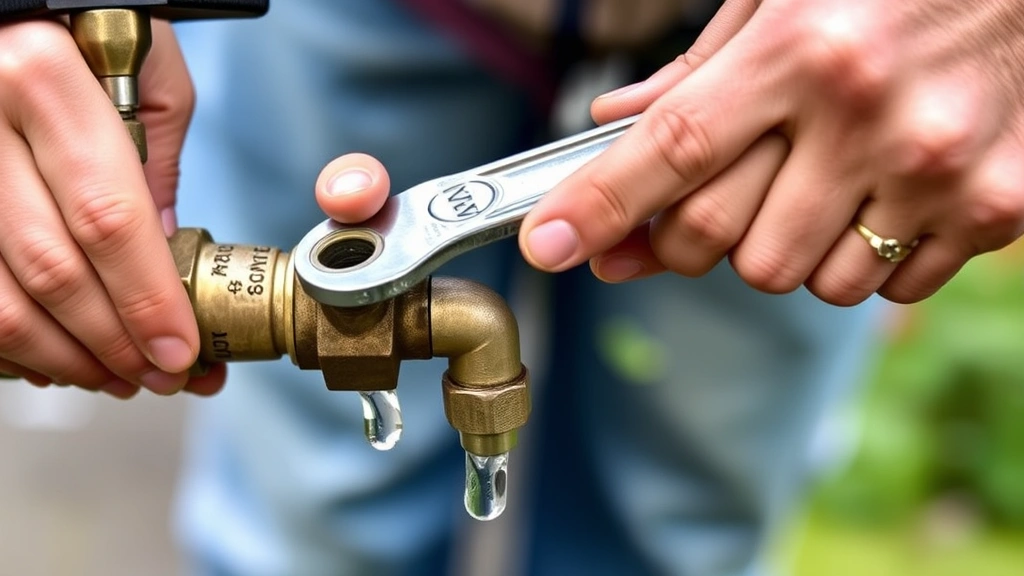
Proper installation of your garden hose adapter ensures longevity and prevents frustrating leaks that waste water and money. Begin by ensuring both the male and female connectors are clean and free from debris. Any dirt, mineral deposits, or residue can prevent a tight seal, so gently wipe the threaded portions with a soft cloth. For heavily corroded connections, use white vinegar and a soft brush to dissolve mineral buildup, then rinse thoroughly.
When connecting threaded adapters, hand-tighten first to ensure the threads are aligned correctly. Forcing a misaligned adapter can damage both the adapter and the fitting it’s connecting to, creating problems that are expensive and frustrating to repair. Once hand-tight, use an adjustable wrench to turn an additional quarter to half rotation—enough to create a secure seal without over-tightening, which can crack plastic components or strip threads.
For barbed adapters, insert the hose end firmly onto the barbs, then secure with hose clamps on both sides of the connection. The clamps should be snug but not so tight that they crimp or distort the hose material. Check clamp tightness seasonally, as temperature fluctuations cause materials to expand and contract, potentially loosening connections over time.
Quick-connect adapters require minimal maintenance beyond occasional cleaning. Simply push the male connector firmly into the female receptacle until you hear or feel a click, indicating the spring-lock mechanism is engaged. To disconnect, press the small release collar while gently pulling the connectors apart.
Common Adapter Problems and Solutions
Even with proper installation, gardeners occasionally encounter issues with their hose adapters. The most common problem is leaking at the connection point. If water drips from where two adapters meet, first attempt to tighten the connection slightly using an adjustable wrench. If tightening doesn’t resolve the issue, disconnect the adapters and inspect the threaded surfaces for damage or debris. Clean thoroughly and reconnect, applying plumber’s thread seal tape (also called Teflon tape) to male threads before reconnecting. This thin, white tape creates an additional watertight seal and is inexpensive insurance against persistent leaks.
Adapter corrosion presents another challenge, particularly in areas with hard water or high mineral content. Brass and stainless steel adapters resist corrosion better than cheaper zinc-plated options, making them worthwhile investments for long-term use. If you notice white, green, or blue crusty deposits on adapters, soak them in white vinegar for several hours, then scrub gently with a soft brush. For stubborn corrosion, a specialized metal cleaner designed for brass or copper works effectively.
Stuck or seized adapters that won’t unscrew require patience and the right approach. Apply penetrating oil like WD-40 or similar products to the connection, then wait fifteen to thirty minutes for the lubricant to penetrate. Gently attempt to turn the adapter using an adjustable wrench—avoid excessive force, which risks breaking the fitting. If still stuck, apply more oil and wait longer. Repeat this process until the adapter gradually loosens.
Choosing the Right Materials
Garden hose adapter materials dramatically impact durability, cost, and performance. Brass adapters represent the premium choice, offering excellent corrosion resistance and durability even in challenging climates. They’re heavier than plastic alternatives but worth the investment for permanent installations or adapters you’ll use season after season.
Stainless steel adapters provide another durable option, particularly suitable for coastal regions or areas with salt-spray exposure. While more expensive than brass, they offer superior corrosion resistance in extreme environments.
Zinc-plated steel adapters offer an affordable middle-ground option. They’re less corrosion-resistant than brass or stainless steel but adequate for most home gardening applications if properly maintained. Avoid leaving zinc-plated adapters exposed to winter weather without protection, as freeze-thaw cycles accelerate corrosion.
Plastic adapters (typically made from polypropylene or ABS) are the most economical choice and perfectly adequate for low-pressure applications like drip irrigation or soaker hoses. However, they’re not suitable for high-pressure situations and can become brittle in extreme cold or intense sunlight. Many experienced gardeners keep plastic adapters on hand for temporary connections or seasonal setups while reserving brass adapters for permanent installations.
DIY Projects Using Adapters
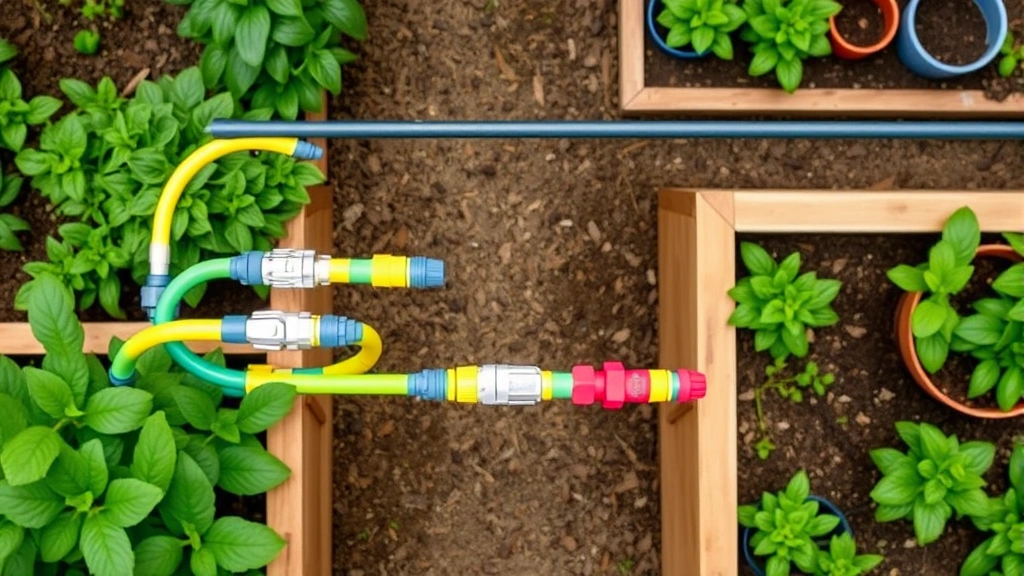
Once you understand garden hose adapters, countless DIY projects become accessible. Creating a multi-zone watering system using tee adapters allows you to simultaneously water different garden areas with varying moisture needs. Connect a tee adapter to your main faucet, then attach separate soaker hoses to each outlet. Add individual shut-off valves to each line, enabling you to water your hydrangea bushes on a different schedule than your vegetable beds or container plants.
Building a rain barrel irrigation system requires several adapters to connect your downspout collection system to distribution hoses. Use reducing adapters to match your downspout size to standard hose connections, then attach shut-off valves and soaker hoses for efficient watering. This setup conserves municipal water while providing free irrigation, making it both environmentally responsible and economical.
Creating a portable watering station for seasonal container gardening involves assembling multiple quick-connect adapters on a central manifold. This allows you to swap between different watering wands, soaker hoses, and spray nozzles without constantly threading and unthreading connections. Position the station near your patio or deck where container plants cluster, dramatically reducing setup time for daily watering.
For gardeners interested in coffee grounds in garden applications or other liquid fertilizer feeding, adapters enable you to create a simple injection system. Connect a reducing adapter to your faucet, then attach a hose-end sprayer containing diluted fertilizer. This approach distributes nutrients evenly while requiring minimal additional equipment.
Building a soaker hose network for vegetable gardens or ornamental beds requires multiple adapters to create branching lines. Use tee and elbow adapters to navigate garden layouts, connecting to different bed sections. This system delivers water directly to soil, minimizing evaporation and reducing disease pressure compared to overhead watering.
FAQ
What size garden hose adapter do I need?
The most common size is three-quarter-inch NPT (National Pipe Thread) for the faucet connection, with five-eighths-inch diameter for standard hoses. However, always measure your specific connections before purchasing. Older homes may use different sizes, and some specialty equipment requires non-standard adapters.
Can I use adapters to connect different hose sizes?
Yes, absolutely. Reducing adapters are designed specifically for this purpose. They allow you to connect a larger hose to a smaller faucet or vice versa. This flexibility is one of the primary reasons adapters are so valuable in garden setups.
How do I prevent leaks at adapter connections?
Ensure connections are clean before assembly, hand-tighten thoroughly, then use a wrench to tighten an additional quarter to half rotation. For threaded connections, apply plumber’s thread seal tape to male threads. Check connections seasonally and re-tighten if necessary.
Are quick-connect adapters worth the extra cost?
For gardeners who frequently swap between different watering tools or hoses, quick-connects save significant time and frustration. For simple, permanent installations, traditional threaded adapters are more economical and equally effective.
What’s the best material for garden hose adapters?
Brass offers the best durability and corrosion resistance for long-term use, making it ideal for permanent installations. Stainless steel works well in coastal or high-salt environments. Zinc-plated steel provides a budget-friendly option for temporary connections. Plastic adapters are acceptable for low-pressure applications like drip irrigation.
Can I repair a corroded adapter?
Yes, soak corroded adapters in white vinegar for several hours, then scrub with a soft brush. For stubborn corrosion, use a specialized metal cleaner. If the adapter is severely damaged or won’t seal properly after cleaning, replacement is the safest option.
How often should I check my adapters?
Inspect adapters at the beginning of each watering season and monthly during active use. Check for leaks, corrosion, or loose connections. Tighten any connections that have loosened due to temperature fluctuations or vibration.


