Build a Raised Garden Bed? DIY Expert Tips
Raised garden beds are one of the most practical investments you can make for your garden. Whether you’re working with poor soil, limited space, or simply want better control over your growing environment, a raised bed transforms your gardening experience. These elevated planting areas offer superior drainage, warmer soil temperatures in spring, easier access for planting and harvesting, and the ability to customize your soil composition exactly as your plants need it.
Building your own raised garden bed is a straightforward DIY project that requires minimal tools and can be completed in just a few hours. The satisfaction of creating a thriving garden space from scratch, combined with the cost savings compared to pre-made options, makes this an excellent weekend project for gardeners of all skill levels. This comprehensive guide walks you through everything you need to know to construct a durable, functional raised bed that will serve your garden for years to come.
Materials and Tools You’ll Need
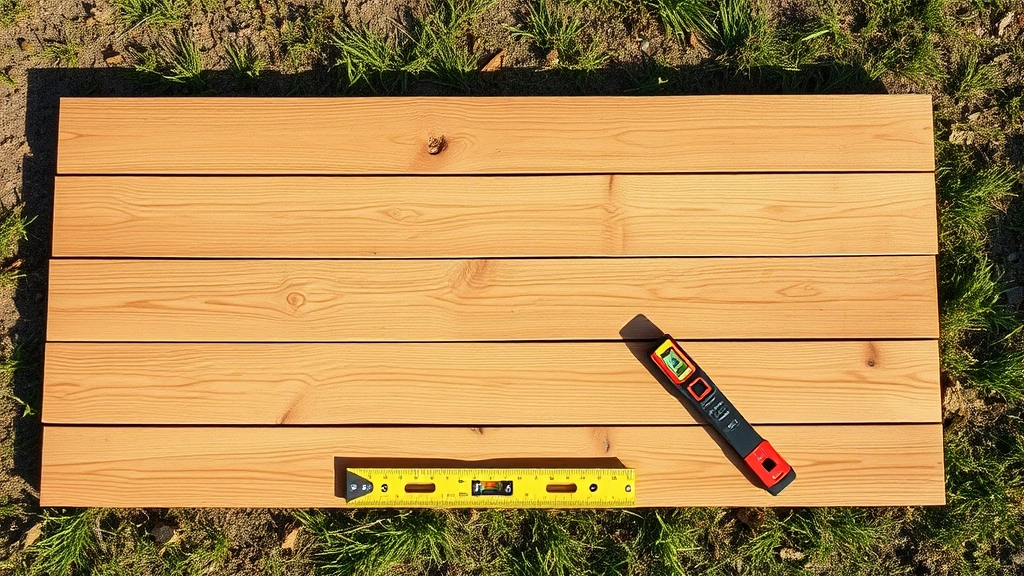
Before you start building, gather all necessary materials and tools. The primary material for most raised beds is untreated wood, typically cedar or redwood due to their natural rot resistance. Cedar is widely preferred because it’s attractive, durable, and won’t leach harmful chemicals into your soil. For a standard 4×8-foot bed, you’ll need four boards measuring 2 inches by 8 inches in length. Some gardeners prefer taller beds (12 inches or higher) for better accessibility and deeper root systems.
Essential materials include:
- Wood boards (cedar, redwood, or composite materials) – untreated and food-safe
- Wood screws (3-inch exterior-grade) – approximately 16-20 screws per bed
- Landscape fabric (optional but recommended) to prevent weed growth from below
- Wood stain or sealant (food-safe) to extend wood lifespan
- Soil and amendments for filling your bed
Your tool collection should include a power drill with a screwdriver bit, a circular saw or hand saw for cutting wood to length, a level to ensure your bed is even, a measuring tape, and a square to verify right angles. A rubber mallet helps with final adjustments, and work gloves protect your hands during construction. Many hardware stores will cut lumber to size for free, saving you time and requiring fewer tools.
Avoid pressure-treated wood, railroad ties, and other chemically treated materials that can leach toxins into your soil, especially important if you’re growing vegetables or herbs. Composite materials and galvanized metal are alternatives if wood isn’t suitable for your space, though they typically cost more than quality cedar.
Choosing the Perfect Location
Location determines your raised bed’s success more than almost any other factor. Most vegetables and flowers require six to eight hours of direct sunlight daily. Observe your yard throughout the day to identify areas that receive adequate light without excessive afternoon heat exposure. Morning sun is ideal, as it dries dew and helps prevent fungal diseases. If you’re planning to grow garden lettuce or other shade-tolerant crops, you have more flexibility with location choices.
Consider proximity to water sources. Your raised bed should be reasonably close to a hose or water access, as hand-watering elevated beds regularly becomes tedious. Ensure the location drains well and doesn’t become a collection point for runoff during heavy rains. If you’re in an area with poor drainage, your raised bed naturally elevates soil above standing water, but extremely wet locations may require additional drainage solutions.
Check for underground utilities before digging. Call your local utility locating service (usually free) to identify buried gas lines, electric cables, and water pipes. Position your bed away from tree roots that could compete for water and nutrients, and avoid spots directly under tree canopies that create excessive shade. Consider wind exposure as well; extremely windy locations may require windbreaks or more frequent watering.
Accessibility is crucial, especially as you age. Position your bed where you can comfortably reach the center from either side without excessive bending. A width of three to four feet is ideal for most gardeners. If you’re building multiple beds, arrange them with adequate pathways between them for comfortable movement and maintenance access.
Step-by-Step Construction
Step 1: Prepare the Site
Clear your chosen location of grass, weeds, and debris. You don’t need to remove soil entirely, but level the ground as much as possible. Remove large rocks and sticks. If you’re concerned about perennial weeds like bindweed or quackgrass, lay down landscape fabric before assembling your bed frame. This prevents these aggressive plants from penetrating from below.
Step 2: Cut and Arrange Your Wood
Measure and cut your boards to length if not pre-cut by the hardware store. For a standard 4×8-foot bed, you’ll have two pieces at 8 feet and two at 4 feet. Lay these out in a rectangle on your prepared ground, checking that corners are roughly square using the 3-4-5 triangle method: measure 3 feet along one side, 4 feet along the adjacent side, and the diagonal should measure 5 feet if your angle is 90 degrees.
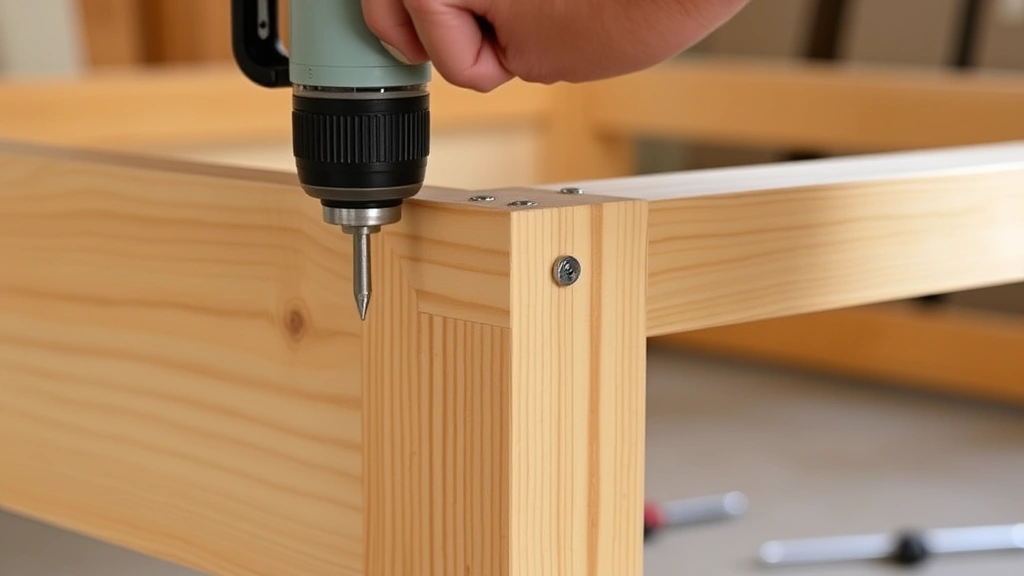
Step 3: Assemble the Frame
Position two boards perpendicular to each other at a corner. Using your power drill, insert 3-inch exterior-grade wood screws at an angle through one board into the end grain of the adjacent board. Install at least two screws per corner, positioning them about one inch from the top and bottom edges. Drive screws at a slight angle to increase holding power. Repeat for all four corners, frequently checking with your level to ensure the frame isn’t twisting.
Step 4: Install Corner Supports (Optional but Recommended)
For beds larger than 3×6 feet or in areas with heavy soil, install internal corner braces. Cut 4×4-inch posts to match your bed height and position them inside each corner, screwing them to the boards. These supports prevent the bed from bowing outward under soil pressure, ensuring longevity. For standard 2×8 beds in normal conditions, corner supports aren’t essential, but they significantly extend your bed’s lifespan.
Step 5: Make Final Adjustments
Once assembled, place your level across multiple points on the bed’s interior rim. Make small adjustments by tapping shims under low spots with your rubber mallet. A perfectly level bed ensures even water distribution and prevents soil from settling unevenly. Check the level in multiple directions—lengthwise, widthwise, and diagonally.
Step 6: Apply Protective Finish (Optional)
While cedar naturally resists rot, applying a food-safe sealant or stain extends its lifespan significantly. Use only products labeled safe for vegetable gardens. Apply according to manufacturer directions, typically two coats with drying time between applications. This step adds minimal cost but can extend your bed’s life by five to ten years.
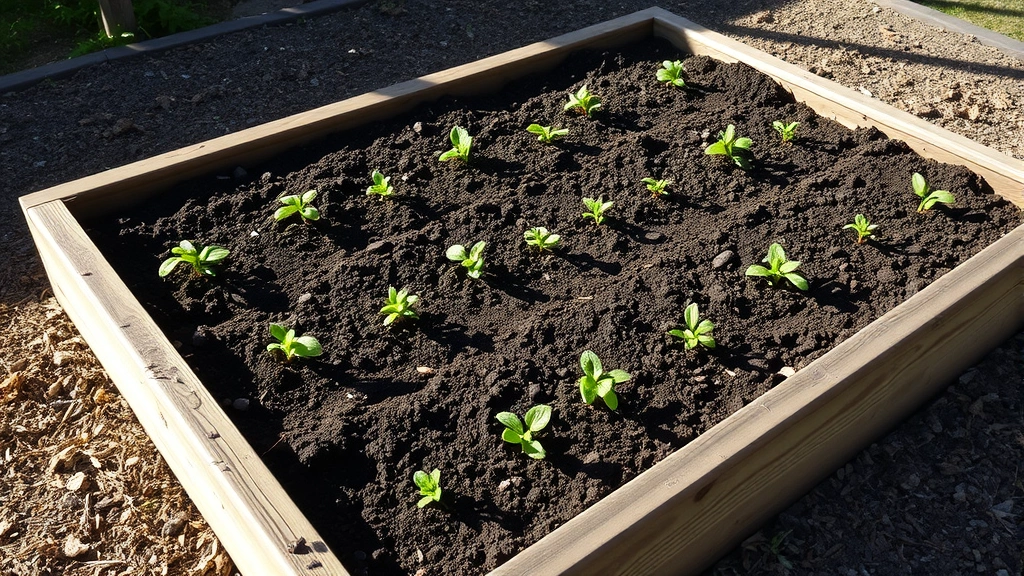
Filling Your Bed with Soil
The quality of soil you fill your bed with directly impacts plant growth and health. Rather than using garden soil alone, create a balanced growing medium. A popular recipe combines 40% topsoil, 40% compost, and 20% perlite or coarse sand for drainage. This mixture provides nutrients, organic matter, water retention, and drainage.
Calculate the volume before purchasing soil. For a 4×8-foot bed filled to 8 inches deep, you’ll need approximately 21 cubic feet of soil. Most garden centers sell soil by the cubic yard (27 cubic feet), so you’d need about three-quarters of a cubic yard. Ordering slightly extra accounts for settling.
Layer your materials if creating a custom mix. Start with landscape fabric (if using) to suppress weeds, then add your soil components. Water as you fill to help settle the mixture and eliminate air pockets. Allow the bed to settle for a few days before planting. The soil level will drop as it compacts, but this is normal and expected.
If you’re growing mint in containers alongside your raised bed or establishing an indoor herb garden, use similar high-quality soil for consistency. For specific crops like gardening with native plants, research native species’ soil preferences and adjust your mixture accordingly.
Consider a lasagna or “no-dig” bed method where you layer cardboard, compost, aged manure, and soil without mixing. This method works well if you have access to quality compost materials and prefer to minimize soil purchasing costs. The layers break down over time, improving soil structure naturally.
Long-Term Maintenance and Care
Raised beds require minimal maintenance compared to in-ground gardens, but several practices extend their lifespan and productivity. Annually, add one to two inches of compost to the top of your bed. This replenishes nutrients removed by harvests and improves soil structure. Spring is ideal for this amendment, allowing the compost to integrate before planting season.
Monitor wood condition yearly, especially at the base where wood contacts soil. Cedar typically lasts eight to twelve years before significant decay occurs. When wood begins deteriorating noticeably, plan replacement boards. Rather than rebuilding entirely, you can replace boards individually by carefully removing screws and sliding out the compromised piece.
Manage moisture carefully. Raised beds drain faster than in-ground gardens, requiring more frequent watering in hot, dry weather. Conversely, in wet seasons, they shed excess water efficiently. Mulch the soil surface with two to three inches of organic material like straw or wood chips to moderate soil temperature, retain moisture, and suppress weeds. Leave a small mulch-free zone around plant stems to prevent rot.
Rotate crops annually to prevent soil depletion and disease buildup. If you grew tomatoes in one section this year, plant legumes (beans, peas) or leafy greens next year. This natural rotation maintains soil health and reduces pest and disease pressure. Test soil every two to three years to monitor nutrient levels and pH, adjusting amendments accordingly.
Refresh your garden decor and consider adding trellises, shade cloth, or row covers as seasons change. These additions help you extend your growing season and protect plants from extreme weather. For pruning hydrangea bushes or managing other perennials near your raised beds, maintain adequate spacing to prevent competition and allow air circulation.
Address pest and disease issues promptly. The contained environment of raised beds makes pest management easier—you can install row covers or netting quickly. Monitor regularly for signs of trouble, removing affected leaves or plants before problems spread. Encourage beneficial insects by planting flowers and providing water sources nearby.
FAQ
What’s the ideal size for a raised garden bed?
A 4×8-foot bed is standard and accommodates most gardeners’ needs. Beds should be no wider than 4 feet so you can reach the center from either side without stepping into the bed. Length can vary based on available space. Smaller beds of 2×4 or 3×6 feet work well for patios or limited spaces.
How deep should my raised bed be?
Minimum depth is 6 inches for shallow-rooted crops like lettuce and herbs. Eight inches accommodates most vegetables. For root vegetables like carrots and parsnips, or deep-rooted perennials, 12 inches or deeper is ideal. Consider your physical capability to reach the bottom when choosing depth.
Can I use treated wood for my raised bed?
Avoid pressure-treated wood, especially older wood treated with chromated copper arsenate (CCA), which contains arsenic. Modern pressure-treated wood is safer but still not recommended for vegetable gardens. Cedar, redwood, composite materials, and galvanized metal are safer alternatives.
Do I need landscape fabric in my raised bed?
Landscape fabric isn’t essential but prevents weeds from growing up through the bottom of your bed. It’s particularly helpful if you’re building on existing lawn or in areas with aggressive perennial weeds. Ensure fabric is permeable to allow drainage and root penetration.
How much soil do I need to fill my raised bed?
Calculate volume in cubic feet: length × width × depth. For a 4x8x0.67-foot bed (8 inches), you need approximately 21 cubic feet. Soil is typically sold by the cubic yard (27 cubic feet). Order slightly extra to account for settling.
What’s the best soil mix for raised beds?
A balanced mix of 40% topsoil, 40% compost, and 20% perlite or coarse sand provides nutrients, organic matter, and drainage. Adjust ratios based on your climate—add more compost in sandy regions, more perlite in clay-heavy areas. Use quality, organic materials free from pesticides and heavy metals.
When should I build my raised bed?
Spring and fall are ideal seasons. Building in spring allows you to fill and plant immediately. Fall construction gives you time to amend soil over winter before spring planting. However, raised beds can be built anytime your ground isn’t frozen.
How long do raised beds typically last?
Cedar beds generally last eight to twelve years before significant wood decay occurs. Redwood lasts slightly longer. Composite materials and galvanized metal extend lifespan to fifteen to twenty years but cost considerably more. Regular sealing and maintenance add years to wooden bed lifespan.
Can I build a raised bed on concrete or hardscape?
Yes, raised beds work on patios, decks, and concrete. Ensure drainage holes or gaps allow water to escape, preventing waterlogging. You may need to water more frequently on hardscape surfaces. Landscape fabric under the bed prevents weeds from growing through cracks.
Do I need corner supports in my raised bed?
For standard 2×8-inch beds up to 3×6 feet, corner supports aren’t essential. Larger beds or deeper soil loads benefit from internal 4×4-inch posts at corners to prevent bowing. Beds in areas with clay soil may also benefit from added support due to moisture-related expansion and contraction.


