Zebbies Garden Tips: Grow Your Best Veggies Yet!
Welcome to your complete guide for cultivating a thriving vegetable garden that produces abundant harvests throughout the growing season. Whether you’re a seasoned gardener or just beginning your journey with zebbies garden practices, this comprehensive resource will equip you with proven strategies to maximize your yields and create a healthier, more productive growing space. From soil preparation to pest management, we’ll explore every aspect of vegetable gardening that transforms ordinary plots into exceptional food sources.
Growing your own vegetables offers unparalleled satisfaction—fresh produce, cost savings, and the joy of nurturing life from seed to harvest. The key to success lies in understanding your local climate, selecting appropriate varieties, and implementing sustainable practices that work with nature rather than against it. Let’s explore the essential techniques that will help you achieve your vegetable gardening goals this season.
Soil Preparation and Amendment
The foundation of any successful zebbies garden begins with exceptional soil. Before planting a single seed, invest time in understanding your soil composition, pH level, and nutrient content. Quality soil acts as a reservoir for water, nutrients, and beneficial microorganisms that support vigorous plant growth. Test your soil through your local USDA plant health resources or extension office to determine exact nutrient levels and pH requirements for your chosen vegetables.
Most vegetables thrive in slightly acidic to neutral soil with a pH between 6.0 and 7.0. If your soil tests acidic, add agricultural lime; if alkaline, incorporate sulfur. The ideal vegetable garden soil contains approximately 45% mineral particles, 25% water, 25% air, and 5% organic matter. Build this balance by incorporating aged compost, well-rotted manure, and other organic amendments. When constructing a raised garden, you can create the perfect soil mixture from scratch, ensuring optimal growing conditions immediately.
Work amendments into the top 8-12 inches of soil where most vegetable roots establish themselves. Perform this preparation in autumn for spring planting, or at least 2-3 weeks before your planting date. For zebbies garden success, consider creating a three-bin composting system to continuously generate nutrient-rich amendments. This sustainable approach reduces waste while building soil health year after year.

Selecting the Right Vegetables
Choosing vegetables suited to your climate zone, available space, and personal preferences ensures higher success rates and greater satisfaction. Begin by identifying your USDA hardiness zone and growing season length. Cool-season crops like lettuce, peas, and broccoli prefer temperatures below 70°F, while warm-season vegetables such as tomatoes, peppers, and squash require consistent warmth above 60°F at night.
Consider your space constraints when planning your zebbies garden layout. Compact varieties work well in containers and small plots, while sprawling vegetables like pumpkins and watermelons need room to spread. Growing garden lettuce offers quick returns and works in tight spaces, making it perfect for beginners. Vertical growers like beans and peas maximize limited areas when trained on a garden arch trellis.
Succession planting extends your harvest throughout the season. Rather than planting all lettuce seeds simultaneously, sow new batches every two weeks for continuous supply. Similarly, determinate tomato varieties produce fruit within a concentrated window, while indeterminate types fruit continuously until frost. Select a diverse mix of vegetables to maintain interest and ensure nutritional variety in your kitchen.
High-yield vegetables for zebbies gardens:
- Tomatoes—prolific producers in warm climates
- Zucchini—incredibly productive summer squash
- Beans—nitrogen-fixing legumes that enrich soil
- Peppers—long-season crops with multiple harvests
- Cucumber—vining plants perfect for vertical training
- Kale—cold-hardy green that improves with frost
- Carrots—reliable root crops with long storage life
Don’t overlook herb garden additions like basil, parsley, and cilantro. These aromatic plants enhance culinary creations while attracting beneficial pollinators to your vegetable beds.
Proper Planting Techniques
Correct planting depth and spacing determine whether seedlings thrive or struggle. A general rule states seeds should be planted at a depth equal to 2-3 times their width. Tiny seeds like lettuce barely press into soil surface, while larger beans go 1-2 inches deep. Spacing recommendations vary by variety, but adequate air circulation prevents fungal diseases that plague crowded gardens.
Harden off transplants by gradually exposing them to outdoor conditions over 7-10 days before planting. This process toughens plants and reduces transplant shock. Place seedlings in a sheltered location for a few hours daily, gradually increasing exposure to wind and direct sunlight. Water well before transplanting, and plant during cool parts of the day—early morning or late afternoon—to minimize stress.
When transplanting, bury tomatoes deeper than their container depth, as buried stems develop additional roots for stronger plants. Most other vegetables should be planted at the same depth they grew in their starter pots. Firm soil gently around each plant, creating a slight basin to catch water. Water thoroughly after planting to settle soil and eliminate air pockets.
Direct seeding works best for crops with delicate root systems that don’t transplant well—carrots, beans, peas, and radishes. Prepare a fine seedbed by breaking up soil clumps and removing debris. Create furrows at appropriate depths, sow seeds, cover lightly, and keep consistently moist until germination. Thin seedlings once they develop true leaves, spacing them according to mature plant requirements.
Watering and Nutrition
Consistent moisture availability drives vegetable productivity and quality. Most vegetables require 1-2 inches of water weekly, either from rain or irrigation. Water deeply but less frequently to encourage deep root development and drought tolerance. Shallow, frequent watering creates weak root systems dependent on constant moisture.
Water early morning to minimize disease pressure and allow foliage to dry quickly. Avoid overhead watering that wets leaves, promoting fungal infections. Drip irrigation and soaker hoses deliver water directly to soil, maximizing efficiency and plant health. In zebbies garden systems, mulch heavily—3-4 inches of straw, shredded leaves, or wood chips—to conserve moisture, moderate soil temperature, and suppress weeds.
Nutrient management sustains vigorous growth and high yields. Nitrogen promotes leafy growth, phosphorus supports root and flower development, and potassium enhances overall plant health and disease resistance. Balanced fertilizers suited to vegetable production typically show an NPK ratio of 5-10-10 or 10-10-10. Apply slow-release organic options like fish emulsion, compost tea, or granular fertilizers according to package directions.
Sidedress heavy feeders—tomatoes, peppers, squash, and corn—with additional nitrogen every 3-4 weeks once flowering begins. Lighter feeders like root vegetables and legumes require minimal supplemental feeding if soil was properly amended. Foliar feeding with diluted fish emulsion provides quick nutrient boosts during growth spurts. Monitor plant appearance for nutrient deficiency signs: yellowing leaves suggest nitrogen need, purple coloration indicates phosphorus deficiency, and brown leaf margins suggest potassium shortage.
Managing Pests and Diseases
Integrated pest management (IPM) combines cultural, biological, and chemical controls to minimize pest damage while protecting beneficial insects. Prevention proves more effective than treatment, so implement these strategies from the start of your zebbies garden season.
Cultural controls:
- Rotate crop families annually to break pest life cycles and prevent soil-borne disease buildup
- Remove diseased plants immediately to prevent spread
- Space plants adequately for air circulation
- Water at soil level to keep foliage dry
- Remove weeds that harbor pests and diseases
Biological controls:
- Encourage beneficial insects like ladybugs, lacewings, and parasitic wasps through flowering plant borders
- Install bird netting to protect young seedlings while allowing pollinator access
- Introduce beneficial nematodes for soil-dwelling pest larvae
- Plant trap crops like nasturtiums to lure aphids away from vegetables
Common vegetable pests include aphids, spider mites, squash bugs, and tomato hornworms. Inspect plants regularly, catching infestations early when populations remain manageable. Spray infested plants with strong water spray to dislodge aphids and mites. Hand-pick larger pests like hornworms and beetles. Neem oil and insecticidal soaps provide organic control options for persistent problems.
Fungal diseases—powdery mildew, early blight, and downy mildew—thrive in humid conditions. Improve air circulation, avoid overhead watering, and remove affected leaves promptly. Sulfur and copper fungicides offer organic prevention when disease pressure remains high. Bacterial wilt and viral diseases lack chemical controls, making prevention through insect control and resistant varieties your best strategy.
Seasonal Planting Guide
Successful zebbies gardens follow seasonal rhythms, aligning planting dates with your local climate patterns. Understanding your first and last frost dates—available through your local Almanac frost date calculator—guides planting decisions throughout the year.
Spring (4-6 weeks before last frost): Start cool-season crops indoors: lettuce, spinach, peas, cabbage, and broccoli. Direct seed peas, radishes, and carrots as soon as soil is workable. These hardy vegetables tolerate light frosts and establish strong root systems in cool weather.
Late Spring (after last frost): Transplant warm-season crops: tomatoes, peppers, eggplants, and basil. Direct seed beans, squash, cucumber, and corn. Temperatures must remain consistently above 60°F at night to prevent seed rot and plant stress.
Summer (during hot months): Provide afternoon shade for heat-sensitive crops. Continue succession planting beans and corn every 2-3 weeks for extended harvests. Mulch heavily to conserve moisture in intense heat. Reduce watering frequency but apply deeper soakings to maintain consistent moisture.
Late Summer/Early Fall (8-10 weeks before first frost): Plant cool-season crops again for fall harvest. Lettuce, spinach, kale, and broccoli thrive in cooling temperatures and shorter days. These crops often taste sweeter after experiencing light frosts, which convert starches to sugars.
Fall/Winter (after first frost): Harvest remaining crops and prepare beds for spring. Cut back spent plants, remove debris, and incorporate compost or aged manure. Plant cover crops like clover or winter rye to prevent erosion, suppress weeds, and add organic matter.
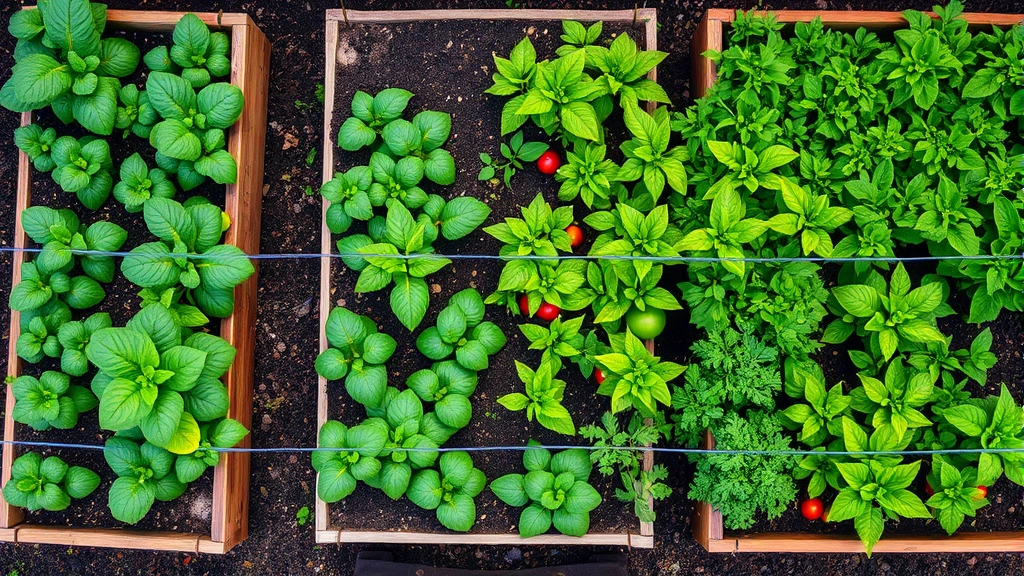
Garden Structures and Layout
Thoughtful garden design maximizes space, improves accessibility, and enhances productivity. When constructing a raised garden, consider bed dimensions of 4 feet wide by 8 feet long—wide enough to reach the center from either side without stepping into beds. Narrower beds work better in tight spaces. Height of 12-18 inches accommodates most vegetable roots while remaining accessible.
Vertical growing structures like garden arch trellises maximize production in limited space. Train vining crops—beans, peas, cucumbers, and squash—upward to save ground space while improving air circulation. Archways create visual interest while defining pathways through your zebbies garden.
Arrange beds in north-south orientation so taller plants don’t shade shorter varieties. Group vegetables by water needs—place thirsty tomatoes and squash together, while drought-tolerant herbs occupy a separate area. Organize beds by crop family to streamline crop rotation and pest management.
Container gardening extends possibilities for apartment dwellers and those with poor soil. Most vegetables grow successfully in containers with adequate depth—18 inches minimum for tomatoes and peppers, 12 inches for lettuce and herbs. Use quality potting mix rather than garden soil, which compacts in containers. Water containers more frequently than in-ground gardens, as they dry rapidly in heat.
Pathways between beds should be at least 2-3 feet wide for wheelbarrow access. Mulch pathways with wood chips or straw to suppress weeds, improve aesthetics, and provide traction during wet conditions. Consider installing drip irrigation systems along beds for efficient, consistent watering. These systems reduce water waste while delivering moisture directly where plants need it most.
FAQ
When should I start seeds indoors for zebbies garden?
Start seeds indoors 6-8 weeks before your last spring frost date. Tomatoes, peppers, and eggplants need this extended indoor period. Cool-season crops like lettuce and cabbage can start 4-5 weeks before transplanting. Direct seed warm-season crops like beans and squash after frost danger passes.
How often should I fertilize my vegetable garden?
Apply balanced fertilizer every 3-4 weeks during the growing season. Heavy feeders like tomatoes benefit from supplemental nitrogen every 3 weeks once flowering begins. Light feeders like root vegetables and legumes need minimal fertilizing if soil was well-amended initially. Slow-release fertilizers reduce application frequency to once at planting time.
What’s the best way to prevent powdery mildew?
Prevent powdery mildew through proper spacing for air circulation, avoiding overhead watering, and removing affected leaves immediately. Apply sulfur or neem oil preventatively when humidity runs high. Water early morning so foliage dries quickly. Choose resistant varieties when available for susceptible crops.
Can I grow vegetables in containers year-round?
Year-round container gardening depends on your climate. In mild regions, cool-season crops survive outdoors through winter. In cold climates, move containers indoors or focus on seasonal production. Herb garden containers can be brought inside during winter to extend harvest. Use containers with drainage holes and quality potting mix for best results.
How do I know when vegetables are ready to harvest?
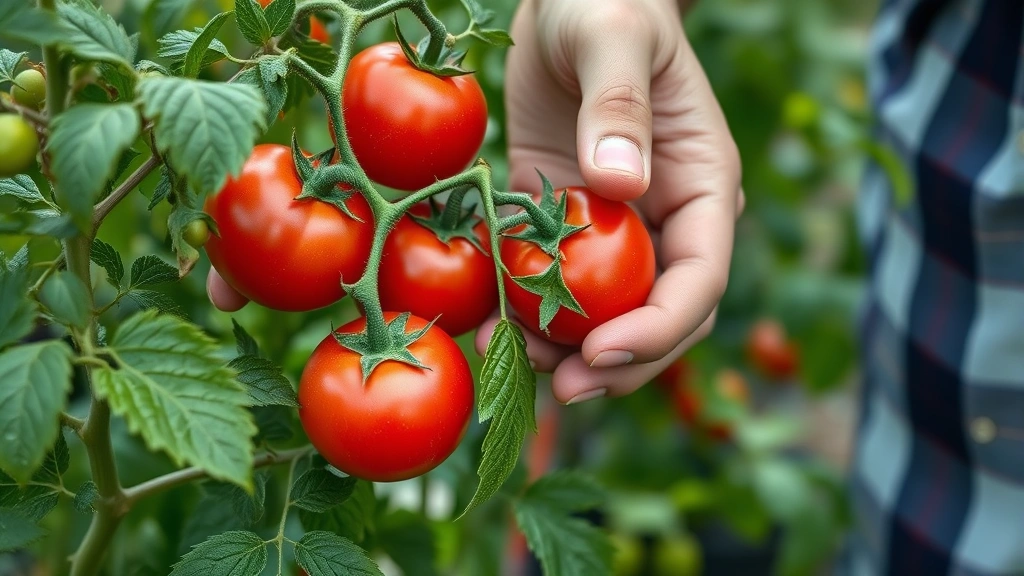
Harvest timing varies by crop. Pick tomatoes when fully colored but still slightly soft. Harvest beans when pods snap cleanly. Cut lettuce when leaves reach desired size but before bolting. Pull carrots when shoulders reach desired diameter. Zucchini tastes best when 6-8 inches long. Regular harvesting encourages continued production throughout the season.
What’s the best mulch for vegetable gardens?
Organic mulches like straw, shredded leaves, and wood chips work excellently for vegetable gardens. Apply 3-4 inches around plants, keeping mulch 2-3 inches away from stems to prevent rot. As organic mulch decomposes, it enriches soil with organic matter. Avoid hay with weed seeds; use straw instead. Wood chips work well between rows but can tie up nitrogen as they decompose.
How can I extend my harvest season?
Succession planting—sowing crops every 2-3 weeks—provides continuous harvests. Plant cold-hardy varieties in late summer for fall production. Use row covers to protect early spring and late fall crops from frost. Cold frames and low tunnels extend seasons on both ends. Choose crop varieties with different maturity dates for staggered harvests.
Should I use chemical pesticides in my vegetable garden?
Integrated pest management emphasizes organic and cultural controls before resorting to chemicals. Many common pests respond to hand-picking, water spray, or beneficial insects. Neem oil, insecticidal soaps, and sulfur provide effective organic options. Chemical pesticides work but may harm beneficial insects and leave residues. Always follow label directions carefully for any product used near food crops.
What’s the difference between determinate and indeterminate tomatoes?
Determinate tomatoes grow to a fixed height (usually 3-4 feet) and produce fruit in concentrated periods—ideal for canning and preserving. Indeterminate varieties grow continuously, reaching 6+ feet, and produce fruit throughout the season until frost. For fresh eating throughout summer, choose indeterminate; for processing, select determinate varieties.
How do I improve soil quality year after year?
Build soil through continuous organic matter addition. Incorporate compost and aged manure annually. Use cover crops in off-season to prevent erosion and add organic matter. Avoid tilling, which damages soil structure and beneficial organisms. Mulch heavily to protect soil surface and feed organisms as it decomposes. Test soil regularly to monitor nutrient levels and adjust amendments accordingly.
Can I grow vegetables in shade?
Most fruiting vegetables—tomatoes, peppers, squash—require 6-8 hours direct sunlight daily. Leafy greens like lettuce, spinach, and kale tolerate partial shade and actually prefer it in hot climates. Root vegetables need 4-6 hours sun. Herbs vary; basil loves sun while parsley tolerates shade. Assess your garden’s light patterns throughout the day before selecting varieties.


