

Perfect Vegetable Garden Layout? Expert Tips Inside
Creating an efficient vegetable garden layout transforms your growing space into a productive oasis. Whether you’re working with a sprawling backyard or a compact urban balcony, the right arrangement maximizes sunlight, minimizes pest pressure, and streamlines your daily maintenance routine. A well-planned layout considers companion planting strategies, crop rotation patterns, water access, and seasonal transitions—elements that separate thriving gardens from struggling ones.
The foundation of any successful vegetable garden begins with understanding your specific growing conditions and space constraints. This comprehensive guide walks you through expert strategies for designing a layout that works with your environment rather than against it. From determining sun exposure to spacing plants correctly, you’ll discover practical techniques that experienced gardeners use to achieve consistent harvests year after year.
Assess Your Growing Space and Sunlight
Before sketching a single row, spend time observing your garden space throughout the day. Most vegetables require 6-8 hours of direct, unobstructed sunlight daily, with heat-loving crops like tomatoes, peppers, and eggplants preferring 8+ hours. Use a simple tracking method: note where shadows fall at morning, midday, and evening during different seasons. Winter shadows extend further than summer shadows, so a spot perfect for spring planting might become too shaded by mid-summer.
Identify your microclimates—areas where conditions differ from the general garden. South-facing walls retain warmth and suit cold-sensitive plants. Low-lying areas collect cold air and moisture, ideal for water-loving crops but problematic for those prone to fungal diseases. North-facing locations offer afternoon shade, perfect for extending the season for cool-season crops like lettuce and spinach during hot summers. Understanding these variations allows you to position plants where they’ll thrive naturally.
Consider prevailing winds and air circulation. Gardens positioned to catch morning breezes dry faster after rain, reducing disease pressure. However, strong winds can damage delicate plants and increase water loss. If your space is wind-exposed, plan windbreaks using trellises or taller plants as natural barriers. Document soil conditions too—drainage patterns, existing soil composition, and pH levels influence where different vegetables perform best.
Plan Your Bed Configuration
The shape and size of your growing beds dramatically impact efficiency and maintenance. Rectangular beds are standard and economical, but your space might accommodate L-shaped, circular, or curved configurations. When constructing a raised garden bed, aim for widths of 3-4 feet—allowing you to reach the center comfortably from either side without stepping into the bed. This prevents soil compaction and root damage.
Length varies based on available space, but 8-12 feet proves manageable for most gardeners. Longer beds make efficient use of space but can feel overwhelming to maintain. Shorter beds allow easier access and quicker cultivation. Depth matters equally: 12 inches suits shallow-rooted crops, while 18-24 inches accommodates deeper-rooted vegetables and improves drainage. Rain garden principles can enhance your bed design, incorporating slight depressions that capture runoff and maximize water retention during dry periods.
In-ground gardens require strategic planning around existing trees, structures, and utilities. Avoid planting directly under eaves where water runoff concentrates, or beneath trees competing for nutrients and water. If space is limited, consider vertical growing systems, container gardens, or tiered arrangements that maximize production without expanding your footprint. Pathways between beds should be at least 2 feet wide for comfortable movement and equipment passage.
Implement Companion Planting Strategies
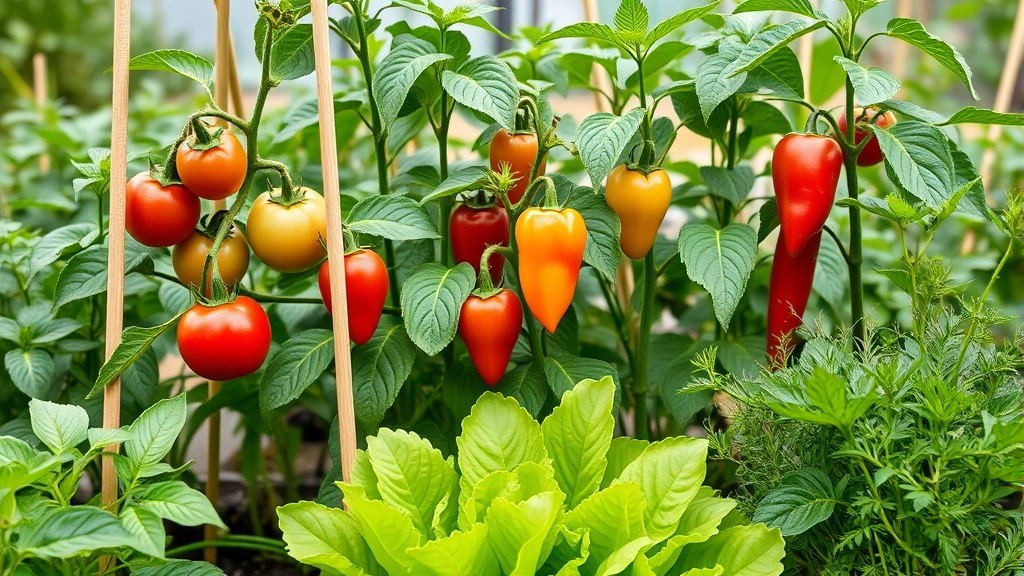
Companion planting harnesses natural relationships between plants to enhance growth, improve pest management, and maximize space. This ancient practice combines plants that benefit each other through nutrient exchange, pest deterrence, or physical support. The classic “Three Sisters” (corn, beans, and squash) exemplifies this: corn provides structure, beans fix nitrogen in soil, and squash shades roots while deterring pests with its prickly leaves.
When arranging your vegetable garden layout, position tall plants strategically. Tomatoes, peppers, and beans benefit from the afternoon shade provided by corn or sunflowers during peak heat. Conversely, place shade-sensitive plants like carrots and beets where they receive morning sun but afternoon protection. Leafy greens appreciate dappled shade from taller neighbors, extending their harvest window into summer months.
Aromatic herbs protect neighboring vegetables from common pests. Basil planted near tomatoes repels spider mites and flies. Marigolds deter nematodes and whiteflies. Nasturtiums act as trap crops, attracting aphids away from vegetables. Plant these beneficial companions strategically throughout your layout rather than in isolated clusters. Interspersing them maximizes their protective benefits across your entire garden.
Root depth variations allow efficient space utilization. Shallow-rooted lettuce and spinach grow beneath medium-rooted onions and beets. Deep-rooted tomatoes and peppers occupy different soil strata than nearby shallow-rooted radishes. This vertical stratification lets you pack more plants into less space while reducing competition. Create detailed maps noting companion relationships and spatial arrangements to guide planting and ensure optimal positioning.
Organize by Plant Height and Growth Pattern
Strategic height arrangement prevents shading conflicts and maximizes light exposure for every plant. Establish a general rule: taller plants on the north side, progressively shorter plants toward the south. This tiered arrangement ensures even the shortest plants receive adequate sunlight. In northern hemispheres, this north-to-south orientation works optimally; southern hemisphere gardeners reverse this pattern.
Categorize plants into height tiers. Tall plants (5-8+ feet) include indeterminate tomatoes, pole beans, corn, and sunflowers. Medium plants (2-4 feet) include peppers, bush beans, broccoli, and cabbage. Short plants (under 2 feet) include lettuce, spinach, radishes, and herbs. Within each tier, position plants by their specific growth habits. Determinate tomatoes grow more compact than indeterminate varieties, so they might occupy middle tiers despite being tomatoes.
Growth pattern considerations extend beyond height. Some plants spread outward significantly—pumpkins, melons, and winter squash require generous spacing. Plan these spreading crops at garden edges where runners can extend along pathways without overwhelming neighbors. Conversely, vertical growers like pole beans and cucumbers trained on trellises occupy minimal ground space while producing abundantly.
Seasonal height changes demand flexible planning. Spring cool-season crops like peas grow tall quickly, then disappear by early summer. Plan to replace them with heat-loving crops that don’t mind afternoon shade from adjacent plants. This succession strategy maximizes production throughout the season by using the same space multiple times for different crops with varying light requirements.
Design Water and Access Pathways
Water delivery infrastructure influences your entire garden layout. Drip irrigation systems prove more efficient than overhead watering, reducing disease pressure while conserving water. When planning bed positions, consider water source locations and how you’ll route hoses. A central water source with pathways radiating outward minimizes hose lengths and water loss. Garden hose repair kits help maintain delivery systems, but smart layout design prevents damage in the first place.
Create pathways that allow comfortable access to every plant without stepping on beds. Mulched pathways prevent weeds while defining spaces clearly. Width matters: 18 inches accommodates a person comfortably; 24-30 inches allows two people to walk side-by-side or permits wheelbarrow passage. Main pathways deserve more width than secondary access routes. Consider traffic patterns—frequent access paths should be most convenient, while rarely-visited areas can have narrower routes.
Position work stations strategically. A potting bench or tool storage near garden entrances keeps frequently-used items accessible without traversing the entire garden. A compost bin positioned conveniently encourages regular additions. Water sources should be central or distributed throughout larger gardens. Soaker hoses laid along bed edges deliver water directly to roots with minimal waste, while rain barrels capture runoff for supplemental watering during dry periods.
Accessibility planning matters for all gardeners, especially those with mobility limitations. Raised beds at waist height eliminate bending. Wide, firm pathways accommodate walkers or wheelchairs. Vertical trellises and hanging containers bring plants to comfortable working heights. These modifications benefit everyone—tall gardeners appreciate reduced bending, and anyone managing injuries or disabilities gains independence and comfort.
Create a Crop Rotation System
Crop rotation—planting different plant families in different locations each year—prevents pest and disease buildup while improving soil health. Vegetables fall into several families with distinct nutrient demands and pest affinities. Nightshades (tomatoes, peppers, eggplants) attract similar pests. Brassicas (cabbage, broccoli, kale) share diseases. Legumes (beans, peas) fix nitrogen. Cucurbits (squash, cucumbers, melons) have unique requirements.
Divide your garden into 3-4 sections, assigning each section to a different plant family annually. Year one: Section A grows nightshades, Section B grows brassicas, Section C grows legumes. Year two: rotate each family to the next section. Year three completes the cycle. This prevents pest populations from establishing in permanent locations while distributing nutrient demands evenly across your garden.
Document rotations carefully. Maintain a simple map showing what grew where each year, referencing it during planning. This historical record prevents accidental repetition and guides future decisions. Some gardeners use color-coded maps or spreadsheets; others maintain written journals. Whatever system you choose, consistency matters more than complexity.
Rotation planning influences initial layout decisions. Design bed positions knowing they’ll host different crops each season. Some gardeners prefer fixed bed locations with rotating crops; others rotate entire bed positions. Either approach works—what matters is preventing the same plant families from occupying identical locations in consecutive years. When designing your vegetable garden layout, build flexibility into your system to accommodate rotation requirements.

Incorporate Season-Specific Planning
A truly excellent vegetable garden layout accounts for seasonal transitions. Spring brings cool-season crops like peas, lettuce, and spinach. Summer demands heat-lovers like tomatoes, peppers, and cucumbers. Fall allows cool-season crops to return. Winter gardening in mild climates extends production through garlic, onions, and hardy greens. Your layout should accommodate this progression seamlessly.
Plan succession plantings within sections. As spring peas finish, replace them with summer beans. When summer lettuce bolts, plant fall brassicas in the same spot. This succession maximizes productivity from limited space. Map out what you’ll plant when during the planning phase, ensuring adequate space and sun exposure for each crop during its growing season.
Understand your local frost dates and growing season length. USDA Plant Hardiness Zones guide crop selection, while your first and last frost dates determine planting windows. A layout that works perfectly for 120-day growing seasons requires adjustment in regions with 90-day seasons. Work within your climate’s constraints rather than fighting them.
Temperature variations influence positioning too. Early-spring plantings benefit from south-facing locations that warm quickly. Midsummer plantings of cool-season crops need afternoon shade. Fall plantings of winter crops should be positioned to capture maximum light as day length decreases. This seasonal awareness transforms your layout from static to dynamic, responding to nature’s rhythms rather than fighting them.
Consider perennial vegetables like asparagus, rhubarb, and artichokes in your layout. These multi-year crops need permanent positions where they won’t be disturbed during annual rotations. Position them along garden edges or in dedicated sections, allowing access without disrupting crop rotation elsewhere. Herb garden sage and other perennial herbs benefit similarly from permanent, accessible locations.
FAQ
How much space do I need for a productive vegetable garden?
A 4×8 foot raised bed (32 square feet) produces significant vegetables for a family of four with succession planting. However, space needs vary by crop selection and desired harvest volume. Intensive gardening with succession planting maximizes productivity in small spaces. Start with what’s available and expand as needed. Many productive gardens occupy less than 100 square feet; others sprawl across thousands.
Should I use raised beds or in-ground gardens?
Both work excellently; the choice depends on your situation. Raised beds offer better drainage, warmer soil in spring, easier access, and better pest control. In-ground gardens connect with native soil, reducing watering needs and initial investment. Raised beds suit poor soil conditions or mobility limitations. In-ground gardens suit those with good soil and ample space. Many gardeners use both in different areas.
What’s the ideal spacing between plants?
Spacing depends on mature plant size. Tomatoes need 24-36 inches between plants; lettuce needs 6-12 inches; carrots need 2-3 inches. Check seed packet information or use online spacing guides. Inadequate spacing reduces air circulation, increasing disease pressure and reducing yields. Excessive spacing wastes productive space. Dense planting with succession harvesting maximizes productivity while maintaining plant health.
How do I prevent pests without chemicals?
Companion planting, physical barriers, and beneficial insects reduce pest pressure naturally. Row covers protect young plants. Hand-picking removes larger pests. Neem oil and insecticidal soap provide organic solutions for serious infestations. Encouraging beneficial insects through native plants and water sources controls pest populations naturally. Healthy soil and proper spacing reduce stress-related pest susceptibility.
Can I garden in containers if I lack yard space?
Absolutely. Containers work beautifully for vegetables. Use 5-gallon minimum containers for tomatoes and peppers; smaller containers suit lettuce and herbs. Arrange containers on patios, balconies, or porches. Container gardening requires more frequent watering and fertilizing than ground gardens but offers flexibility and aesthetic appeal. Growing in containers allows urban gardeners to produce fresh vegetables in minimal space.
How often should I rotate crops?
Minimum rotation is annual—moving different plant families to different locations each year. Three-year rotations provide better disease prevention. Some gardeners practice four-year rotations for maximum benefit. The key is preventing the same plant families from occupying identical locations in consecutive years. Even simple annual rotation significantly reduces pest and disease pressure.
What’s the best time to plan my garden layout?
Late fall or winter suits planning perfectly. You’ll have time to observe light patterns, research crops, and design layouts without seasonal rush. Implement plans in early spring before planting. If you’re already mid-season, sketch plans for next year based on current observations. Continuous improvement beats perfect initial planning; each season teaches lessons that refine future layouts.