
How to Plant Tulips? Expert Gardener Tips
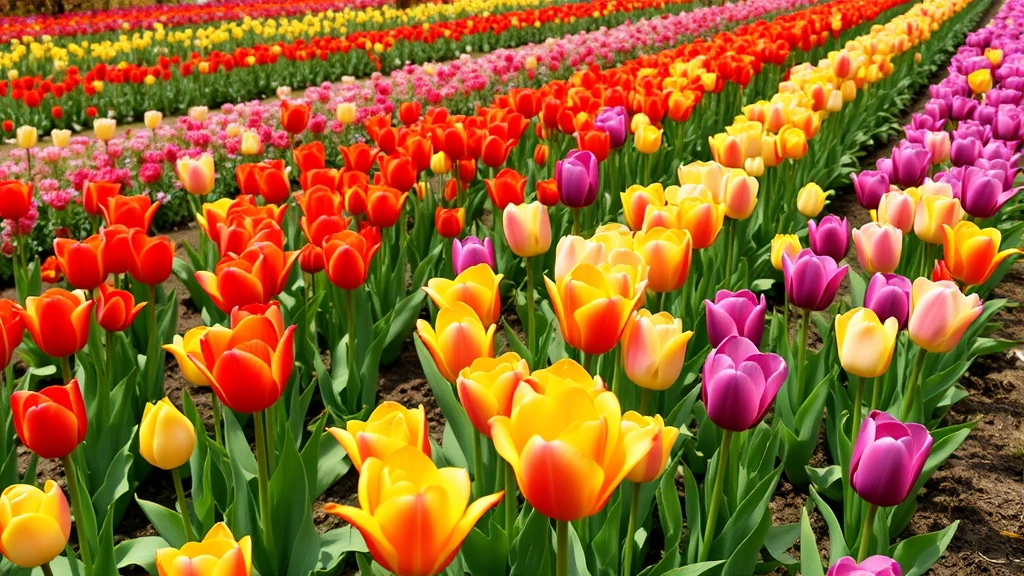
Tulips represent one of the most beloved and versatile spring-flowering bulbs available to home gardeners. With their elegant cup-shaped flowers and vibrant color range spanning from soft pastels to bold jewel tones, tulips can transform any fairy garden ideas into a spectacular spring display. Whether you’re planning your first tulip garden or expanding an existing one, understanding the fundamentals of tulip cultivation ensures success and year-after-year blooms that brighten your outdoor space.
The beauty of growing tulips lies in their relatively straightforward care requirements and forgiving nature, even for beginner gardeners. Unlike many perennials that demand years to establish, tulips deliver gratifying results within a single growing season. From selecting the right bulbs to timing your planting perfectly, this comprehensive guide walks you through every step of creating a thriving tulip garden that becomes the envy of your neighborhood.
Choosing the Right Tulip Varieties
The first decision when planning your tulip garden involves selecting varieties that match your aesthetic preferences, hardiness zone, and growing conditions. Tulips come in numerous classifications, each with distinct characteristics, heights, and bloom times. Understanding these categories helps you design a cohesive landscape that provides continuous color throughout the spring season.
Single Early tulips bloom in mid-spring with single-layered petals and typically reach 10-16 inches tall. These classic varieties offer excellent value and reliability in most climates. Double tulips feature ruffled, full blooms resembling peonies, adding textural interest to flower arrangements and garden displays. Parrot tulips showcase dramatic, ruffled petals with feathered edges and striped patterns, perfect for creating bold focal points.
Triumph tulips represent the most popular category for home gardeners, offering sturdy stems, mid-to-late spring blooms, and a vast color palette. Darwin Hybrid tulips provide exceptional longevity, often returning reliably for multiple years, making them ideal for permanent tulip garden installations. Lily-flowered tulips feature graceful, pointed petals that create an elegant silhouette, while Botanical tulips remain smaller and more delicate, perfect for rock gardens or container displays.
Consider your landscape design goals when selecting varieties. If you want to incorporate tulips into a constructing a raised garden project, Triumph and Darwin Hybrid varieties thrive in elevated beds with excellent drainage. Color coordination matters too—monochromatic schemes create sophisticated impact, while mixed plantings of complementary colors like purple and yellow generate vibrant energy.
Understanding Tulip Bulb Quality
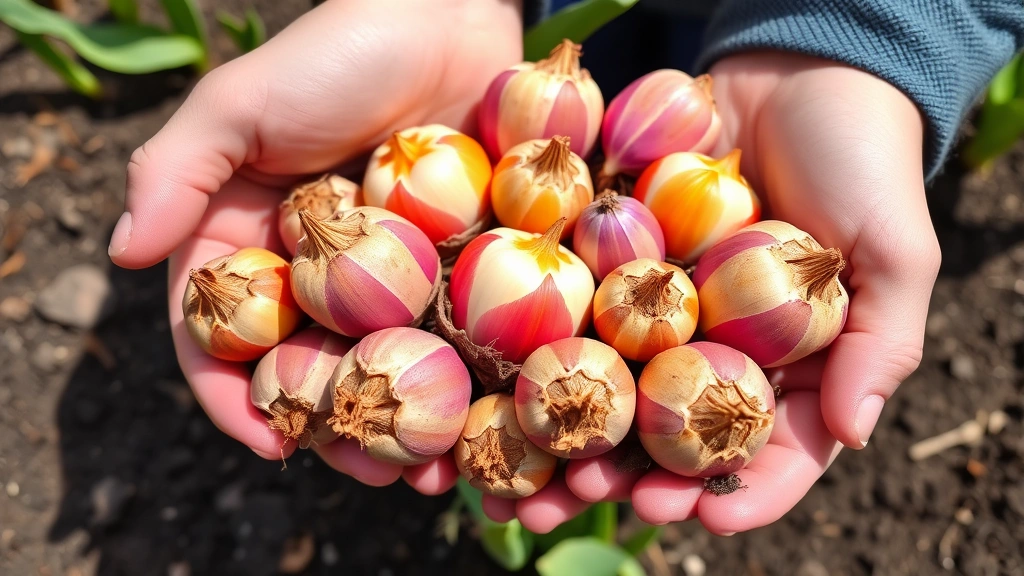
The quality of bulbs you purchase directly determines your planting success and bloom quality. Reputable bulb suppliers provide detailed specifications about bulb size, cultivar names, and expected flower characteristics. When evaluating bulbs, look for those labeled as “top size” or “jumbo,” typically measuring 12 centimeters or larger in circumference. These larger bulbs contain more energy reserves for robust growth and abundant flowering.
Inspect bulbs before purchasing or planting. Quality bulbs feel firm when gently squeezed, lacking soft spots or mushy areas that indicate rot. The papery outer skin should be intact, protecting the delicate interior tissues from damage and disease. Avoid bulbs showing visible mold, sprouting, or shriveling. If ordering online, purchase from established suppliers like Johnny’s Selected Seeds or regional bulb specialists who guarantee bulb viability and provide detailed growing information.
Certified disease-free bulbs prevent tulip-specific pathogens from establishing in your garden. Some suppliers offer treated bulbs that resist common fungal diseases, adding extra insurance against problems. When receiving bulbs, store them in a cool, dry location (50-60°F) with good air circulation until planting time. Never seal bulbs in plastic bags where moisture accumulation promotes rot.
Optimal Planting Time and Season
Timing represents a critical factor in tulip planting success. Tulips require a cold period (vernalization) to develop properly, making fall planting essential in most climates. The ideal planting window opens when soil temperatures drop to 60°F and remain consistently cool, typically occurring 4-6 weeks before the first hard frost in your region.
In northern climates (zones 3-5), plant tulips between September and November, allowing adequate time for root establishment before soil freezes. In moderate climates (zones 6-7), extend your planting window from October through early December. In warmer regions (zones 8-9), delay planting until late November or December when soil has sufficiently cooled. In zones 10 and warmer, tulips often require special handling, either pre-chilling in refrigerators before planting or treating as annuals.
Planting too early in warm soil causes bulbs to sprout prematurely, wasting energy reserves before winter arrives. Conversely, planting too late prevents adequate root development, compromising spring performance. Check local frost date information to determine your specific planting window. Many regional cooperative extension services provide customized planting calendars based on historical weather data.
Soil Preparation Essentials
Tulips demand well-draining soil to prevent bulb rot, the most common cause of tulip failure. Before planting, amend heavy clay soils with organic matter and coarse sand to improve drainage structure. Work 2-3 inches of compost, aged bark, or peat moss into the top 8-10 inches of soil, creating a loose, friable planting bed.
Soil pH should fall between 6.0 and 7.0 for optimal nutrient availability. Test your soil using an inexpensive kit from your local cooperative extension or a professional laboratory. If amendments are needed, incorporate lime to raise pH or sulfur to lower it, following test recommendations for application rates.
Incorporate a balanced bulb fertilizer or bone meal into the planting bed at the rate specified on the package, typically 2-3 tablespoons per planting hole. These slow-release nutrients support root development during fall and early spring growth. Avoid fresh manure, which can encourage rot; use only well-aged or composted manure mixed thoroughly into soil.
If you’re creating a succulent garden with tulips as seasonal accents, ensure the planting area has distinct drainage from succulent sections, as tulips require more consistent moisture than drought-tolerant plants.
Planting Depth and Spacing Guidelines
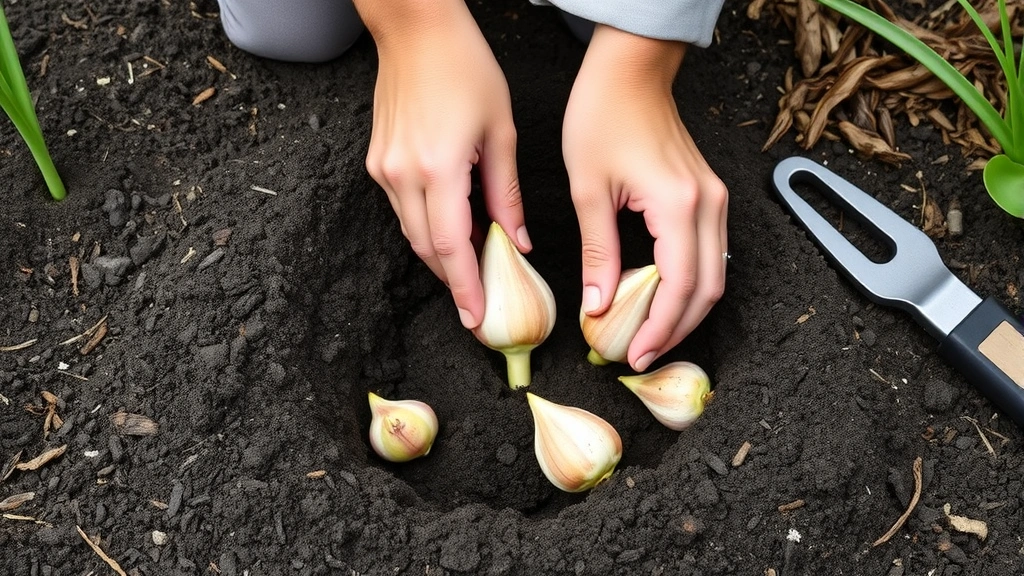
Proper planting depth ensures tulips develop strong root systems and emerge reliably in spring. The general rule states: plant bulbs at a depth equal to 2-3 times the bulb’s height. For standard tulip bulbs measuring 2 inches tall, dig holes 4-6 inches deep. This depth protects bulbs from temperature fluctuations and provides room for root development below the bulb.
Space tulip bulbs 4-6 inches apart center-to-center, allowing room for foliage expansion without overcrowding. Tighter spacing creates denser displays with more visual impact, though air circulation slightly decreases. Wider spacing promotes better air movement and reduces disease pressure, beneficial in humid climates. For mass plantings, create irregular clusters rather than rigid rows, mimicking natural distribution patterns.
When planting individual bulbs in existing gardens, use a tulip planter tool or dibber to create precise holes. Position bulbs with the pointed end facing upward and the flat basal plate (where roots emerge) facing downward. If you accidentally plant a bulb upside-down, don’t worry—tulips will reorient themselves, though growth may be slightly delayed. Backfill holes with amended soil, gently firming to eliminate air pockets.
For large-scale tulip gardens, consider planting in blocks or drifts using a shovel. Dig a trench to the appropriate depth, space bulbs evenly across the bottom, and backfill with soil. This method proves faster than individual hole planting and creates cohesive color displays. After planting, water thoroughly to settle soil and initiate root growth.
Watering and Initial Care
Immediately after planting, water your tulip bed thoroughly to settle soil and promote root contact with soil particles. This initial watering proves crucial for establishing good soil-to-bulb contact. In fall, rely on natural rainfall for ongoing moisture; tulips need consistent moisture but not waterlogging during their root development phase.
If fall weather turns dry after planting, supplement with 1-2 inches of water weekly until soil freezes. Avoid overhead watering in late fall, which can promote fungal diseases on foliage. Use soaker hoses or drip irrigation directed at soil level for most effective watering.
Mulching after planting offers several benefits: it moderates soil temperature fluctuations, suppresses weed growth, and improves moisture retention. Apply 2-3 inches of coarse mulch like shredded bark or straw after the first hard frost, when soil freezes temporarily. This timing prevents rodents from nesting in warm mulch before winter. Remove mulch gradually in early spring as temperatures warm, allowing emerging shoots to push through.
Avoid fertilizing after planting until spring growth begins. Fall nitrogen application encourages tender foliage susceptible to frost damage and disease. Wait until shoots emerge in spring before applying supplemental fertilizer if your soil test indicated deficiencies.
Winter Protection Strategies
In most climates, established tulip beds require minimal winter protection once properly planted. The combination of soil insulation and mulch typically suffices. However, in zones 3 and colder where soil freezes deeply and temperatures plummet below -20°F, additional protection helps ensure survival.
In extremely cold regions, apply 4-6 inches of mulch after soil freezes, providing extra insulation against temperature extremes. Use materials that don’t compact heavily, such as evergreen boughs, straw, or shredded leaves. Avoid heavy clay mulches that retain moisture and promote rot.
Rodent protection becomes important in areas with voles or mice. These creatures tunnel through mulch searching for food and may damage bulbs. Hardware cloth buried around planting areas creates barriers against rodent access. Alternatively, use fine-mesh chicken wire laid horizontally over bulbs before covering with mulch.
In areas prone to winter flooding or excessive moisture, construct raised beds or mounds to ensure proper drainage. Poor drainage during winter dormancy causes bulb rot more reliably than cold temperatures. If your soil remains waterlogged through winter, consider growing tulips in constructing a raised garden beds elevated 12-18 inches above native soil.
Spring Emergence and Blooming
As spring arrives and soil temperatures warm, tulip shoots push through the mulch layer. Remove mulch gradually as growth accelerates, allowing foliage full access to sunlight. Early spring represents a critical period for nutrition; apply a balanced fertilizer or one formulated for bulbs when shoots reach 2-3 inches tall.
Water regularly during spring growth if rainfall remains scarce. Tulips need consistent moisture during the active growing season, but avoid waterlogging. Aim for 1 inch of water weekly from rainfall or irrigation. Drip irrigation or soaker hoses deliver water efficiently without wetting foliage.
As flower buds form and color develops, resist the urge to fertilize with high-nitrogen formulas that promote foliage at the expense of blooms. Phosphorus and potassium support flower development; use fertilizers with higher middle and last numbers (like 5-10-10) during the blooming phase.
Tulip blooms typically last 2-3 weeks, though longevity varies by variety and weather conditions. Cool, cloudy springs extend bloom duration, while warm, sunny weather shortens it. Protect blooms from strong winds by planting in sheltered locations or near garden arch trellis structures that provide windbreaks.
Enjoy fresh flower arranging tips by cutting tulips in early morning when stems are fully hydrated. Cut at an angle just above the lowest leaves, leaving at least two leaves on the plant to photosynthesize and support the bulb. Change vase water every 2-3 days and recut stems for extended vase life.
Post-Bloom Maintenance
After tulips finish blooming, resist the temptation to cut back foliage immediately. Leaves continue photosynthesizing and transferring energy to bulbs for next year’s growth. Allow foliage to remain until it yellows naturally, typically 5-6 weeks after bloom time. This extended foliage period determines whether bulbs develop adequately for reliable next-season blooms.
Deadhead spent flowers by pinching off the bloom head, leaving stems and leaves intact. This prevents seed development, which diverts energy from bulb storage. However, if you want tulips to self-seed and naturalize, leave a few flowers to set seed.
Continue watering during the post-bloom period if spring rains prove insufficient. Bulbs undergo rapid development during this phase, requiring consistent moisture and nutrients. Apply a low-nitrogen, phosphorus-rich fertilizer like 2-10-10 to support bulb maturation.
Once foliage completely yellows and dries, it can be cut back or removed. At this point, bulbs have entered dormancy. In most climates, leave tulip bulbs in the ground year-round if they’re hardy varieties in appropriate zones. However, in warm climates (zones 9-10), dig bulbs after foliage dies back and store them in cool, dry conditions over summer, replanting in late fall. This mimics natural dormancy cycles and prevents bulb degeneration.
To maintain tulip garden vigor for multiple years, incorporate garden mums and other fall bloomers into adjacent beds. This extends your color season and prevents the bare patch left when tulip foliage fades. Many gardeners interplant tulips with summer-blooming perennials that fill the space once tulip foliage is removed.
Apply a balanced fertilizer in fall after foliage completely dies back to replenish soil nutrients and support next year’s growth. Alternatively, incorporate a 1-2 inch layer of compost over the bulb bed each fall, gradually improving soil structure and nutrient content over multiple years.
FAQ
Can I plant tulip bulbs in spring instead of fall?
Spring planting generally fails because bulbs haven’t experienced adequate cold exposure. Tulips require vernalization—a prolonged cold period—to develop flowers properly. If you missed fall planting, pre-chill bulbs in a refrigerator for 12-16 weeks before spring planting, though results remain unpredictable. For reliable spring color, purchase pre-sprouted tulip plants from nurseries instead.
How long do tulips bloom in the garden?
Individual tulip flowers typically last 2-3 weeks, though the entire tulip garden can display color for 4-6 weeks when you plant early, mid, and late-season varieties. Cool spring weather extends bloom duration, while heat shortens it significantly. Planting in partial shade rather than full sun also prolongs blooming periods.
Do I need to dig up tulip bulbs each year?
In zones 3-8, hardy tulip varieties, especially Darwin Hybrids, reliably return for multiple years without digging. However, tulips gradually decline in vigor after the first year, producing smaller flowers. Many gardeners treat tulips as annuals, digging bulbs after foliage dies and composting them, then planting fresh bulbs each fall. Alternatively, dig every 2-3 years, divide bulblets, and replant to maintain vigor.
What causes tulips to fail to bloom?
Common causes include insufficient cold exposure (inadequate vernalization), improper planting depth, poor drainage causing bulb rot, and depleted soil nutrients. Overcrowding, shade conditions, and premature foliage removal also prevent flowering. Ensure bulbs receive 12-16 weeks of temperatures below 55°F, plant at correct depths in well-draining soil, and allow foliage to mature fully before removal.
Can I grow tulips in containers?
Yes, tulips thrive in containers filled with well-draining potting mix. Use containers at least 12 inches deep with drainage holes. Plant bulbs at the same depth as in-ground planting, spacing them closer together for massed displays. Water thoroughly after planting and maintain consistent moisture through fall and spring. Containers freeze more severely than in-ground beds; in cold climates, insulate pots with mulch or move them to protected locations during extreme cold.
Are tulips toxic to pets?
Tulip bulbs contain compounds that can cause gastrointestinal upset in cats and dogs if ingested. All parts of the plant, especially bulbs, may cause vomiting, diarrhea, or drooling. Prevent pet access by planting in fenced areas or using protective fencing around beds. If your pet ingests tulips, contact your veterinarian or poison control immediately.
How do I prevent tulip disease and pest problems?
Proper cultural practices prevent most issues: ensure excellent drainage to prevent bulb rot, space bulbs adequately for air circulation, avoid overhead watering that promotes fungal diseases, and remove fallen leaves and debris. Inspect bulbs before planting and discard any showing signs of rot or disease. In problem areas, apply fungicide treatments according to product directions. Rodent barriers protect bulbs from vole and mouse damage during winter dormancy.