Can You Grow Candy Blossoms? Pro Tips Inside
Candy blossoms, scientifically known as Gomphocarpus physocarpus (also called balloon plant or love-in-a-puff), are a delightful addition to any garden space. These charming plants produce delicate flowers followed by distinctive balloon-like seed pods that truly capture the imagination of gardeners and visitors alike. While they don’t produce actual candy, their whimsical appearance and ease of cultivation make them a favorite among both novice and experienced growers seeking something unique and conversation-starting for their outdoor spaces.
Growing candy blossoms successfully requires understanding their basic needs: warm temperatures, well-draining soil, adequate sunlight, and consistent moisture during the growing season. The good news is that these plants are remarkably forgiving and adapt well to various growing conditions, making them an excellent choice for gardeners of all skill levels. Whether you’re planning to grow them in traditional garden beds, containers, or as part of a decorative landscape design, this comprehensive guide will walk you through everything you need to know.
Understanding Candy Blossoms and Their Growing Requirements
Candy blossoms are tender perennials typically grown as annuals in most climates. These plants thrive in warm conditions and cannot tolerate frost, making them perfect for spring and summer gardening. Native to southern Africa, they’ve adapted to warm, sunny environments with moderate water availability. Understanding these origins helps explain their preferences and growing patterns.
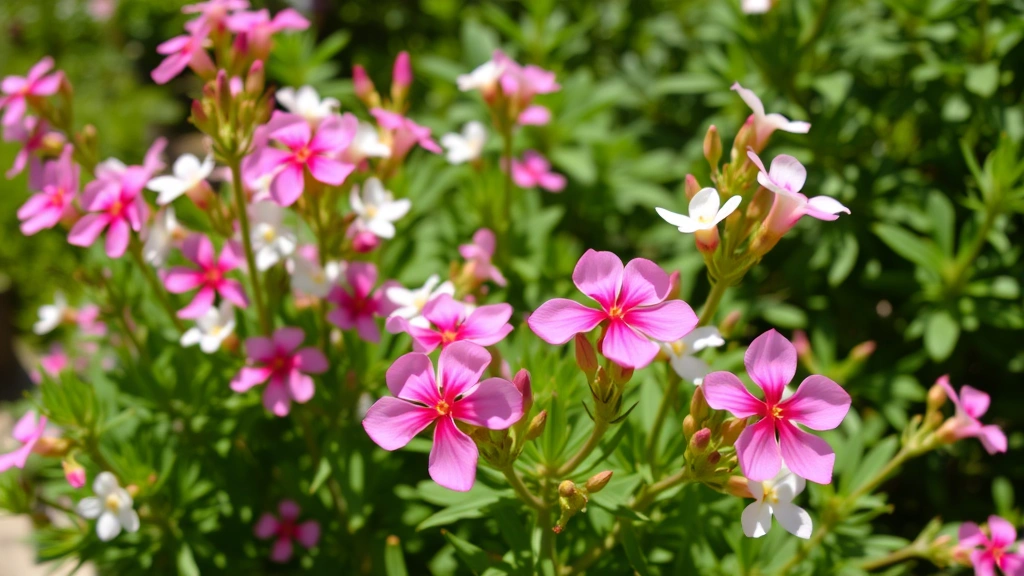
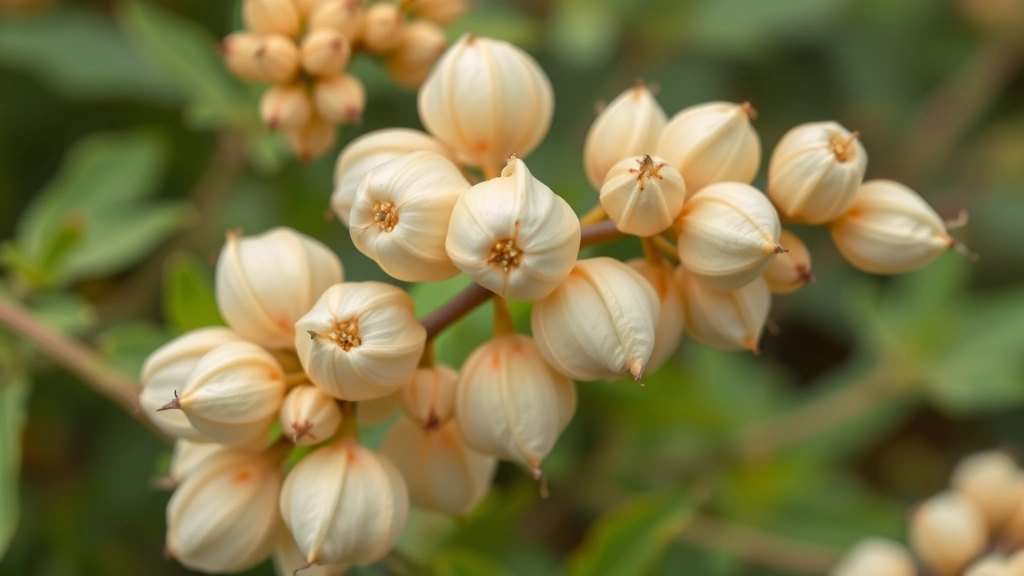
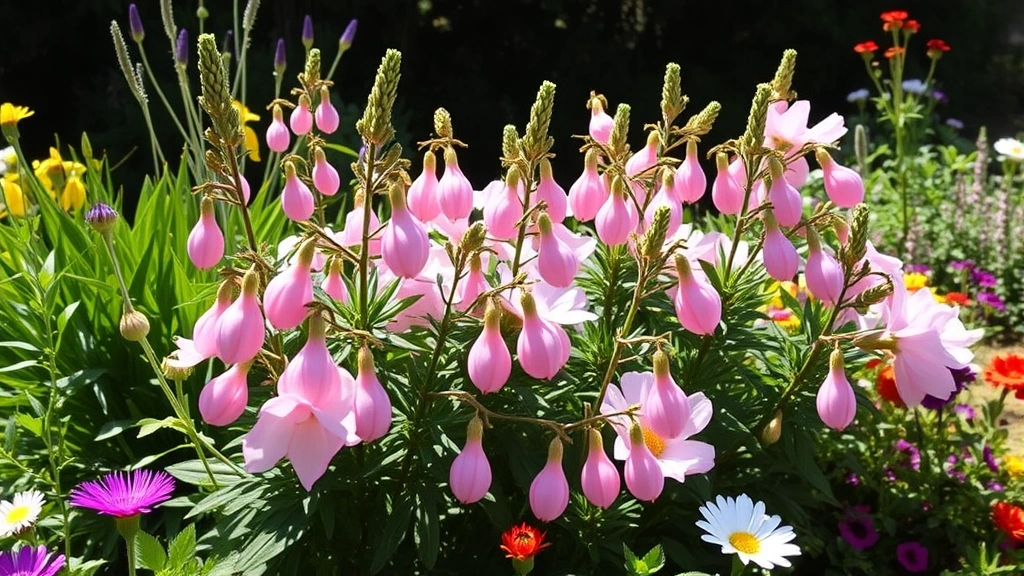
The plant typically reaches 2 to 3 feet in height, producing small pink, white, or pale purple flowers that appear throughout the growing season. However, the real showstopper comes after flowering—the distinctive papery balloon-like seed pods that develop are what give the plant its common names. These pods can be harvested fresh for decorative arrangements or left on the plant to mature and eventually release seeds for propagation.
When planning your candy blossom garden, consider your climate zone and growing season length. In most regions, you’ll want to start seeds indoors 6-8 weeks before your last frost date. This timing ensures mature, flowering plants by mid-summer. If you’re located in warmer zones (USDA zones 10-11), you might direct sow seeds outdoors after all danger of frost has passed. Understanding your local frost dates and growing season is crucial for success.
These plants prefer full sun exposure—at least 6-8 hours of direct sunlight daily produces the most robust growth and prolific flowering. In extremely hot climates, some afternoon shade can prevent heat stress, but this should be minimal. The plants are relatively drought-tolerant once established, though consistent moisture during active growth produces better results.
Starting Seeds and Initial Growth
Starting candy blossom seeds indoors is straightforward and highly successful. Begin by filling seed trays or small pots with high-quality seed-starting mix. Moisten the medium thoroughly before sowing to ensure good seed-to-soil contact. Candy blossom seeds are tiny, so handle them carefully and distribute them thinly across the soil surface. Rather than burying them, simply press seeds gently into the moist medium—they require light to germinate and should not be covered with soil.
Place your seed trays in a warm location with temperatures between 70-75°F (21-24°C). A heating mat under the trays significantly improves germination rates. Keep the soil consistently moist but never waterlogged, as this encourages fungal issues. Most seeds will germinate within 7-14 days, though some may take up to three weeks. Once seedlings emerge, provide bright light—ideally from grow lights positioned 2-3 inches above the seedlings. Without adequate light, seedlings become leggy and weak.
As your seedlings develop their first true leaves, thin them to prevent overcrowding. Space seedlings at least 1-2 inches apart to allow air circulation and reduce disease risk. When seedlings have developed 3-4 true leaves, begin a diluted fertilizer regimen using a balanced, water-soluble fertilizer at half strength every two weeks. This promotes sturdy growth without excessive vegetative development at the expense of flowering later.
Harden off seedlings gradually before transplanting outdoors. Begin this process 7-10 days before your intended planting date by placing seedlings in a sheltered outdoor location for a few hours daily. Gradually increase outdoor exposure over a week, allowing plants to acclimate to wind, direct sun, and temperature fluctuations. This critical step prevents transplant shock and ensures successful establishment in the garden.
Soil Preparation and Garden Setup
Candy blossoms perform best in well-draining soil with a slightly acidic to neutral pH (6.0-7.0). Poor drainage is the primary cause of problems with these plants, often leading to root rot and fungal issues. If your garden soil tends to be heavy or clay-based, amend it generously with compost, peat moss, or coconut coir to improve drainage. Creating raised garden beds is an excellent solution that guarantees superior drainage and allows you to control soil composition completely.
When preparing your planting area, incorporate 2-3 inches of well-rotted compost or aged manure into the top 8-10 inches of soil. This improves soil structure, adds essential nutrients, and promotes beneficial microbial activity. If you’re growing in containers, use a high-quality potting mix rather than garden soil—potting mixes are specifically formulated for drainage and aeration in container environments. A 5-gallon container accommodates a single plant nicely, while larger containers can hold multiple plants spaced 12-18 inches apart.
Consider your overall garden layout when positioning candy blossoms. These plants work beautifully in mixed flower borders, cottage gardens, or as standalone focal points. Their height (2-3 feet) makes them suitable for mid-border placement where they won’t shade shorter plants. The delicate foliage and flowers provide an airy quality that complements bolder, more substantial plants. If you’re creating a formal garden structure with garden arches or trellises, candy blossoms can be trained as climbers with gentle support, creating elegant vertical interest.
Space transplants 18-24 inches apart to allow mature plants room to develop their full form. Closer spacing creates a fuller, more densely planted appearance but may reduce air circulation. Wider spacing allows individual plants to develop into attractive specimens. The choice depends on your design goals and the overall aesthetic you’re trying to achieve in your garden space.
Watering, Feeding, and Seasonal Care
Establishing proper watering practices is essential for candy blossom success. While these plants tolerate some drought once established, consistent moisture during the growing season produces superior results. Water deeply when the top inch of soil feels dry to the touch. In hot weather, this may mean daily watering, while cooler periods require less frequent irrigation. Water at the base of plants early in the morning to minimize foliar wetness and reduce disease pressure.
Fertilization should be moderate and balanced. Over-fertilizing, particularly with high-nitrogen formulations, promotes excessive vegetative growth at the expense of flowers. Apply a balanced, water-soluble fertilizer (such as 10-10-10) every 3-4 weeks during the active growing season. Alternatively, incorporate a slow-release fertilizer into the soil at planting time, which provides consistent nutrition throughout the season without additional applications. Organic gardeners appreciate fish emulsion or seaweed extracts, which provide gentle nutrition and beneficial micronutrients.
Deadheading—removing spent flowers—encourages continuous blooming throughout the season. As flowers fade, pinch them off just below the flower head. This prevents the plant from directing energy into seed production and instead stimulates the development of new flower buds. However, if you’re saving seeds for future growing seasons, allow some flowers to mature into their distinctive seed pods rather than deadheading everything.
Pruning is minimal but beneficial. In mid-summer, if plants become leggy or overly tall, pinch back the growing tips to encourage bushier, more compact growth. This creates fuller plants with more flowering sites. Avoid heavy pruning, as candy blossoms don’t respond well to severe cutting back.
Monitor plants throughout the season for signs of stress, pest damage, or disease. Healthy candy blossoms are vigorous and resilient, but early intervention prevents minor issues from becoming major problems. Keep detailed notes about watering schedules, fertilizer applications, and plant performance—this information proves invaluable for improving results in future seasons.
Managing Pests and Common Problems
Candy blossoms are relatively pest-resistant, but several common garden insects may occasionally cause problems. Spider mites thrive in hot, dry conditions and can cause stippling on leaves and fine webbing on foliage. Increase humidity by misting plants lightly in the morning, and ensure adequate watering to prevent drought stress. Neem oil or insecticidal soap effectively controls spider mites when needed.
Whiteflies sometimes infest candy blossoms, particularly in warm climates. These tiny insects cluster on leaf undersides and cause yellowing foliage. Yellow sticky traps effectively monitor and control small populations. For larger infestations, insecticidal soap or neem oil provides control. Encourage beneficial insects like ladybugs and parasitic wasps, which naturally predates whiteflies and other soft-bodied pests.
Fungal diseases, particularly powdery mildew and leaf spot, occur when foliage remains wet for extended periods. Prevent these issues by watering at the base of plants rather than overhead, providing adequate air circulation, and avoiding working with wet plants. If fungal issues appear, remove affected leaves and apply a fungicide suitable for vegetable and ornamental gardens. Sulfur-based products work well for powdery mildew, while copper fungicides address leaf spot diseases.
Root rot represents the most serious threat to candy blossoms and occurs almost exclusively in poorly draining soil. Prevention is far easier than treatment—ensure excellent drainage through soil amendment, raised beds, or container growing. If you suspect root rot, inspect the roots. Healthy roots are white or light tan and firm. Rotted roots appear dark brown or black and feel mushy. Unfortunately, severely affected plants cannot be saved, but improved drainage prevents recurrence in future plantings.
Nutrient deficiencies occasionally appear, typically manifesting as yellowing leaves or pale foliage. Iron chlorosis (yellowing between leaf veins while veins remain green) suggests iron deficiency, often related to overly alkaline soil. Apply chelated iron products or acidify soil with sulfur. Nitrogen deficiency causes overall pale, stunted growth—address this with balanced fertilizer applications. Consistent care and appropriate fertilization prevent most nutrient problems.
Harvesting Seeds for Future Growing Seasons
One of the most rewarding aspects of growing candy blossoms is harvesting seeds for next year’s garden. The distinctive balloon-like seed pods are actually the ripening fruit containing numerous seeds. Allow some flowers to remain on the plant rather than deadheading everything. As pods mature, they change from green to pale tan or beige and become papery and translucent.
When pods feel dry and papery, typically 6-8 weeks after flowering, harvest them by snipping the stems with clean scissors. Place pods in a paper bag or envelope in a warm, dry location for 1-2 weeks. The pods will split open naturally as they continue drying, releasing small, flat seeds. Alternatively, carefully open mature pods by hand and collect seeds directly.
Once harvested, store seeds in an airtight container in a cool, dry location. A refrigerator or cool closet works well. Properly stored candy blossom seeds remain viable for 2-3 years, allowing you to build a seed bank for future seasons. Label your seed containers clearly with the variety name and harvest date. If you’re planning to establish garden beds exclusively with candy blossoms or to create a seed business selling to other gardeners, maintaining detailed records of seed quality, germination rates, and plant performance becomes essential.
Creating a seed account for selling requires careful attention to seed quality, germination testing, and proper storage. Test germination rates before marketing seeds—sow a sample of 10-20 seeds and record the percentage that germinate within the normal timeframe. This information helps customers understand what to expect. Package seeds in small envelopes with clear planting instructions and germination information. Many gardeners appreciate knowing the germination percentage and expected germination timeline. Store inventory in cool conditions and rotate stock regularly, selling older seeds first.
Building a reputation as a quality seed supplier requires consistency and reliability. Respond promptly to customer inquiries, provide accurate product descriptions, and ensure seeds are properly packaged to prevent damage during shipping. Include growing instructions with every order—this supports customer success and generates positive reviews. Consider offering varieties with unique characteristics, such as seeds from particularly vigorous plants, exceptional bloomers, or plants with unusual pod coloration.
FAQ
How long do candy blossoms take to flower from seed?
Most candy blossom plants flower within 60-90 days from seed, depending on light, temperature, and growing conditions. Starting seeds indoors in late winter ensures flowering plants by mid to late summer. Direct sowing outdoors after frost danger passes results in flowering by late summer or early fall.
Can candy blossoms survive winter outdoors?
In USDA zones 10-11, candy blossoms may survive mild winters and regrow from the roots. In colder zones, they are killed by frost. Many gardeners treat them as annuals, replanting each spring. If you want to preserve plants, dig them before the first frost, pot them up, and overwinter indoors in a bright, cool location with minimal watering.
Do candy blossoms need support or staking?
Most candy blossoms grow as bushy, self-supporting plants without staking. However, in windy locations or when grown in containers, light staking with twine or small stakes prevents wind damage. Some gardeners train plants as climbers on trellises or garden structures, which requires gentle tying to supports as the plant grows.
What’s the best fertilizer for candy blossoms?
Balanced, water-soluble fertilizers (10-10-10 or 5-5-5) work well for candy blossoms. Apply every 3-4 weeks during the growing season. Avoid high-nitrogen fertilizers, which promote excessive foliage at the expense of flowers. Slow-release granular fertilizers provide consistent nutrition with minimal application effort.
Can you grow candy blossoms in containers?
Yes, candy blossoms thrive in containers, making them excellent for patios, balconies, and small spaces. Use 5-gallon containers with drainage holes filled with high-quality potting mix. Container plants may require more frequent watering than in-ground plants, particularly in hot weather. Feed every 2-3 weeks with diluted liquid fertilizer, as frequent watering leaches nutrients from container soil.
Are candy blossoms edible?
Despite their whimsical common name, candy blossoms are not edible. The flowers and seed pods are purely ornamental and decorative. Never consume any part of the plant, as the safety of ingestion has not been established.
How do you propagate candy blossoms from cuttings?
While candy blossoms propagate easily from seed, propagation from cuttings is possible but less reliable. Take 3-4 inch cuttings from new growth in spring, dip in rooting hormone, and place in moist potting mix under humid conditions. Provide bright, indirect light and maintain consistent moisture. Rooting typically occurs within 2-3 weeks, though success rates are lower than with seed propagation.
Why aren’t my candy blossoms flowering?
Insufficient light is the most common cause of poor flowering. Ensure plants receive at least 6-8 hours of direct sunlight daily. Excessive nitrogen fertilizer also inhibits flowering—switch to balanced or slightly phosphorus-heavy formulations. Inconsistent watering, extreme temperatures, or pest damage may also reduce flowering. Mature, healthy plants typically flower prolifically with proper care.


