
DIY Garden Stepping Stones: Expert Guide to Creating Beautiful Pathways
Garden stepping stones are more than just functional elements—they’re the bones of your landscape design that guide visitors through your outdoor space while protecting your plants from foot traffic. Whether you’re starting a flower garden or enhancing an established landscape, properly installed stepping stones create defined pathways that prevent soil compaction and plant damage. These versatile hardscape features work beautifully in gardens of all sizes, from intimate cottage gardens to sprawling suburban landscapes.
Creating your own garden stepping stones is an achievable DIY project that saves money compared to purchasing pre-made options and allows complete creative control over design, size, and placement. With basic materials, simple tools, and a few hours of work, you can craft custom stepping stones that complement your garden’s aesthetic while improving accessibility and protecting your precious plantings. This comprehensive guide walks you through every step of the process, from material selection through installation, ensuring your finished pathways are both beautiful and durable.
Choosing Your Stepping Stone Materials
The material you select for your garden stepping stones dramatically impacts durability, appearance, and installation difficulty. Each option offers distinct advantages depending on your climate, budget, and aesthetic preferences. Understanding these differences ensures you choose the right solution for your specific garden conditions.
Concrete is the most popular DIY choice because it’s affordable, customizable, and relatively simple to work with. You can create uniform stones or artistic designs using molds and pigments. Concrete stepping stones typically last 15-20 years with proper installation and maintenance, making them an economical long-term investment. The material handles freeze-thaw cycles reasonably well when properly sealed, though it can develop hairline cracks over time in harsh climates.
Natural stone including flagstone, slate, and granite offers timeless beauty and exceptional durability. These materials can last 30+ years and develop attractive patinas as they age. However, natural stone requires more careful installation due to irregular shapes and higher weight. Slate provides excellent slip resistance when wet, making it ideal for areas near water features or in regions with frequent rain.
Recycled materials like reclaimed bricks, pavers, and wood rounds offer eco-friendly alternatives with unique character. These options work wonderfully in cottage gardens and rustic settings. Wood rounds require regular treatment to prevent rot and typically last 5-10 years depending on climate and wood species. Oregon State University Extension provides excellent guidance on treating wood stepping stones for longevity.
Permeable pavers made from recycled plastic or porous concrete allow water drainage, reducing puddle formation and supporting soil health. These eco-conscious options work particularly well if you’re building a raised garden bed or creating sustainable landscape designs.
Essential Tools and Supplies
Gathering the right tools before starting ensures smooth progress and professional-quality results. Your specific tool list depends on which stepping stone method you choose, but most DIY projects require basic equipment you may already own.
For concrete stepping stones:
- Concrete mix (bags or bulk)
- Water source and measuring container
- Mixing tools (wheelbarrow or large bucket)
- Molds (plastic containers, silicone molds, or DIY wooden frames)
- Trowel for smoothing surfaces
- Safety equipment (gloves, dust mask, eye protection)
- Release agent (cooking oil or commercial mold release)
- Optional: concrete colorant, pigments, or decorative elements
For natural stone installation:
- Gravel or sand base material
- Landscape fabric
- Rubber mallet for setting stones
- Level for checking grade
- Shovel and spade
- Measuring tape and string
- Dust mask and work gloves
Universal tools for all methods:
- Garden spade and edging tools
- Measuring tape (25-foot minimum)
- String line for marking pathways
- Work gloves and safety glasses
- Wheelbarrow for material transport
Investing in quality tools makes the work safer and more enjoyable. Borrow or rent specialized equipment like concrete mixers if you’re creating multiple stones, reducing physical strain and saving time.
Concrete Stepping Stone Method
The concrete approach is ideal for beginners because it requires minimal special skills and produces uniform, durable results. Creating custom concrete stepping stones takes approximately 30 minutes per stone, plus curing time.
Step 1: Prepare Your Molds
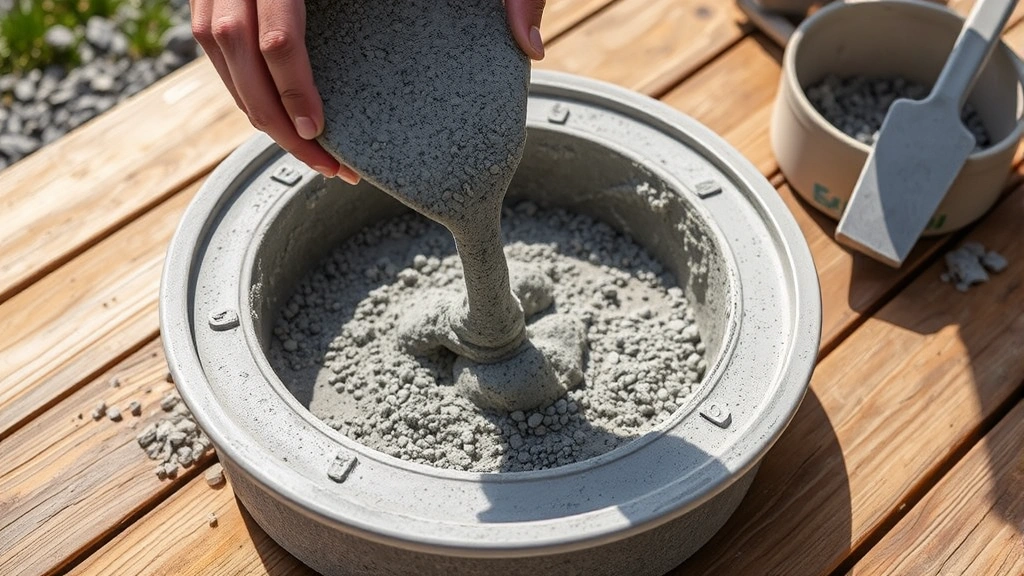
Select molds that create stepping stones 12-18 inches in diameter and 1.5-2 inches thick. Plastic molds designed for this purpose work beautifully, or create custom molds using wooden frames and scrap lumber. Coat molds with release agent to prevent concrete from sticking. This step is crucial—improper release often ruins stones or makes removal difficult.
Step 2: Mix Your Concrete
Follow package instructions for mixing concrete. A typical ratio is one part cement to three parts sand and gravel, but pre-mixed bags simplify the process. Mix thoroughly until the consistency resembles thick peanut butter. Add concrete colorant now if you want tinted stones. Work in manageable batches—you’ll have about 30 minutes before concrete begins setting.
Step 3: Fill Molds and Remove Air Pockets
Pour concrete into molds and gently tap the sides with a rubber mallet to release trapped air bubbles. Overfill slightly, then smooth the top with a trowel. For decorative stones, press glass pieces, stones, or shells into the surface now. Allow the concrete to set for 24-48 hours before removing molds.
Step 4: Cure Properly
Concrete reaches 90% strength after 7 days but continues strengthening for 28 days. Keep newly removed stones moist during the first week by misting them lightly. This slow cure process produces stronger, more durable stepping stones than rapid drying.
Once fully cured, apply a concrete sealer to protect against moisture penetration, freeze-thaw damage, and staining. Reapply sealer every 2-3 years for optimal protection.
Natural Stone and Slate Options
Natural stone stepping stones offer unmatched beauty and longevity, though installation requires more precision than concrete. The irregular shapes and varying thicknesses demand careful site preparation and leveling.
Selecting Natural Stone
Visit stone suppliers to examine options in person—photos don’t capture the subtle color variations and texture that make natural stone special. Slate offers excellent slip resistance and durability, while flagstone provides elegant, irregular surfaces that create organic-looking pathways. Granite is the most durable but also the heaviest, requiring significant physical effort during installation.
Preparing the Base
Proper base preparation determines stepping stone longevity. Remove existing vegetation and soil to a depth of 3-4 inches. Lay landscape fabric to suppress weeds, then add 2-3 inches of gravel or coarse sand. This base provides drainage and allows for stone settling without creating mud or water pooling problems.
Setting Stones
Place each stone on the prepared base and test its stability by pressing down firmly. Use a rubber mallet to gently tap stones level, checking frequently with a carpenter’s level. Stones should sit firmly without rocking. Fill gaps beneath stones with additional sand, then add fine sand or polymeric sand between stones for a finished appearance. University of New Hampshire provides detailed guidance on stone pathway installation.
Spacing and Walkability
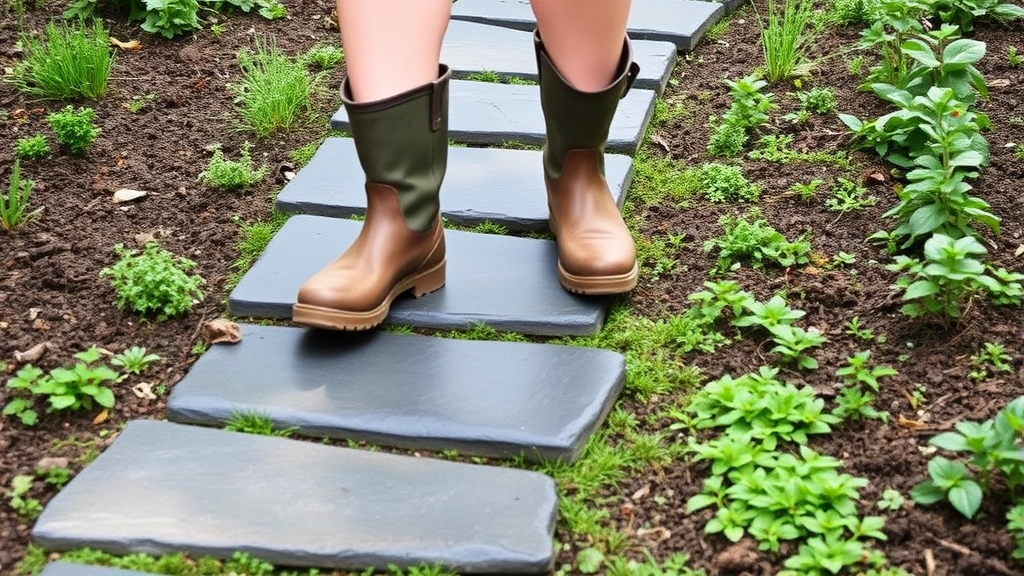
Space stepping stones 12-18 inches apart (center to center) to accommodate average stride length. Test your spacing by walking the pathway in your normal gait—adjust as needed for comfort. Proper spacing prevents stepping awkwardly while protecting plants on either side of the path.
Design and Placement Strategies
Strategic placement transforms stepping stones from purely functional elements into design features that enhance your landscape’s visual flow and usability.
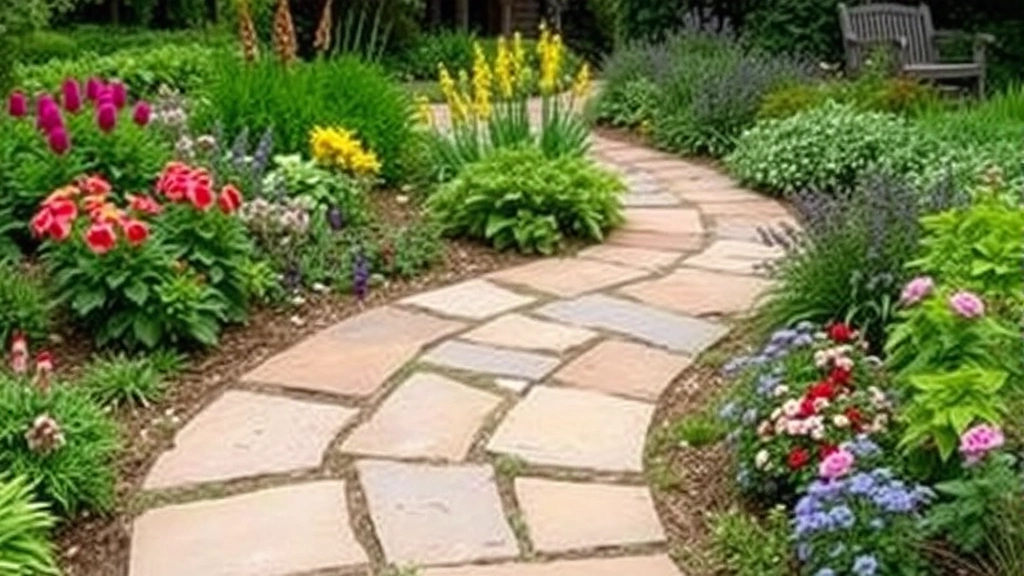
Creating Curved Pathways
Curved paths feel more organic and natural than straight lines, encouraging leisurely strolls through your garden. Use a garden hose to lay out curves before placing stones—this helps you visualize the final effect and make adjustments easily. Gentle curves work best; avoid sharp angles that feel awkward to navigate.
Connecting Garden Spaces
Link your container gardens and raised beds with stepping stones that create logical traffic patterns. Pathways should lead naturally from entry points to focal areas like benches, water features, or specimen plants. This intentional design guides visitors while protecting your plantings from trampling.
Integrating with Landscape Features
Position stepping stones to complement existing elements. Create pathways that loop around trees, border flower beds, or lead to hidden seating areas. Stepping stones work beautifully in herb gardens, where they allow easy harvesting without compacting soil around plants. In vegetable gardens, pathways reduce soil disturbance and make harvesting more accessible.
Considering Sight Lines and Focal Points
Design pathways that reveal garden features gradually. A winding path that disappears around a corner creates anticipation and makes smaller gardens feel larger. Position stepping stones to draw attention to ornamental elements or create vistas toward focal points.
Installation and Finishing
Proper installation ensures stepping stones remain stable, level, and attractive for years. Rushing this process often leads to problems like shifting stones or water pooling.
Site Preparation
Mark your pathway using string and stakes, then remove all vegetation and debris. For concrete stones, you can place them directly on compacted soil if the area drains well. For natural stone, create the prepared base described earlier. Check that the pathway slopes slightly (1/8 inch per foot) for water drainage, preventing puddle formation.
Placement Technique
Work methodically from one end to the other, ensuring each stone sits firmly before moving to the next. Test stability by applying downward pressure—stones shouldn’t rock or shift. Use sand or gravel to shim stones level if needed. Take your time with this step; rushing leads to uneven pathways that look unprofessional and feel unsafe to walk.
Finishing Touches
Fill gaps between stones with sand, fine gravel, or polymeric sand. Polymeric sand hardens when wet, creating a more permanent joint that prevents weed growth. For natural stone, consider adding decorative elements like pebbles in contrasting colors to create visual interest. Edge the pathway with low plants like creeping thyme or sedum for a finished appearance that softens hard lines.
Maintenance and Longevity
Regular maintenance keeps stepping stones beautiful and safe while extending their lifespan significantly. A few simple practices prevent common problems and preserve your investment.
Cleaning
Remove leaves, debris, and moss regularly using a stiff brush or pressure washer on low setting. Moss and algae growth occurs naturally in moist, shaded areas—this is normal and doesn’t indicate problems. However, slippery surfaces become safety hazards, so clean stepping stones in damp climates regularly. Avoid harsh chemicals that damage stone or harm nearby plants.
Sealing
Concrete stepping stones benefit from sealing every 2-3 years. Penetrating sealers protect against moisture penetration and freeze-thaw damage without altering appearance. Natural stone typically doesn’t require sealing unless you want to darken colors or provide additional protection in harsh climates.
Addressing Settling and Shifting
Over time, stepping stones may settle unevenly due to soil movement or frost heave. Inspect pathways annually and reset any rocking stones immediately. Add sand underneath to shim stones level—this is much easier than removing and relaying entire sections.
Seasonal Considerations
In cold climates, concrete stepping stones can crack if water enters and freezes. Ensure proper base preparation and sealing to minimize this risk. Remove ice carefully using salt alternatives designed for stone surfaces—rock salt damages both concrete and natural stone over time. In warm climates, stepping stones may shift due to ground movement; check them after heavy rains or during drought cycles.
When planning garden features, remember that well-maintained stepping stones provide decades of service. Your initial effort in proper installation and basic maintenance pays dividends through years of enjoyable garden use.
FAQ
How much does it cost to make DIY garden stepping stones?
Concrete stepping stones cost approximately $2-5 per stone in materials (concrete, molds, colorants). A 20-stone pathway costs $40-100 in materials plus your time. Natural stone costs more—typically $10-20 per stone depending on type and size—but lasts longer. Recycled materials like reclaimed bricks cost $0-3 per stone if sourced from salvage yards.
What’s the best size for garden stepping stones?
Stepping stones should be 12-18 inches in diameter or width for comfortable stepping. Larger stones (18-24 inches) work well in formal gardens, while smaller stones create more delicate pathways. Consider your own stride length when deciding—walk the proposed pathway in your normal gait to ensure comfortable spacing.
Can I make stepping stones in winter?
Concrete requires temperatures above 50°F to cure properly. Avoid pouring concrete in freezing weather or when temperatures will drop below 50°F during the 48-hour curing period. Natural stone installation works in any season but is more pleasant in moderate weather. Winter is ideal for planning and gathering materials.
How long do concrete stepping stones last?
Properly sealed concrete stepping stones typically last 15-20 years in temperate climates. In harsh freeze-thaw regions, durability decreases to 10-15 years. Natural stone lasts 30+ years with minimal maintenance. Lifespan depends heavily on base preparation, sealing, and climate conditions.
Should stepping stones be level or slightly sloped?
Stepping stones should slope slightly (1/8 inch per foot) for water drainage. Perfectly level stones trap water, creating puddles and promoting algae growth. Gentle slopes are barely perceptible to walk on but significantly improve drainage and safety.
Can I install stepping stones over existing grass?
Remove grass and soil before installing stepping stones. Placing stones directly on grass compresses it, creating dead patches and uneven surfaces. Proper base preparation (removing vegetation, adding gravel) ensures stable, long-lasting results. This extra effort prevents problems down the road.
What’s the best material for shady, damp garden areas?
Slate and other natural stone work best in damp conditions because they’re naturally slip-resistant even when wet. Ensure excellent drainage by creating proper base layers. In very shady areas, moss and algae grow readily on any surface—clean regularly and consider adding shade-tolerant groundcovers alongside the pathway for visual interest.