

DIY Garden Shed Plans: A Comprehensive Architect’s Guide to Building Your Dream Garden Storage
A garden shed serves as the heart of any serious gardener’s operation. Whether you’re storing tools, seeds, fertilizers, or creating a potting station for your raised garden bed projects, having a well-organized, weatherproof structure transforms your gardening experience. This comprehensive guide walks you through professional-grade garden shed plans that you can build yourself, combining architectural principles with practical gardening needs.
Building a garden shed requires more than just hammering boards together. You need to understand structural integrity, drainage, ventilation, and how your shed will integrate with your overall garden layout. Whether you’re a seasoned carpenter or a determined beginner, these plans provide the foundation for creating a functional garden storage solution that will serve you for decades.

Foundational Design Principles for Garden Sheds
Before you purchase a single board, understanding the architectural fundamentals of garden shed design ensures your structure will be both beautiful and durable. The most critical principle is proper weight distribution. Your shed must support not only its own weight but also the tools, equipment, and supplies you’ll store inside. Most gardeners underestimate the total weight they’ll accumulate—a typical garden shed can hold several hundred pounds of equipment when fully stocked.
Building codes and setback requirements vary by location, so consulting your local planning department should be your first step. Many jurisdictions require sheds to be positioned a certain distance from property lines, and some require permits for structures above a specific size. Check these regulations before finalizing your site plan.
The orientation of your shed matters significantly. Position the door entrance facing away from prevailing winds to reduce drafts and weather exposure. If possible, orient the roof ridge to run north-south, which helps with ventilation and reduces temperature extremes inside. This consideration becomes particularly important if you plan to use your shed as a potting station for growing vegetables in containers.
Site Selection and Preparation
The location you choose for your garden shed determines its longevity and functionality. Avoid low-lying areas where water pools after rain—proper drainage is absolutely essential. Your shed should sit on well-draining ground or, ideally, elevated slightly above the surrounding terrain. Standing water creates rot, rust, and pest problems that will compromise your structure within years.
Assess sunlight exposure carefully. While you want some air circulation, constant direct sunlight causes wood deterioration and makes the interior unbearably hot during summer months. A location with morning sun but afternoon shade is ideal. Additionally, position your shed where it’s easily accessible from your main gardening areas, reducing the distance you must carry tools and supplies.
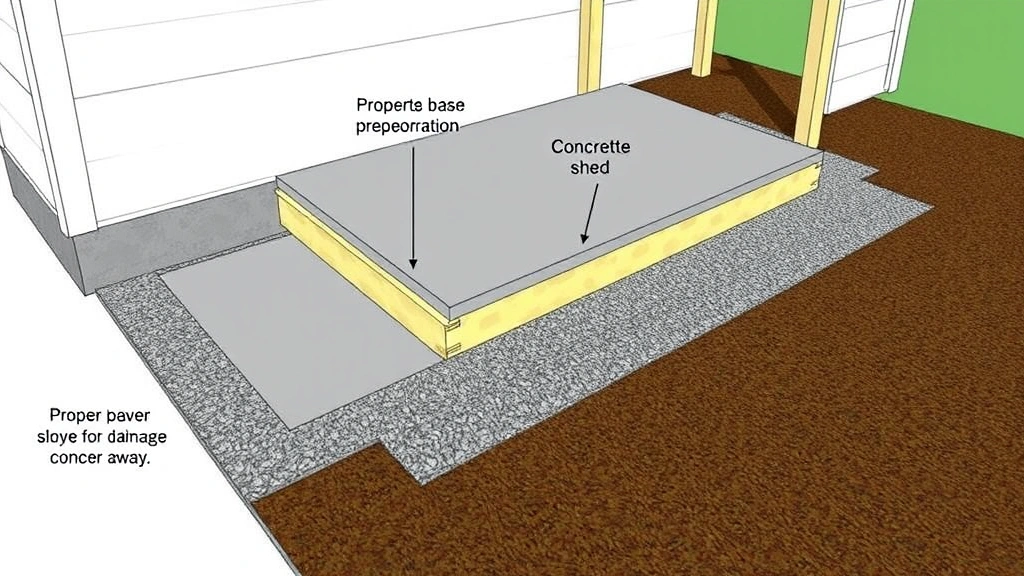
Prepare your foundation before construction begins. The most common foundation options include:
- Concrete pads: Pour concrete footings at the four corners and center points. This provides excellent drainage and prevents ground moisture from affecting wooden posts.
- Gravel base: A 4-6 inch layer of compacted gravel creates drainage while being more budget-friendly than concrete.
- Pressure-treated skids: Laying pressure-treated lumber directly on the ground works for smaller sheds, though it requires more frequent maintenance.
- Concrete slab: The most expensive option but provides the best long-term protection and allows for a smooth interior floor.
Remove all vegetation and level the ground thoroughly. Uneven ground causes structural stress and water pooling. Use a level to verify your foundation is true before beginning construction.
Choosing the Right Shed Size and Style
Garden shed size should match your actual storage needs, not just your budget. Undersizing is the most common mistake gardeners make. Take inventory of everything you need to store—tools, pots, herb garden supplies, seasonal equipment, and any furniture or potting benches. Add 30% more space than you think you need, as gardens expand over time.
Standard sizes include 8×10, 10×12, and 12×16 feet, with 10×12 being the most popular choice for serious gardeners. This size provides enough room for tool storage, a small potting bench, and supplies without being overwhelming to construct or maintain.
Style considerations should align with your home’s architecture. Common styles include:
- Traditional A-frame: Classic peaked roof design that sheds water effectively and allows loft storage
- Saltbox style: Asymmetrical roof with more headroom on one side, ideal for workbenches
- Modern flat-roof: Contemporary appearance with easier construction but requires careful drainage management
- Gambrel roof: Barn-style with maximum interior vertical space
The roof style you choose affects both aesthetics and functionality. Pitched roofs (A-frame or saltbox) shed water more effectively and allow snow to slide off. Flat roofs require excellent waterproofing and drainage systems but provide usable roof space for solar panels or additional storage.
Essential Materials and Tools
Successful garden shed construction requires quality materials that withstand outdoor conditions. For a typical 10×12 foot shed, budget approximately $1,500-$3,000 in materials, depending on finish quality and whether you’re adding electricity or plumbing.
Structural materials:
- Pressure-treated lumber for all ground-contact framing (2×4, 2×6, 2×8 depending on span)
- Cedar or treated wood for siding—cedar resists rot naturally and ages beautifully
- Quality roofing material: asphalt shingles (budget-friendly), metal roofing (durable), or cedar shakes (premium)
- Concrete or gravel for foundation
- Fasteners: galvanized or stainless steel nails and screws to prevent rust
Tools you’ll need:
- Circular saw or miter saw for cutting lumber
- Power drill with driver bits
- Level and measuring tape
- Roofing nailer or hammer
- Square for checking angles
- Ladder or scaffolding
- Safety equipment: gloves, eye protection, dust masks
Renting specialized tools like nail guns, table saws, or roofing equipment is more economical than purchasing if this is your first major project.
Step-by-Step Construction Process
The construction sequence matters. Building your shed in the correct order prevents costly mistakes and ensures structural integrity.
Phase 1: Foundation and Floor Frame
Begin with your foundation system. If using concrete pads, allow 48 hours for curing before proceeding. Install pressure-treated rim joists around the perimeter, then add floor joists spaced 16 inches on center. The floor frame should be perfectly level—use shims under joists to achieve this. For a 10×12 shed, you’ll typically need 8-10 floor joists. Once the frame is secure and level, install subflooring with exterior-grade plywood, staggering joints for maximum strength.
Phase 2: Wall Framing
Construct walls on a flat surface before raising them into position. Lay out your wall studs 16 inches on center with headers above door and window openings. For a standard 8-foot wall height, use 2×4 studs with doubled top and bottom plates. After building each wall, raise it carefully into position and brace it temporarily. Connect walls with corner posts and install diagonal bracing to prevent racking (twisting).
Phase 3: Roof Framing
Install the top plate and begin roof framing. For an A-frame design with a 6/12 pitch (rises 6 inches per 12 inches of horizontal run), calculate rafter lengths using the Pythagorean theorem or consult framing tables. Space rafters 16 or 24 inches on center depending on your roof loading requirements. Add collar ties every third rafter pair to prevent spreading. Install plywood roof sheathing once the rafter structure is complete and braced.
Phase 4: Exterior Cladding
Install roofing material first, working from the bottom up. Apply roofing felt or synthetic underlayment, then shingles or metal panels, ensuring proper overlap for water shedding. Next, apply siding to walls. Cedar boards, vinyl, or metal panels all work well—ensure all fasteners are galvanized or stainless steel. Install corner trim and flashing around openings to direct water away from the structure.
Phase 5: Windows, Doors, and Interior
Install windows high on walls to maximize natural light while minimizing heat gain. Add shelving, workbenches, and hooks for tools. Consider installing storage solutions for garden accessories like hooks for gloves and aprons. Proper interior organization separates successful gardeners from frustrated ones.
Interior Organization and Functionality
Your shed’s interior layout should reflect how you actually garden. If you spend significant time starting seeds or potting plants, position a workbench near the brightest window. This supports your gardening journey by creating an efficient workspace.
Install shelving systems 12-18 inches apart vertically to accommodate various container sizes. Use wall-mounted pegboard for frequently accessed tools. Create a dedicated zone for seasonal equipment, keeping winter tools separate from summer gear. Store pesticides and fertilizers in a locked cabinet away from children and pets, with proper ventilation to prevent fumes from accumulating.
Ventilation deserves special attention. Install gable vents or ridge vents to allow air circulation, preventing moisture buildup and mold growth. During warm months, add a small fan to circulate air further. If you’re storing sensitive items like seeds or tender plants, consider installing a thermostat-controlled vent fan.
For gardeners maintaining raised bed gardens, your shed becomes the command center. Store soil amendments, mulch, and potting supplies in clearly labeled containers. A large potting bench with a lower shelf for soil bags keeps everything organized and accessible.
Weatherproofing and Maintenance
A well-built shed requires regular maintenance to maximize its lifespan. Weatherproofing starts during construction and continues throughout the years.
Initial weatherproofing:
- Caulk all joints and seams where water might penetrate
- Apply wood stain or paint to all exposed wood surfaces—this protects against UV damage and moisture
- Install gutters and downspouts to direct roof water away from the foundation
- Ensure all fasteners are corrosion-resistant
- Grade the soil to slope away from the shed foundation
Ongoing maintenance:
- Inspect roof condition annually, replacing damaged shingles promptly
- Clear gutters of debris in fall and spring
- Check for wood rot around doors and windows, addressing any damage immediately
- Repaint or re-stain exterior wood every 5-7 years depending on climate
- Ventilate interior regularly to prevent moisture accumulation
- Check foundation annually for settling or shifting
In colder climates, ensure your shed can handle snow load. Most standard designs accommodate 30-40 pounds per square foot of snow, but verify this matches your region’s typical accumulation. In areas with heavy snow, increase rafter size or reduce spacing to handle additional weight.
FAQ
Do I need a permit to build a garden shed?
Permit requirements vary significantly by location. Many jurisdictions exempt sheds under a certain square footage (typically 100-200 square feet) if they’re set back appropriate distances from property lines. However, some areas require permits for any permanent structure. Contact your local building department before starting construction to avoid potential code violations or forced removal of your shed.
What’s the best foundation for a garden shed?
Concrete pads at corner and center points offer the best balance of cost and performance for most gardeners. This approach provides excellent drainage while preventing ground moisture from rotting wooden posts. For permanent installations, a full concrete slab is superior but more expensive. Gravel bases work adequately for smaller, temporary structures.
How much does it cost to build a garden shed?
Material costs for a basic 10×12 foot shed range from $1,500-$3,000, depending on finish quality and regional lumber prices. Labor costs vary widely—hiring professional builders adds $2,000-$5,000 or more. Building it yourself saves labor but requires tool investment and significant time commitment (typically 40-80 hours).
Can I add electricity or plumbing to my garden shed?
Yes, but this requires professional installation and permits in most areas. Electricity allows for lighting, fans, and power tools. Plumbing enables a sink for cleanup. Both require proper permits and inspections to ensure safety and code compliance. Budget an additional $500-$2,000 for these utilities depending on distance from your house.
What’s the ideal location for a garden shed?
Choose a location with good drainage, partial shade (morning sun, afternoon shade is ideal), and easy accessibility from your main gardening areas. Avoid low-lying spots where water pools. Position the door entrance facing away from prevailing winds. Ensure the location complies with local setback requirements from property lines.
How do I prevent rot in my wooden shed?
Use pressure-treated lumber for all ground-contact framing, ensure excellent drainage around the foundation, maintain proper ventilation inside, and keep the exterior painted or stained. Inspect regularly for early signs of rot, especially around doors, windows, and where wood contacts the ground. Address any damage immediately to prevent it from spreading.
What roof style is best for a garden shed?
Pitched roofs (A-frame or saltbox) shed water and snow most effectively, making them ideal for most climates. The steeper the pitch, the better water drainage. In areas with heavy snow, a steeper pitch (8/12 or greater) helps snow slide off rather than accumulating. Flat roofs require more sophisticated drainage systems and are better suited to dry climates.