
Garden phlox is a beloved flowering plant that brings vibrant color and delightful fragrance to any landscape. Whether you’re a seasoned gardener or just beginning your gardening journey as a beginner, understanding how to care for phlox will help you cultivate stunning blooms year after year. These resilient perennials thrive in various climates and reward attentive gardeners with clusters of colorful flowers that attract pollinators and add visual interest to borders, beds, and cottage gardens.
Phlox comes in numerous varieties, each with unique characteristics and growing requirements. From tall summer bloomers to low-growing creeping types, there’s a phlox variety suited for nearly every garden space. Proper care involves attention to soil conditions, watering schedules, sunlight exposure, and pest management. This comprehensive guide will walk you through everything you need to know to keep your garden phlox healthy, vibrant, and blooming abundantly.

Understanding Garden Phlox Varieties
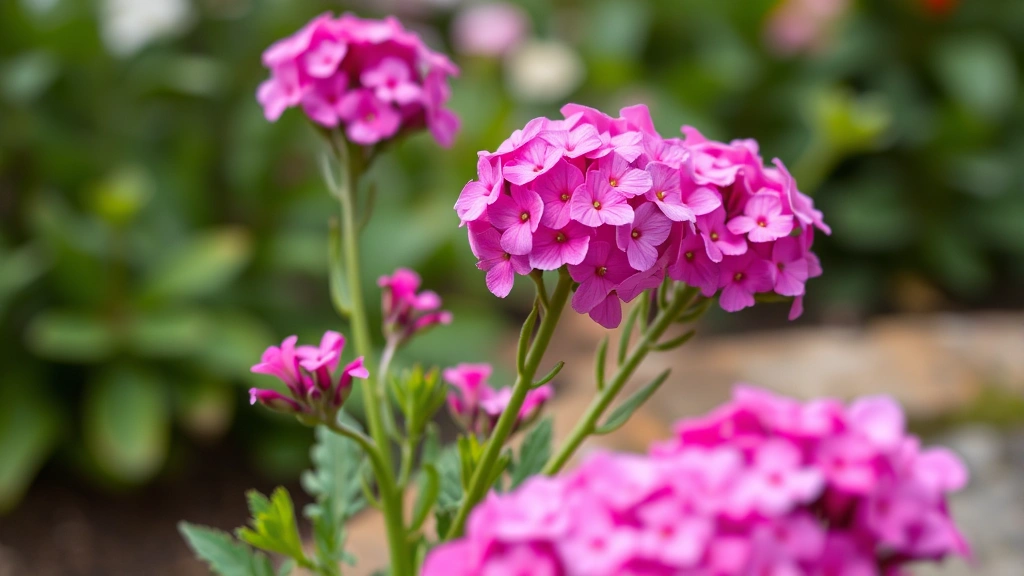
Garden phlox encompasses several distinct types, each with specific care needs and bloom times. Panicle phlox (Phlox paniculata) is the tallest variety, reaching 2-4 feet in height and producing cone-shaped flower clusters in mid to late summer. These dramatic bloomers are perfect for back-of-border plantings and create striking focal points in garden design. Their tall stems provide excellent cut flowers for arrangements, making them valuable for those interested in flower arranging tips and beautiful bouquets.
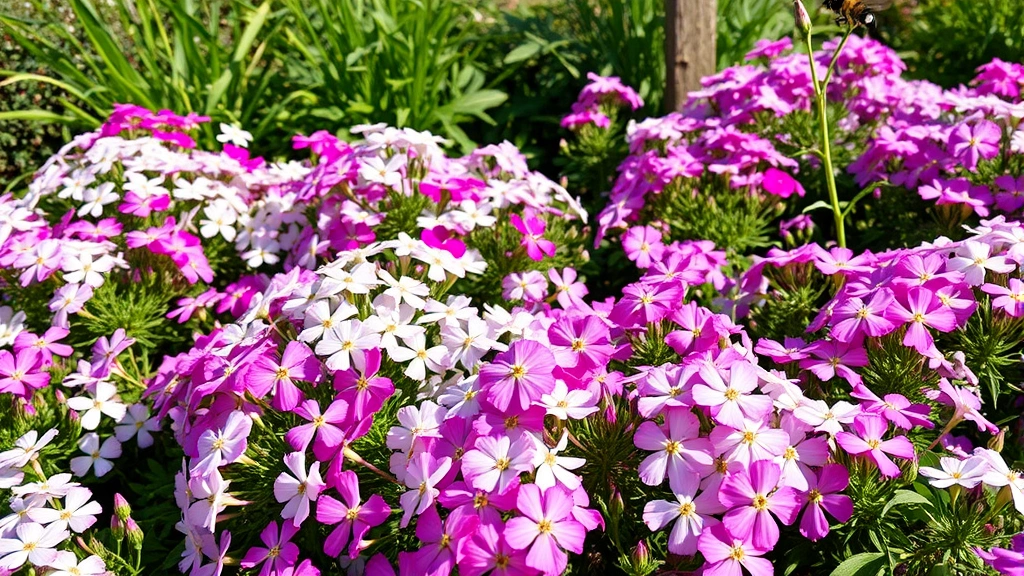
Creeping phlox (Phlox subulata) offers a completely different growth habit, spreading low across the ground with needle-like foliage and early spring blooms. This ground cover variety thrives on rocky slopes, in containers, and along garden borders where its mat-forming nature creates colorful carpets of flowers. Woodland phlox (Phlox divaricata) prefers shade and features lavender-blue flowers in spring, making it ideal for shaded borders and naturalized plantings.
Moss phlox (Phlox subulata ‘Moss’) and alpine phlox varieties are smaller cultivars perfect for rock gardens and alpine troughs. Understanding which variety you’re growing is essential because each type has slightly different care requirements, bloom times, and environmental preferences. Most garden centers label plants clearly, helping you identify your specific phlox type.
Ideal Growing Conditions
Creating the right environment for garden phlox success begins with understanding their native habitat and preferred conditions. Most phlox varieties originated in North American woodlands, meadows, and rocky slopes, adapting them to tolerate various conditions while preferring specific environments. The ideal growing situation includes moderate to full sunlight, well-draining soil, and adequate air circulation around plants.
Temperature tolerance varies among phlox varieties, but most are hardy in USDA zones 3-9, thriving in regions with cold winters and warm summers. Panicle phlox handles heat better than creeping varieties, making it excellent for southern gardens. Winter hardiness is generally excellent, though extreme temperature fluctuations can stress plants. Spring frost rarely damages established phlox, as they emerge after the worst frost danger passes.
Humidity levels should be moderate, with good air circulation preventing fungal diseases common in stagnant, humid conditions. Avoid planting phlox in low-lying areas where cold air settles or where moisture accumulates. Elevated beds, sloped areas, and locations with afternoon breezes promote healthy plant growth and disease resistance.
Soil Preparation and Amendment
Proper soil preparation is fundamental to phlox success, as these plants are somewhat particular about soil conditions despite their reputation for toughness. Soil pH should range between 6.0-7.0, slightly acidic to neutral. Testing your soil before planting reveals pH levels and nutrient content, allowing you to amend accordingly. Most extension services offer affordable soil testing that provides detailed recommendations.
Garden phlox prefers well-draining soil rich in organic matter. Heavy clay soils require amendment with compost, aged bark, or peat moss to improve drainage and prevent root rot. Sandy soils need organic matter to improve water retention and nutrient availability. Incorporate 2-3 inches of compost or well-rotted manure into the top 8-10 inches of soil before planting. This amendment improves soil structure, drainage, and nutrient content simultaneously.
Mulching around plants with 2-3 inches of organic material like wood chips or shredded bark moderates soil temperature, retains moisture, and suppresses weeds. Keep mulch several inches away from plant stems to prevent rot and discourage pests. Refresh mulch annually as it decomposes, which also continuously improves underlying soil quality. If you’re considering raised bed gardening advantages, phlox thrives excellently in raised beds with properly prepared soil.
Nutrient-poor soils can be enriched with balanced fertilizers or slow-release granules worked into the soil at planting time. Avoid excessive nitrogen, which promotes leafy growth at the expense of flowers. A soil amendment ratio of one part compost to three parts existing soil provides excellent results for most garden situations.
Watering and Moisture Management
Establishing proper watering habits is crucial for healthy, disease-resistant garden phlox. Young plants require consistent moisture during their first growing season while establishing root systems. Water deeply but infrequently, aiming for 1-1.5 inches of water weekly from rainfall or irrigation combined. Deep watering encourages roots to grow deeper into the soil, improving drought tolerance and plant stability.
Established phlox plants are fairly drought-tolerant once their roots develop fully, typically after their second season. During hot, dry periods, supplemental watering prevents stress and maintains continuous blooming. Water at soil level rather than overhead to minimize fungal disease risk. Morning watering allows any splash to dry quickly in sunlight, further reducing disease problems.
Overwatering is a more common problem than underwatering, especially in areas with regular rainfall. Soggy soil promotes root rot, powdery mildew, and other fungal diseases that can kill plants. Ensure excellent drainage and avoid watering if soil remains moist from recent rain. In containers, check soil moisture daily during growing season and water only when the top inch feels dry.
Mulching helps regulate soil moisture by reducing evaporation and moderating temperature fluctuations. During establishment year, monitor soil moisture regularly and adjust watering based on rainfall and weather conditions. Hot, windy periods increase water needs, while cool, cloudy weather reduces them. Observing plant appearance helps guide watering decisions—wilting indicates thirst, while yellowing leaves may signal overwatering.
Sunlight Requirements
Light exposure dramatically affects phlox performance, flowering abundance, and disease susceptibility. Panicle phlox requires 6-8 hours of direct sunlight daily for optimal flowering and dense growth. Plants grown in insufficient light become leggy, produce fewer flowers, and develop weaker stems prone to flopping. Afternoon shade in hot southern climates prevents flower fade and reduces heat stress, while northern gardens benefit from full sun exposure.
Creeping phlox also prefers full sun but tolerates partial shade, especially afternoon shade in intense climates. In shade conditions, creeping phlox spreads more slowly and produces fewer flowers, though foliage remains attractive. Woodland phlox is the exception, preferring partial to full shade and actually declining in hot, full-sun locations. Understanding your specific phlox type’s light preferences ensures you plant it in the most suitable location.
Dappled shade from deciduous trees provides excellent growing conditions for shade-tolerant varieties, offering protection from intense afternoon sun while providing adequate light. Avoid planting beneath evergreen trees where dense shade and root competition stress phlox. Reflected heat from walls or pavement can intensify light exposure; monitor plants in these locations for heat stress during extreme summers.
Insufficient light promotes poor air circulation around foliage, increasing fungal disease risk. Ensure adequate spacing between plants and pruning to maintain airflow. Relocating plants to sunnier locations in spring is possible if they’re underperforming in current positions, though established plants may need a season to recover.
Fertilizing Your Phlox
Moderate fertilization supports healthy growth and abundant flowering without promoting excessive vegetative growth. Apply balanced fertilizer (10-10-10 or similar) once in spring as new growth emerges. A second application in early summer supports mid-season blooming, but avoid fertilizing after midsummer, which encourages tender new growth vulnerable to fall frost damage.
Slow-release granular fertilizers provide consistent nutrition throughout the growing season with minimal effort. Work granules into soil around plants in spring, following package directions for application rates. Water thoroughly after application to activate the fertilizer. Organic gardeners can use compost, aged manure, or fish emulsion for gentle, steady nutrient delivery.
Plants growing in well-amended soil may need minimal supplemental fertilization after establishment. Excessive nitrogen produces lush foliage but fewer flowers and increased disease susceptibility. If phlox blooms sparsely despite adequate sunlight, nutrient deficiency may be responsible. A soil test reveals specific deficiencies and guides targeted fertilization decisions.
Container-grown phlox requires more frequent fertilization since watering leaches nutrients from limited soil. Feed container plants every 2-3 weeks during growing season with diluted liquid fertilizer. Reduce fertilization in late summer to allow plants to harden off before winter dormancy.
Pruning and Deadheading Techniques
Strategic pruning and deadheading enhance phlox appearance, extend flowering, and maintain plant health. Deadheading spent flower clusters encourages continued blooming throughout the season. Remove flower heads as they fade, cutting just below the spent cluster. This simple task redirects plant energy from seed production toward flower formation, dramatically extending bloom time.
Tall panicle phlox benefits from early-season pruning to reduce height and promote bushier growth. When plants reach 12 inches tall, pinch back the top 2-3 inches of growth. This technique delays flowering by 2-3 weeks but produces shorter, more densely branched plants with more flowers. Pinch back only until early July; later pruning prevents flower development before frost.
Thinning crowded stems improves air circulation and reduces disease problems. In early spring, remove weak or crossing stems at soil level, keeping 3-5 healthy stems per plant. This opens the plant’s interior to light and air, discouraging powdery mildew and other fungal diseases. Thin creeping phlox if it becomes too dense and matted.
Remove dead or diseased foliage promptly, cutting affected stems back to healthy tissue. After first frost kills foliage, cut back tall panicle phlox to 3-4 inches above ground. Leave creeping phlox growth intact unless severely damaged. Spring cleanup removes winter-damaged growth and dead leaves that harbor disease organisms.
Pest and Disease Control
Powdery mildew is the most common phlox disease, appearing as white coating on leaves in late summer. Improve air circulation through proper spacing and pruning, water at soil level to keep foliage dry, and apply sulfur-based fungicides at first sign of infection. Resistant varieties exist; check labels when purchasing plants. Once established, powdery mildew is difficult to eliminate, making prevention essential.
Spider mites occasionally attack phlox in hot, dry conditions, causing stippled, yellowing leaves. Strong water spray from the hose removes mites and improves humidity. Insecticidal soap or horticultural oil treats severe infestations. Maintaining adequate moisture and avoiding excessive heat stress prevents spider mite problems.
Slugs and snails chew irregular holes in phlox foliage, particularly on young plants. Hand-pick pests in early morning, or use beer traps, copper barriers, or slug baits. Remove garden debris where these pests hide. Encourage beneficial insects like ground beetles that prey on slugs.
Root rot develops in poorly drained soil with excessive moisture. Ensure excellent drainage, avoid overwatering, and space plants adequately for air circulation. Remove affected plants entirely, as root rot is difficult to reverse. Replant in amended soil with improved drainage.
Leaf spot diseases cause brown spots on foliage, usually in humid conditions. Remove affected leaves, improve air circulation, and avoid overhead watering. Most leaf spot issues resolve with improved cultural practices; fungicides are rarely necessary for established plants.
Seasonal Care Schedule
Spring is the busiest season for phlox care. Remove winter mulch gradually as soil warms, revealing emerging growth. Cut back previous year’s dead stems to 3-4 inches above ground. Apply balanced fertilizer as new growth appears, and thin crowded stems for better air circulation. Plant new phlox in spring when soil is workable, ensuring adequate watering during establishment.
Early summer requires consistent watering and attention to pest problems. Deadhead spent flowers regularly to encourage continuous blooming. Watch for early powdery mildew signs and take action immediately. Pinch back tall varieties if height control is desired. Mulch around plants if not already done, maintaining 2-3 inches depth.
Mid to late summer focuses on maintaining plant appearance and managing heat stress. Continue deadheading and watering during dry periods. Stop fertilizing after midsummer to allow plants to harden off. Monitor for disease and pest issues, treating promptly. Enjoy peak flowering and cut flowers for arrangements.
Fall prepares plants for winter dormancy. Reduce watering as temperatures cool and growth slows. Stop fertilizing entirely. Cut back dead foliage after first hard frost kills growth. Apply fresh mulch layer for winter protection, especially in cold climates. Plant phlox in early fall if spring planting wasn’t possible, giving roots time to establish before winter.
Winter requires minimal intervention in most climates. Mulch protects roots from temperature fluctuations in areas with freeze-thaw cycles. In extremely cold regions, additional mulch or burlap wrapping protects tender varieties. Plan next season’s garden improvements during quiet winter months.
Propagation Methods
Garden phlox propagates easily through several methods, allowing you to expand plantings or share plants with fellow gardeners. Division is the simplest method, ideal for spring or fall when plants are dormant or just emerging. Dig up established plants carefully, separate clumps into smaller sections with roots attached, and replant immediately in prepared soil. Each section develops into a complete plant within one growing season.
Divide phlox every 3-4 years to rejuvenate aging plants and control spread. Older plants in the center often decline in vigor; division removes dead portions and revitalizes the planting. Divide in early spring for fastest establishment or in early fall for plants to establish before winter dormancy.
Softwood cuttings provide another propagation method, though more time-intensive than division. Take 3-4 inch cuttings from new growth in late spring, remove lower leaves, and insert into moist rooting medium. Enclose in plastic to maintain humidity while roots develop over 2-3 weeks. Once rooted, pot up individually and grow on until large enough to plant outdoors.
Seeds produce new plants but require stratification for germination. Collect seeds in fall, store in cool, dry conditions, and stratify in moist sand or peat for 4-6 weeks in refrigerator. Sow on moist seed-starting mix, maintain moisture without waterlogging, and provide bright light for germination. Seedlings take longer than division to reach flowering size, typically blooming in the second year.
Layer creeping phlox stems by pinning them to moist soil, where they root and develop new plants. Once rooted, separate from parent plant and transplant. This method works excellently for expanding creeping phlox groundcover plantings with minimal effort.
FAQ
When is the best time to plant garden phlox?
Plant phlox in spring as soil becomes workable or in early fall for root establishment before winter. Spring planting works best in cold climates, while fall planting succeeds in moderate climates. Container-grown plants can be planted anytime during growing season with adequate watering.
How often should I water newly planted phlox?
Water newly planted phlox deeply 2-3 times weekly during the first growing season, adjusting based on rainfall and weather. Established plants need supplemental watering only during extended dry periods. Always water at soil level to minimize disease risk.
Why is my phlox not blooming?
Common causes include insufficient sunlight (less than 6 hours daily), excessive nitrogen fertilizer, overcrowding preventing air circulation, or inadequate establishment time. Ensure plants receive appropriate light, reduce nitrogen fertilization, thin stems, and be patient with young plants taking time to reach full flowering potential.
Can I grow phlox in containers?
Yes, phlox grows well in containers with drainage holes and quality potting soil. Use containers at least 12 inches deep for panicle phlox, 8 inches for smaller varieties. Water and fertilize more frequently than garden-planted phlox. Protect containers in extreme cold by burying them in mulch or moving to protected locations.
How do I prevent powdery mildew on phlox?
Prevent powdery mildew through proper spacing, pruning for air circulation, watering at soil level, and choosing resistant varieties. Apply sulfur-based fungicides at first sign of infection. Improve air circulation by thinning stems and removing lower leaves on tall varieties.
Is it necessary to stake tall phlox varieties?
Tall panicle phlox may require staking in windy locations or if grown too tall and leggy. Pinching back plants when young produces shorter, bushier plants that rarely need staking. If staking is necessary, use inconspicuous supports installed early in season before plants become too tall.
What should I do with phlox in winter?
Cut back dead foliage after first hard frost, apply mulch for root protection, and leave plants undisturbed through winter. In extreme cold regions, additional mulch or burlap provides extra protection. Remove mulch gradually in spring as soil warms.
Can I propagate phlox from cuttings?
Yes, take softwood cuttings in late spring, root in moist medium under humid conditions, and pot up once rooted. Division is faster and easier for most gardeners, producing full-sized plants in one season rather than two.
How do I choose between phlox varieties?
Consider your space, light conditions, and desired bloom time. Panicle phlox for tall borders and summer blooms, creeping phlox for groundcover and spring flowers, woodland phlox for shade areas, and alpine varieties for rock gardens. Visit local botanical gardens or American Horticultural Society for variety recommendations suited to your region.
Are there any companion plants that pair well with phlox?
Phlox pairs beautifully with coneflowers, black-eyed Susans, daylilies, and ornamental grasses. Consider growing herbs nearby that attract beneficial insects. Plan complementary bloom times and colors for extended garden interest throughout seasons.