Composting directly in raised garden beds is an innovative approach that transforms your growing space into a self-sustaining ecosystem. Rather than maintaining a separate compost pile, you can layer organic materials right where your plants will grow, creating what gardeners call “in-situ composting” or “hot composting beds.” This method combines soil building with plant cultivation, eliminating the need for external compost additions while enriching your beds throughout the growing season.
This practice has gained significant traction among sustainable gardeners who want to maximize space efficiency and nutrient cycling. By understanding the science behind decomposition and implementing proper techniques, you can transform kitchen scraps and garden waste into valuable plant food without the mess, smell, or pest problems associated with traditional compost bins. Whether you’re a beginner establishing your first raised bed garden or an experienced grower looking to improve soil health, composting in raised beds offers practical solutions that align with organic gardening principles.
Understanding Composting in Raised Beds
Composting in raised beds operates on the same biological principles as traditional compost piles, but with distinct advantages for home gardeners. When you layer organic materials directly in your raised bed, microorganisms begin breaking down these materials into humus—a dark, nutrient-rich substance that improves soil structure, water retention, and microbial diversity. This process doesn’t require turning or monitoring separate bins, making it ideal for gardeners with limited space or time.
The fundamental principle involves creating the right carbon-to-nitrogen ratio, typically expressed as 30:1 or 25:1. Carbon-rich materials (browns) include dried leaves, straw, shredded paper, and wood chips. Nitrogen-rich materials (greens) include grass clippings, vegetable scraps, coffee grounds, and fresh plant trimmings. When properly balanced, these materials heat up internally, killing weed seeds and pathogens while accelerating decomposition. The beauty of raised bed composting is that you’re simultaneously creating growing medium and nutrient-dense soil for your vegetables, herbs, and flowers.
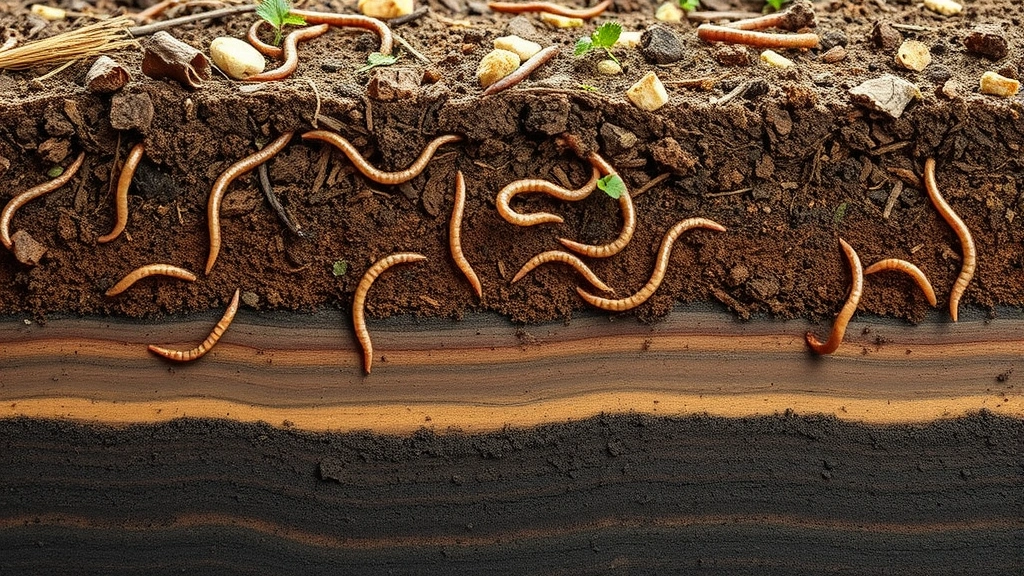
Many gardeners appreciate that in-situ composting reduces the need for purchasing expensive potting soil or compost amendments. Over a single growing season, you can build several inches of rich, dark compost that’s already integrated into your beds. This approach also encourages beneficial earthworms, beneficial bacteria, and fungi that form symbiotic relationships with plant roots, enhancing nutrient uptake and plant vigor.
Materials and Layering Strategy
Success with composting in raised beds depends on careful material selection and strategic layering. Start with a foundation layer of coarse materials like twigs, small branches, or wood chips (about 2-3 inches). This creates air pockets essential for aerobic decomposition and prevents the bed from becoming compacted. You can use materials from pruning garden shears and secateurs work for creating smaller pieces.
Next, alternate layers of greens and browns, aiming for roughly three parts brown to one part green by volume. A practical layering sequence might look like this:
- Layer 1 (Bottom): Coarse woody materials for drainage and aeration (3 inches)
- Layer 2: Brown materials like shredded leaves or straw (4 inches)
- Layer 3: Green materials like grass clippings or kitchen scraps (2 inches)
- Layer 4: Brown materials again (4 inches)
- Layer 5: Continue alternating until reaching desired height
- Top Layer: Finished compost or aged materials (2-3 inches) for immediate planting
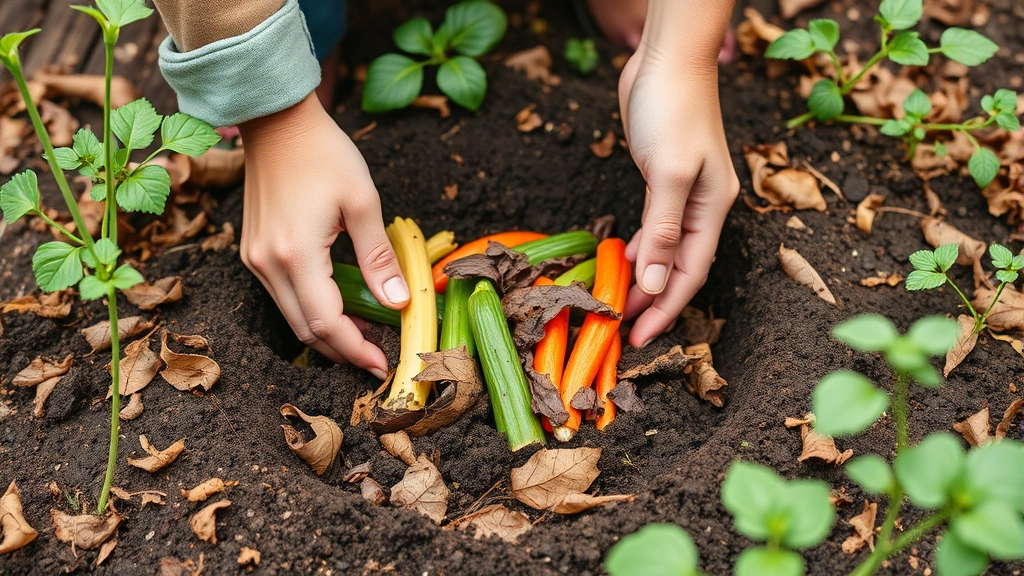
When adding kitchen scraps, bury them 6-8 inches deep within the bed rather than placing them on the surface. This prevents pest attraction and accelerates decomposition by keeping materials in the warmest, most microbially active zone. Acceptable kitchen materials include vegetable and fruit scraps, crushed eggshells, tea bags, and coffee grounds with filters removed. Avoid meat, dairy, oils, and diseased plant material.
For container gardening enthusiasts expanding to raised beds, the same principle applies—you’re building layers that create a living, breathing substrate. Brown materials should be roughly shredded or chopped; whole leaves compact too densely and slow decomposition. Newspaper and cardboard (without glossy coatings) work excellently as brown layers and help suppress weeds.
Moisture and Aeration Management
Proper moisture is critical for microbial activity during decomposition. Your composting raised bed should feel like a wrung-out sponge—moist but not waterlogged. Too little moisture slows decomposition dramatically; too much creates anaerobic conditions that produce odors and methane. Aim for 40-60% moisture content by weight.
During dry periods, water your bed thoroughly, allowing moisture to penetrate all layers. In rainy climates, you might need to cover the bed with burlap or a permeable cloth to prevent oversaturation. Monitor moisture by squeezing a handful of material from the bed’s interior—if water drips out, it’s too wet; if it doesn’t form a ball, it’s too dry.
Aeration works hand-in-hand with moisture. The materials you’ve layered should naturally create air spaces, but you can enhance aeration by occasionally turning the top 12 inches of the bed with a garden fork. Unlike traditional compost piles that require regular turning, raised bed composting is more passive—gentle disturbance once or twice per season is usually sufficient. Some gardeners prefer not turning at all, accepting a slower decomposition timeline in exchange for minimal effort.
The coarse bottom layer you established is crucial for aeration. It prevents the bed’s center from becoming anaerobic and allows excess moisture to drain toward the bottom, where it can eventually be absorbed by underlying soil or drain away. If your raised bed sits on concrete or compacted soil, consider drilling drainage holes in the bed’s bottom corners or installing a perforated drain pipe along the base.
Temperature Control and Decomposition
Temperature profoundly affects decomposition speed. A well-constructed composting bed with optimal carbon-to-nitrogen ratios can reach 130-150°F internally—hot enough to kill weed seeds and pathogens. This “hot composting” phase typically lasts 4-8 weeks before temperatures decline as readily available nutrients are consumed.
Several factors influence temperature development. Larger beds (minimum 3 feet × 3 feet × 2 feet) generate more heat than small ones because they retain warmth better. Dense layering of fresh materials creates more heat than sparse, widely-spaced layers. Ambient temperature matters too—spring and fall composting generates less heat than summer composting, while winter composting may stall entirely in cold climates.
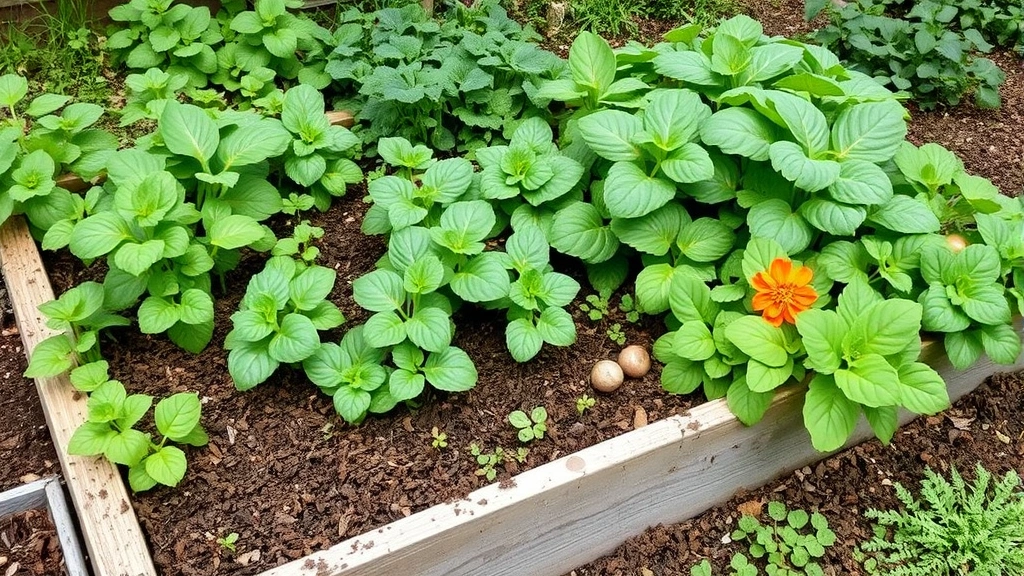
You can monitor internal temperature using a compost thermometer (insert it 12-18 inches deep into the bed). When temperatures peak and begin declining, you know the hot phase is ending and cooler, slower decomposition is beginning. At this point, you can plant heat-tolerant crops like tomatoes, peppers, or squash directly into the bed. The residual heat supports their growth while decomposition continues.
For alternative raised bed materials, consider that dark materials (like cinder blocks) absorb more solar heat than light-colored materials, potentially increasing bed temperatures. Beds positioned in full sun will run warmer than shaded beds, which is important for timing your composting and planting strategy.
Timing and Planting Considerations
When you can plant in a composting raised bed depends on decomposition stage and plant type. Cool-season crops like lettuce, spinach, and peas can be planted 3-4 weeks after layering materials because their shallow roots don’t penetrate deep into actively decomposing material. Warm-season crops requiring deeper rooting should wait 6-8 weeks, allowing the top 12-18 inches to stabilize.
A common strategy is to create your composting bed in late summer or early fall, let it partially decompose over winter, then plant heavily in spring. Alternatively, construct beds in spring, allow 4-6 weeks for initial decomposition, then plant in early summer. The timeline depends on your climate zone, material composition, and bed size.
Some gardeners use a hybrid approach: plant immediately in the top 3-4 inches of the bed (which contains finished compost or aged materials) while decomposition continues below. This works excellently for shallow-rooted crops like lettuce, herbs, and strawberries. As lower layers decompose and settle, you add more organic material to the top, gradually building bed height while continuously growing food.
Monitor settling carefully. A newly constructed composting bed might settle 6-12 inches over the first growing season as materials compress and decompose. This is normal and beneficial—it means active decomposition is occurring. Plan your initial bed height accordingly, or plan to add fresh material to maintain desired depth.
Common Mistakes to Avoid
Even experienced gardeners make composting mistakes in raised beds. One critical error is using diseased plant material. Don’t compost plants affected by late blight, early blight, powdery mildew, or other serious diseases unless your bed reaches and maintains 130°F+ for at least three weeks. When in doubt, discard diseased material or burn it.
Another common mistake involves inadequate carbon-to-nitrogen ratios. Too many greens (nitrogen) without sufficient browns (carbon) creates a smelly, anaerobic mess. Too many browns without greens results in extremely slow decomposition. Weigh your materials mentally—grass clippings alone won’t work, but grass clippings mixed with shredded leaves creates the perfect balance.
Overwatering is another pitfall. Many gardeners, especially in humid climates, inadvertently create waterlogged beds that smell like rotten eggs. This anaerobic decomposition produces hydrogen sulfide and methane while destroying beneficial microorganisms. If your bed smells bad, stop watering, add more brown materials, and gently turn the top layer to reintroduce oxygen.
Don’t forget about pest management. While properly constructed beds rarely attract rodents or insects, burying kitchen scraps too shallowly or using diseased materials can invite problems. Always bury scraps 6-8 inches deep, and avoid placing materials on the bed’s surface where they’re accessible to pests.
Using inappropriate materials is another error. Never use treated lumber for garden tools storage that might contain residues, and avoid glossy cardboard, synthetic materials, or materials treated with pesticides. Stick to uncoated cardboard, untreated wood, and organic plant materials.
Seasonal Adjustments
Composting in raised beds requires seasonal awareness. During spring and summer, decomposition accelerates due to warm temperatures and increased microbial activity. Monitor moisture carefully during hot periods—the bed dries faster and may require supplemental watering beyond what plants need. Increase brown material additions in summer to balance the influx of green garden waste.
Fall presents ideal conditions for starting new composting beds. Abundant leaves provide excellent brown material, and cooler temperatures mean you’re less likely to face anaerobic conditions from overwatering. Many gardeners construct their beds in September or October, allowing decomposition to progress slowly through fall and winter, resulting in rich, ready-to-plant beds by spring.
Winter composting nearly halts in cold climates. Decomposition slows dramatically below 40°F as microbial activity drops. Rather than fighting this, many gardeners simply stop adding materials to beds in late fall and let them rest. This actually benefits soil structure—freeze-thaw cycles break up compacted material and improve soil friability. Resume material additions in spring when temperatures warm.
In mild winter climates, composting continues year-round. You can add materials throughout winter, though decomposition proceeds slowly. Spring brings renewed activity as temperatures climb and day length increases. By late spring, you’ll have substantially decomposed material ready to support summer crops.
FAQ
Can I compost in raised beds year-round?
Yes, though decomposition rates vary seasonally. Spring through fall offers rapid decomposition; winter slows the process dramatically in cold climates but continues slowly in mild regions. Most gardeners construct beds in late summer or early fall for optimal spring planting.
What’s the best size for a composting raised bed?
Minimum dimensions are 3 feet × 3 feet × 2 feet for adequate heat generation and decomposition. Larger beds (4 × 8 feet or bigger) offer better temperature retention and accommodate more material, though they require more initial investment and effort.
Will composting in raised beds attract pests?
Properly constructed beds with buried kitchen scraps rarely attract rodents or insects. Surface-placed materials and shallow burial attract pests. Never compost meat, dairy, or oils in raised beds.
How long until I can harvest from a composting raised bed?
Shallow-rooted crops can be planted 3-4 weeks after construction. Deep-rooted crops should wait 6-8 weeks. Complete decomposition takes 6-12 months, but plants can grow successfully while decomposition continues.
Should I use a raised garden bed liner?
Liners aren’t necessary for composting beds and can actually impede drainage. If using one for pest protection, ensure it has drainage holes. Many gardeners skip liners entirely for composting beds.
Can I add new materials to an active composting bed?
Yes, adding materials throughout the season maintains decomposition. Bury greens 6-8 inches deep and continue alternating with browns. This continuous-addition approach extends the composting timeline but provides ongoing soil building.
What external resources help with composting techniques?
The EPA’s composting guide provides comprehensive information. Your local extension service offers climate-specific advice. The Royal Horticultural Society and Garden Organic provide evidence-based recommendations, while the USDA maintains plant and soil resources.


