Enhance Your Kitchen Garden Window: Pro Tips for Year-Round Fresh Herbs & Vegetables
A kitchen garden window transforms your cooking space into a thriving green sanctuary, offering fresh herbs, microgreens, and compact vegetables right at your fingertips. Whether you’re a seasoned gardener or just beginning your growing journey, maximizing this precious windowsill real estate requires strategic planning, proper equipment, and knowledge of plant selection. This guide reveals professional techniques to turn your kitchen window into a productive mini-garden that supplies your culinary needs throughout the year.
The beauty of a kitchen garden window lies in its convenience and accessibility. Imagine snipping fresh basil for your pasta, harvesting cherry tomatoes for salads, or gathering microgreens for breakfast smoothies without stepping outside. With the right approach, even a modest window can yield impressive harvests. We’ll explore everything from choosing the ideal location and optimizing light conditions to selecting the best-performing plants and implementing professional growing techniques.
Selecting the Perfect Window Location
The foundation of a successful kitchen garden window starts with choosing the right location within your kitchen. Your window’s orientation—north, south, east, or west—dramatically affects plant growth and productivity. South-facing windows receive the most intense, direct sunlight throughout the day, making them ideal for sun-loving plants like tomatoes, peppers, and most herbs. East-facing windows offer gentle morning sun, which is excellent for plants that prefer some afternoon shade protection. West-facing windows provide strong afternoon heat, which can sometimes stress delicate seedlings but works well for heat-loving plants. North-facing windows offer the least light and are best reserved for shade-tolerant options like mint and parsley.
Consider practical kitchen workflow when positioning your garden window. Place it near your cooking station for easy access during meal preparation, but ensure it doesn’t obstruct counter space or create safety hazards. Proximity to a water source is also beneficial for convenient watering without carrying heavy containers across your kitchen. Check for potential obstructions like trees, buildings, or awnings outside that might cast shadows during critical growing seasons. Monitor your chosen window throughout different seasons, as the sun’s angle changes significantly, affecting light availability and intensity.
Understanding Light Requirements
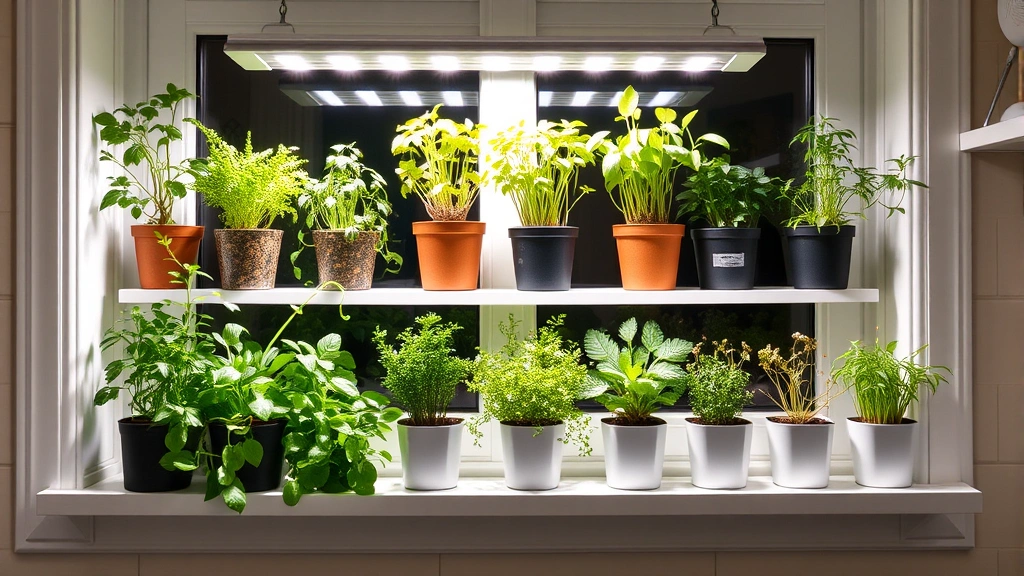
Light is the most critical factor for kitchen window gardening success. Most culinary herbs and compact vegetables require 6-8 hours of direct sunlight daily to thrive. If your window doesn’t naturally provide this duration, supplemental grow lights become essential. Modern LED grow lights are energy-efficient, produce minimal heat, and come in compact designs perfect for kitchen windows. Position them 6-12 inches above plant foliage, adjusting height as plants grow. A timer set to 14-16 hours daily mimics optimal growing conditions and promotes vigorous growth.
Understanding light intensity versus duration helps optimize your setup. A window receiving 4 hours of intense afternoon sun may support plants better than one with 8 hours of diffused, weak light. Reflective surfaces like white walls, aluminum foil, or specialized reflective panels maximize available light by bouncing rays back onto plant leaves. Rotate containers regularly to ensure all sides receive adequate exposure, preventing uneven growth and promoting balanced development. During winter months, when daylight hours decrease significantly, supplemental lighting becomes practically mandatory in most climates to maintain plant vigor and continuous harvests.
Consider installing a propagation setup near your brightest window to start new plants from cuttings or seeds. This allows you to maintain continuous production and experiment with new varieties throughout the year.
Container Selection and Drainage
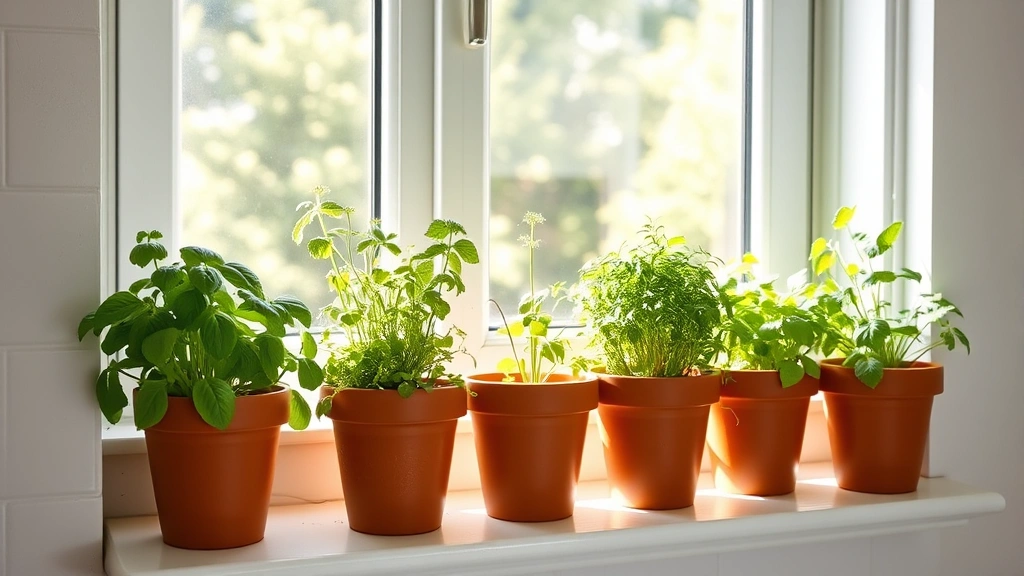
Choosing appropriate containers is fundamental to kitchen window garden success. Containers should be sized according to plant root systems—herbs typically thrive in 4-6 inch pots, while compact vegetables need 8-12 inch containers. Drainage holes are non-negotiable; without proper drainage, water accumulates around roots, causing rot and fungal diseases. Every container, regardless of material, must have drainage holes in the bottom.
Material options include terracotta, ceramic, plastic, and fabric containers, each with distinct advantages. Terracotta is aesthetically pleasing and breathable, allowing excellent air circulation around roots, but it dries quickly and requires frequent watering. Ceramic containers offer visual appeal and moderate water retention but are heavy and prone to chipping. Plastic containers are lightweight, affordable, and retain moisture well but may look less attractive in kitchen settings. Fabric grow bags provide excellent drainage and aeration while taking up minimal space. Consider your aesthetic preferences and maintenance capacity when selecting materials.
Window box containers deserve special attention for kitchen settings. Choose boxes with integral drainage systems and adequate depth—at least 8 inches for herbs, 12 inches for vegetables. Self-watering containers with water reservoirs reduce daily maintenance and prevent inconsistent moisture levels that stress plants. However, they work best with specific soil mixes designed for this system. Ensure containers are food-safe if you’re growing edibles, avoiding any treated wood or materials that might leach harmful chemicals.
Best Plants for Kitchen Windows
Selecting appropriate plants dramatically increases your kitchen garden window’s success rate. Culinary herbs are the obvious choice, offering maximum utility and satisfaction. Basil thrives in warm conditions with consistent moisture, producing abundant leaves for pesto, pasta, and fresh cuisine. Parsley prefers slightly cooler temperatures and partial shade, making it excellent for less-sunny windows. Mint grows aggressively in containers, requiring regular harvesting to prevent overwhelming neighboring plants. Thyme, oregano, and rosemary prefer drier conditions and excellent drainage, tolerating neglect better than moisture-loving herbs. Chives produce delicate onion-flavored leaves and beautiful purple flowers, adding ornamental value alongside culinary function.
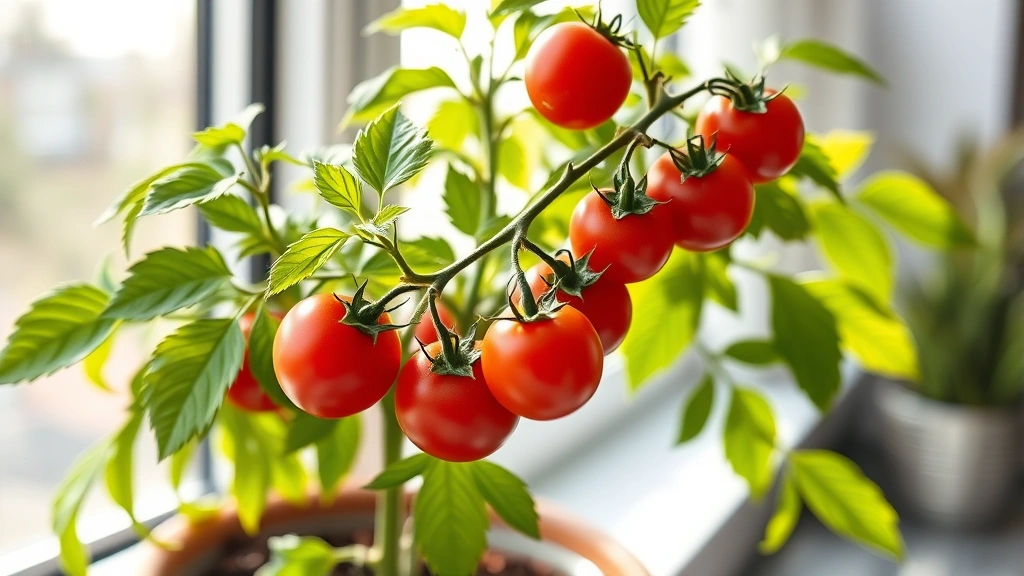
Compact vegetables expand your kitchen garden window’s productivity. Cherry tomato varieties like ‘Tiny Tim’ and ‘Window Box Roma’ produce sweet, abundant fruit in limited space. Pepper plants, especially ornamental and compact varieties, offer colorful harvests and extend growing seasons. Lettuce and leafy greens mature quickly, allowing multiple successive plantings throughout the year. Microgreens—harvested at 1-2 weeks old—provide concentrated nutrition and flavor in minimal space. Radishes mature rapidly, offering quick victories for impatient gardeners. Peas in compact varieties produce sweet pods within weeks of planting.
When planning your kitchen garden window, consider seasonal variations. Cool-season crops like lettuce, spinach, and peas thrive in spring and fall, while warm-season herbs and heat-loving vegetables excel during summer months. Maintaining year-round production requires strategic succession planting and variety selection. Reference professional growing guides when selecting specific varieties, as some cultivars are specifically bred for container growing and compact window spaces.
Soil Preparation and Nutrition
Quality soil is fundamental to kitchen window garden success. Never use garden soil from outdoor beds, which compacts in containers and lacks proper drainage characteristics. Instead, use high-quality potting mix specifically formulated for containers. These mixes typically contain peat moss or coconut coir, perlite, and compost, creating an ideal balance of water retention and drainage.
Understanding soil preparation fundamentals helps optimize your growing medium. Create a custom blend by mixing premium potting soil with additional perlite (for enhanced drainage) or compost (for improved nutrition and water retention). The ideal ratio depends on your specific plants—herbs prefer slightly drier mixes, while vegetables and leafy greens benefit from increased water-holding capacity. Some gardeners add worm castings or aged manure for natural nutrient supplementation.
Nutrition becomes critical in container gardening because frequent watering leaches nutrients from limited soil volumes. Begin with nutrient-rich potting soil containing slow-release fertilizers, providing baseline nutrition for 4-6 weeks. After this period, implement regular fertilization using balanced, water-soluble fertilizers (such as 10-10-10 NPK ratios) applied every 2-3 weeks at half-strength. Organic options like fish emulsion, kelp extracts, and compost tea provide nutrients while improving soil biology. For herbs, reduce fertilization frequency—excessive nitrogen promotes leafy growth but diminishes flavor concentration.
Learn more about optimizing nutrition by exploring garden fertilizer options that work specifically for container systems and small-scale growing.
Watering and Humidity Management
Proper watering is perhaps the most critical daily management task in kitchen window gardening. Container plants dry more rapidly than in-ground gardens, requiring frequent attention. Check soil moisture daily by inserting your finger 1 inch deep into soil; water thoroughly when the top inch feels dry. The goal is consistently moist (not waterlogged) soil that drains freely after watering.
Watering technique matters significantly. Water slowly until liquid drains from drainage holes, ensuring thorough soil saturation and preventing air pockets. Morning watering is ideal, allowing foliage to dry quickly and reducing disease susceptibility. Avoid wetting leaves of susceptible plants, which can promote fungal infections in humid kitchen environments. Use room-temperature water to prevent shocking plant roots with cold water.
Kitchen humidity naturally supports container plants, but monitor carefully. While moderate humidity (40-60%) benefits most plants, excessive moisture in poorly ventilated spaces encourages fungal diseases and mold. Ensure adequate air circulation by positioning a small fan nearby, which also strengthens plant stems through gentle movement. Open windows periodically to refresh air and reduce humidity spikes. In winter, when indoor heating systems dry air dramatically, mist plants occasionally or place containers on pebble trays filled with water—as water evaporates, it increases localized humidity without saturating soil.
Pest and Disease Prevention
Kitchen proximity makes pest and disease management particularly important. Indoor container plants attract spider mites, whiteflies, aphids, and mealybugs—all potential kitchen nuisances. Prevention through excellent cultural practices surpasses reactive pest management. Maintain good air circulation, avoid overhead watering, and inspect new plants thoroughly before introducing them to your kitchen window setup.
Implement integrated pest management principles by monitoring plants regularly for pest presence or disease symptoms. Early detection allows intervention before populations explode. Remove affected leaves promptly and dispose of them in sealed bags away from other plants. Spray affected plants with insecticidal soap or neem oil, both organic options safe for edible plants when applied according to label directions. Always harvest and wash produce thoroughly before consuming, regardless of treatment history.
Powdery mildew, a common fungal disease in humid kitchen environments, appears as white coating on leaves. Prevent it through excellent air circulation and avoiding leaf wetting. If mildew appears, spray with sulfur-based fungicide or baking soda solution (1 tablespoon per gallon of water with small amount of dish soap). Damping off disease affects seedlings in excessively wet conditions; prevent it by using sterile seed-starting mix, avoiding overwatering, and ensuring adequate air circulation around young plants.
Seasonal Adjustments
Successful year-round kitchen garden windows require seasonal adjustments accounting for changing light, temperature, and humidity conditions. Spring and fall offer ideal growing conditions in most climates, with moderate temperatures and adequate daylight. Maximize productivity during these seasons by planting cool-season crops and establishing heat-loving plants for summer production.
Summer brings intense heat and bright light, which benefits heat-loving herbs and vegetables but stresses cool-season crops. Provide afternoon shade using sheer curtains in extremely hot climates, preventing leaf scorch and excessive transpiration. Increase watering frequency as containers dry rapidly in summer heat. Monitor for spider mites and other heat-loving pests, which proliferate in warm conditions.
Winter presents the greatest challenge, with reduced daylight hours and lower temperatures. Most warm-season herbs decline or enter dormancy. Shift to cold-hardy options like parsley, chives, mint, and thyme. Implement supplemental LED grow lights to extend daylight hours to 14-16 hours daily, maintaining plant vigor during naturally dark months. Reduce watering frequency as plants grow more slowly in cool conditions and evaporation rates drop. Monitor humidity carefully, as indoor heating creates dry conditions that stress plants while promoting spider mite infestations.
Succession planting maintains continuous harvests throughout the year. Rather than planting all seeds simultaneously, stagger plantings every 2-3 weeks for continuous supplies of quick-maturing crops like lettuce and radishes. Remove spent plants promptly and replace them with new seedlings, maintaining productive use of limited window space. This approach also prevents nutrient depletion by rotating plant types and allowing occasional soil rest periods.
FAQ
What’s the minimum light requirement for a productive kitchen garden window?
Most culinary herbs and compact vegetables require 6-8 hours of direct sunlight daily. If your window receives less than this, supplemental LED grow lights are essential for maintaining healthy, productive plants. Even windows receiving 4-5 hours of strong sunlight can support growth with properly positioned supplemental lighting extending the photoperiod to 14-16 hours daily.
Can I grow full-size tomato plants in a kitchen window?
Full-size indeterminate tomato varieties won’t thrive in kitchen windows due to space constraints. However, compact determinate varieties and specifically bred dwarf cultivars like ‘Tiny Tim’ and ‘Micro Tom’ produce excellent harvests in 8-12 inch containers near sunny windows. Cherry and grape tomato varieties also perform well, offering abundant sweet fruit from compact plants.
How often should I fertilize kitchen window container plants?
Begin with nutrient-rich potting soil containing slow-release fertilizers, which typically provide adequate nutrition for 4-6 weeks. After this period, apply balanced water-soluble fertilizer every 2-3 weeks at half-strength. Reduce fertilization frequency for herbs, as excessive nitrogen diminishes flavor concentration. Always follow product label directions and observe plant response, adjusting frequency based on growth vigor and appearance.
What’s the best way to prevent fungal diseases in kitchen window gardens?
Prevention through excellent cultural practices is most effective. Maintain adequate air circulation using a small fan, avoid overhead watering, water in morning hours allowing foliage to dry quickly, and monitor humidity levels—aim for 40-60% relative humidity. Inspect plants regularly for early disease signs and remove affected leaves promptly. Ensure containers have proper drainage and avoid overwatering, which creates conditions favoring fungal development.
Can I use outdoor garden soil for kitchen window containers?
Never use outdoor garden soil in containers. It compacts in pot environments, lacks proper drainage characteristics, and may contain pests, diseases, and weed seeds. Always use high-quality potting mix specifically formulated for containers. These mixes contain appropriate ratios of peat moss or coconut coir, perlite, and compost, creating ideal conditions for container plant growth.
What are the easiest herbs to grow in kitchen windows?
Mint, thyme, and oregano are exceptionally forgiving, tolerating neglect and growing vigorously in containers. Parsley and chives are also reliable performers. Basil thrives with adequate warmth and light but requires consistent moisture. Start with the most forgiving varieties while developing your skills, then expand to more demanding herbs as you gain confidence and experience.
How do I maintain year-round production in my kitchen garden window?
Implement succession planting by staggering plantings every 2-3 weeks for continuous supplies of quick-maturing crops. Shift plant varieties seasonally—cool-season crops in spring, fall, and winter; heat-loving herbs and vegetables in summer. Use supplemental LED lighting during winter months to maintain adequate photoperiods. Remove spent plants promptly and replace them with new seedlings, maximizing productive use of limited window space.
Should I use self-watering containers for kitchen windows?
Self-watering containers reduce daily maintenance and prevent inconsistent moisture fluctuations that stress plants. However, they work best with specific potting mixes designed for reservoir systems. If you prefer traditional containers, establish a consistent daily watering routine checking soil moisture before watering. Self-watering options are excellent for busy schedules or situations where daily attention isn’t feasible.


