
Stone Edging Ideas: Landscape Architect Insights for Garden Borders
Stone edging transforms garden beds from ordinary to extraordinary, creating clean lines that define planting areas while adding visual interest and structural integrity to your landscape. Whether you’re working with a sprawling vegetable garden or a modest flower bed, the right stone edging technique can elevate your entire outdoor space. Landscape architects have long recognized that thoughtful border selection serves dual purposes: aesthetic enhancement and practical garden management.
The beauty of stone edging lies in its versatility and durability. Unlike plastic or metal alternatives, natural stone weathers gracefully, developing character over years while maintaining its functional purpose. From rustic flagstone to refined slate, from chunky boulders to delicate pea gravel borders, stone edging options accommodate every garden style, budget, and climate zone. Understanding the various materials and installation methods empowers you to make choices that align with your garden’s unique needs.
Types of Stone for Garden Edging
Selecting the appropriate stone material forms the foundation of any successful edging project. Each stone type brings distinct characteristics regarding appearance, durability, cost, and installation requirements. Understanding these differences helps you make informed decisions that serve your garden’s aesthetic and functional needs.
Flagstone and Slate represent premium choices for formal garden settings. These flat, naturally layered stones stack beautifully and create sophisticated borders that complement contemporary and traditional landscapes alike. Slate particularly appeals to gardeners seeking refined aesthetics, as its varied gray, purple, and rust tones add subtle color variation. When properly installed, flagstone edges last decades, though they require careful placement to prevent shifting.
Limestone and sandstone offer softer, more accessible alternatives to slate. These sedimentary stones weather gradually, developing weathered patinas that enhance their natural charm. Limestone’s neutral cream and tan hues coordinate with virtually any planting scheme. Sandstone provides warmer tones and slightly rougher textures that appeal to cottage and naturalistic garden designs. Both materials are easier to cut than slate, making custom sizing more manageable for DIY projects.
Granite delivers exceptional durability and comes in striking colors from charcoal to rose. Its crystalline structure resists weathering, making granite ideal for regions with harsh winters or intense sun exposure. While granite costs more than limestone, its longevity justifies the investment for permanent installations. Granite edging works particularly well in modern landscapes and contemporary design schemes.
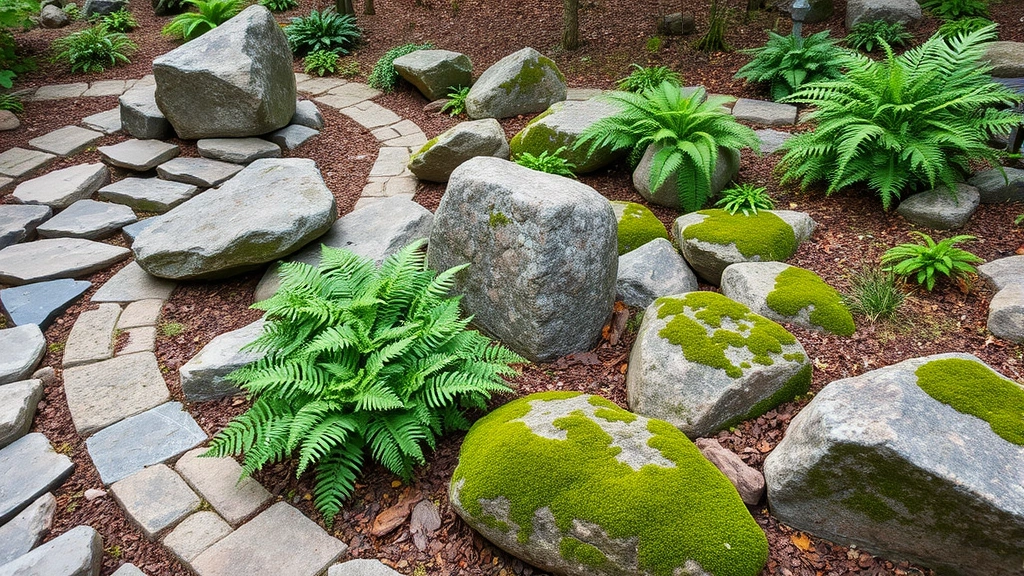
River rocks and boulders create informal, naturalistic borders perfect for cottage gardens and woodland settings. These rounded stones, smoothed by water over millennia, provide textural interest and visual softness. Larger boulders can serve as specimen focal points while smaller river rocks create flowing, organic edges. This approach requires more frequent maintenance, as individual stones may shift seasonally.
Bluestone combines the best qualities of several stone types: it’s durable like granite, workable like limestone, and naturally attractive with blue-gray tones. Bluestone splits into relatively uniform pieces, making installation straightforward. Its popularity among landscape professionals stems from its versatility and reliable performance across diverse climates and garden types.
When selecting stone, consider your regional geology. Using locally quarried materials reduces environmental impact while ensuring appropriate color coordination with natural surroundings. Contact your USDA regional office or local extension service for information about native stone options in your area.
Installation Methods and Techniques
Proper installation determines whether your stone edging remains stable and attractive for years or requires constant adjustment. Landscape architects employ several proven techniques depending on stone type, garden layout, and soil conditions.
The Sunken Edge Method works beautifully for formal gardens and raised beds. Dig a shallow trench (4-6 inches deep) along your garden perimeter, creating a channel that accommodates stone placement below grade. This technique keeps edging flush with surrounding lawn, preventing tripping hazards while creating seamless transitions. Stones sit firmly in the trench, supported by compacted soil or sand base. For DIY raised garden beds, sunken edging prevents soil migration while maintaining clean lines.
The Mortared Installation provides maximum stability for formal applications. After establishing a proper foundation, apply mortar between stones to create permanent bonds. This method suits slate and flagstone particularly well, as the flat surfaces create tight joints that mortar fills completely. Mortared edges resist frost heave and soil movement, though installation requires more skill and time. Landscape professionals often reserve mortared installations for high-visibility areas or sloped terrain where stability is paramount.
The Dry-Stacked Approach offers flexibility and ease of adjustment. Stones are placed tightly together without mortar, relying on weight and friction to maintain position. This method allows future modifications—you can remove and reposition stones as garden designs evolve. Dry-stacked edging works particularly well with irregular stones and in informal garden settings. While less permanent than mortared installations, dry-stacking suits most homeowner applications beautifully.
The Edging Strip with Stone Overlay combines practical containment with aesthetic appeal. Metal or plastic edging strips provide structural support and prevent soil creep, while decorative stones are placed against or atop the strips. This hybrid approach offers professional results without advanced installation skills. The underlying strip handles functional duties while stones provide visual interest.
Landscape architects consistently emphasize proper base preparation. Regardless of installation method, compact soil thoroughly before placing stones. For permanent installations, add 2-3 inches of sand or gravel base to facilitate drainage and provide stable foundation. This preparation prevents settling and shifting that compromises edging integrity.
Consider using specialized garden tools designed for edging work. Flat spades, mattocks, and stone chisels make installation significantly easier. Rent professional equipment for large projects—the modest rental cost pays dividends in reduced labor and improved results.

Design Considerations for Different Garden Styles
Stone edging contributes significantly to overall garden aesthetic, so selection should align with your landscape design vision. Different stone types and installation styles support distinct design philosophies.
Formal and Contemporary Gardens benefit from uniform stones installed in straight lines or geometric patterns. Slate, bluestone, and granite in rectangular cuts create architectural precision. Monochromatic color schemes enhance formality—imagine a slate border in charcoal gray defining crisp beds of single-variety plantings. Mortared installations reinforce the structured aesthetic.
Cottage and Informal Gardens embrace irregular stones, mixed materials, and meandering borders. Flagstone, sandstone, and river rocks create charming, relaxed edges. Cottage gardens traditionally feature mixed stone types and dry-stacked arrangements that suggest organic growth and natural abundance. Combine stone edging with sunflower gardens and other cottage favorites to reinforce the whimsical aesthetic.
Woodland and Naturalistic Gardens call for boulders and river rocks that echo natural geology. Large specimen boulders create focal points while smaller rocks establish organic edges. This approach minimizes visual hierarchy, allowing plantings to command attention. Stone selection should reflect your region’s native geology—limestone boulders in karst regions, granite in glaciated areas, sandstone in sedimentary zones.
Mediterranean and Rustic Gardens showcase warm-toned stones like terracotta-colored sandstone and rust-tinged granite. Irregular flagstone laid in rustic patterns evokes Old World charm. Consider incorporating decorative gravel fills between stones, creating textural variety and practical weed suppression.
Japanese and Zen Gardens employ carefully selected stones with intentional placement that reflects philosophical principles. Smooth river rocks, carefully spaced, create meditative simplicity. Stone edging becomes sculptural element rather than mere border, influencing plant selection and overall composition.
Color coordination matters significantly. Warm-toned stones complement golden and orange-flowering plants, while cool grays harmonize with purple and blue plantings. Light-colored stones brighten shaded areas, while dark stones create depth perception. Landscape architects often photograph existing stone elements—home foundation, hardscape features, or regional rock outcroppings—to ensure color harmony.
Maintenance and Longevity
Stone edging requires minimal maintenance compared to organic alternatives, yet thoughtful care extends its lifespan and preserves aesthetic appeal. Understanding maintenance requirements helps you plan long-term garden management.
Seasonal Cleaning keeps stone edging looking fresh. Spring cleanup removes winter debris, fallen leaves, and accumulated soil. A stiff brush removes algae and moss growth, particularly important in shaded areas or humid climates. Pressure washing works for some stones—particularly granite and slate—but avoid high pressure on softer materials like limestone, which can damage surface texture.
Weed Management around edging prevents unsightly growth and maintains clean lines. Landscape fabric beneath soil prevents weeds from emerging at the border, reducing maintenance needs. Hand-pulling small weeds prevents them from establishing deep roots. In established gardens, apply pre-emergent herbicides before spring growth begins—many organic options effectively suppress weeds without harming ornamental plantings.
Frost Heave Considerations become critical in cold climates. Freeze-thaw cycles can shift improperly installed edging, disrupting garden boundaries. Proper base preparation and adequate drainage minimize frost heave damage. In extreme climates, consider removing and reinstalling edging annually—an early spring task that reestablishes perfect alignment.
Settling and Shifting occurs gradually in most installations. Annually inspect edging for displaced stones and reset as needed. This minor maintenance prevents small problems from becoming major issues. Document original placement with photographs; you’ll appreciate reference images when resetting stones.
Lichen and Moss Growth develops naturally on stone surfaces, particularly in moist, shaded conditions. Many gardeners appreciate this weathered appearance as evidence of time and natural processes. If you prefer clean stone, scrub with dilute bleach solution (1 part bleach to 10 parts water) or use commercial moss removers designed for stone.
Mortared Installations require periodic mortar inspection and repointing. Mortar deteriorates over decades, particularly in regions with freeze-thaw cycles. Professional repointing every 15-20 years maintains structural integrity. DIY repointing is possible but requires skill to match existing mortar color and consistency.
Plan for seasonal adjustments and minor repairs when budgeting maintenance time. Most stone edging requires only 2-3 hours of maintenance annually—a modest investment for years of reliable performance. When edging is properly installed and maintained, it becomes invisible infrastructure, supporting garden function while enhancing beauty.
Cost Analysis and Budget Planning
Stone edging represents a significant investment in landscape infrastructure, making cost analysis important for budget-conscious gardeners. Understanding pricing factors helps you make value-conscious decisions without sacrificing quality.
Material Costs vary dramatically based on stone type and origin. River rocks and common limestone represent budget-friendly options, ranging from $0.50 to $2 per linear foot. Premium materials like slate and granite cost $3-8 per linear foot or more. Imported stones command higher prices due to transportation costs. Locally quarried materials typically cost less than regionally or nationally sourced stone.
Installation Labor comprises significant expense for professional installation. Landscape contractors typically charge $5-15 per linear foot for basic installation, with premium prices for complex patterns or difficult terrain. DIY installation eliminates labor costs but requires tool rental and time investment. Calculate your hourly rate—if labor costs exceed DIY time value, professional installation may justify the expense.
Preparation and Base Materials add hidden costs often overlooked in initial budgeting. Sand, gravel, landscape fabric, and edging strips accumulate quickly. Budget $0.50-1 per linear foot for base materials and preparation. For large projects, these costs become substantial—a 100-foot perimeter garden requires $50-100 in base materials alone.
Tool Rental and Equipment costs affect DIY project budgets. Renting a ditch witch or walk-behind trencher costs $40-60 daily—a worthwhile investment for large projects but excessive for small installations. Stone-cutting equipment rental ($20-40 daily) helps with custom sizing. Factor equipment costs into project budgets.
Long-Term Value Assessment reframes stone edging from expense to investment. Quality stone edging lasts 20-40 years or longer, amortizing to mere dollars annually. Compare this to plastic edging replaced every 3-5 years or metal alternatives requiring regular maintenance. Over 25 years, stone edging typically costs less than seemingly cheaper alternatives.
Budget for rain gardens and other specialized plantings that benefit from stone edging. Edging investment extends beyond border definition—it enables functional garden features that improve property drainage and support native plantings.
Phased installation spreads costs over time. Install edging for high-visibility areas first, then progress to less prominent sections as budget allows. This approach maintains aesthetic continuity while managing cash flow. Many landscape professionals recommend prioritizing front-yard edging for maximum visual impact.
FAQ
What is the best stone for garden edging in cold climates?
Granite and bluestone perform exceptionally well in cold climates due to their density and frost resistance. These stones withstand freeze-thaw cycles without spalling or deterioration. Avoid softer materials like limestone in areas experiencing frequent freezing and thawing. Ensure proper base preparation and drainage to minimize frost heave issues regardless of stone selection.
Can I install stone edging myself, or should I hire professionals?
DIY installation is absolutely possible for most gardeners, particularly for informal designs and dry-stacked arrangements. Formal installations with mortared joints or complex patterns benefit from professional expertise. Consider your comfort level with landscape work, available tools, and project complexity. Start with a small section to build confidence before committing to full-scale installation.
How do I prevent soil from spilling over stone edging?
Proper installation height prevents soil migration—edging should rise 2-3 inches above surrounding grade. Landscape fabric beneath soil reduces settling that allows soil to escape. Install edging firmly against soil, eliminating gaps. For raised beds, ensure edging is properly secured and adequately tall. Adding a subtle lip or collar to edging creates additional containment.
Should I use mortar or dry-stack my stone edging?
Dry-stacking offers flexibility and suits most homeowner applications. Choose mortared installation for formal gardens, sloped terrain, or permanent installations in high-traffic areas. Mortared edges require more skill and cost but provide superior permanence. Consider climate—regions with significant frost heave may favor dry-stacking, which allows seasonal adjustment.
How often should I maintain my stone edging?
Most stone edging requires minimal maintenance: spring cleaning, occasional weeding, and annual inspection for displacement. Pressure wash annually to remove algae and debris. In cold climates, reset displaced stones in spring before growing season begins. Well-installed edging becomes largely invisible, requiring attention only during seasonal transitions.
What’s the most cost-effective stone edging option?
River rocks and common limestone offer excellent value for informal gardens. These materials cost significantly less than premium options while performing admirably. Local stone is typically cheaper than imported materials. Consider your long-term budget—while initial costs matter, durability and maintenance requirements affect total cost of ownership.
Can stone edging work with container gardening?
Absolutely. Stone edging creates attractive borders around container plantings and defines spaces for grouped pots. Boulders can anchor container arrangements while smaller stones create visual transitions. Stone edging works particularly well with organized garden infrastructure like hose storage and tool areas.


